CP Executive train in Albany

CP Executive train in Albany

Monday, March 14, 2022

Index of Scratchbuilding Posts

I wanted an index of all of my scratchbuilding posts for easier reference. It will be updated over time.

Structures for my D&H layout

Southworth Machinery: Part 1Part 2Part 3, Part 4, Part 5, Part 6; Part 7 

Agway - Main Building: Part 1

Agway - Blue Building: Part 1

Agway - Quonset hut: Part 1

Colony Liquor: Part 1Part 2Part 3

Albany Terminal Warehouse: Part 1

Albany Steel: Part 1

Iroquois Millwork: Part 1

Structures (for MMR)

Albany Tomato Company (HO scale): Part 1Part 2Part 3Part 4Part 5Part 6Part 7Part 8Part 9

Earned Merit Award.

House on the Hill (HO scale): Part 1   

Tar Paper Shack (HO scale): Part 1

NYO&W milk station (HO scale): Part 1

Sinclair gas station (HO scale): Part 1, Part 2  Earned Merit Award.

N&W coal trestle (HO scale): Part 1

Rural white church (HO scale): Part 1

*B&M uncovered bridge (HO scale): Part 1

Big Red Barn (HO scale): Part 1, Part 2  Earned Merit Award.

Benton Station (N scale): Part 1  Earned Merit Award.

Ben's Hobby Shop (HO scale): Part 1

Arcade & Attica sandhouse (HO scale): Part 1  Earned Merit Award.

Wooden Engine House (HO scale): Part 1, Part 2, Part 3 Earned Merit Award.

Freight Cars (for MMR)

*All Earned Merit Award.

D&H Bobber Caboose #10 (O scale): Part 1, Part 2, Part 3, Part 4, Part 5, Part 6, Part 7, Part 8

Conrail & Burlington Northern flatcars (HO scale): Part 1, Part 2, Part 3, Part 4, Part 5


B&M Milk Reefer (HO scale): Part 1, Part 2, Part 3, Part 4, Part 5, Part 6

Borden "Butter Dish" car (HO scale): Part 1, Part 2, Part 3, Part 4

T.C.D.A. Boxcar (On2 scale): Part 1, Part 2, Part 3, Part 4

GWR Cattle Wagon (OO scale): Part 1, Part 2, Part 3, Part 4, Part 5

Arcade & Attica M.O.W. flatcar (HO scale): Part 1, Part 2, Part 3

Thursday, March 10, 2022

Weathering O gauge freight cars

I weather almost all of my HO scale trains. When done carefully it makes them look more realistic, and I am not really concerned about their re-sale value. There are a couple of expensive, ready-to-run HO cars I purchased that I haven't gotten the nerve to touch yet. For my O gauge trains, I have also begun weathering them. It is a bit unnerving to make them "uncollectible" but since I am generally paying only about $30-$50 a car I can live with the risk. Besides, I enjoy the work and I don't buy them for their potential future value. However, I don't weather my tinplate trains or trains that are clearly "toy" proportioned because that would look silly and it would also ruin their cute, toy appearance.

I frequently buy my O gauge cars used, so the first step is to them over and repair broken or missing parts. Sometimes replacement parts are available, and sometimes I have to fabricate them myself. I then completely disassemble them and make sure everything is glued in place. Boxcar doors are usually secured shut (unless I am modeling an open-door car), detail parts like brake wheels that were left unpainted by the manufacturer are painted to match the body, and the car's weight is checked. Then, everything is washed in preparation for weathering.

The wheel faces are brush painted various shades of brown, and the backs and axles are painted flat black to hide the shine. Truck sideframe are painted flat black and then highlighted with drybrushed orange rust and brown dirt. The couplers are carefully drybrushed brown. The car underframes are sprayed flat black followed by various short bursts of brown and rusty orange. The car bodies are Dullcoted and then weathered with oil paint washes and drybrushing to match prototype pictures. Finally, everything is reassembled.

It all takes time, but all that work is what I enjoy most. It is the process, just as much as the finished result, that makes it worthwhile. And, after having put 3-5 extra hours into a boxcar I can justify its price tag.

I don't have a lot of cars right now, but they are already taking up a lot of space. Each car is 8x the size of its HO equivalent, and that adds up. So, I am slowly adding to my collection one or two cars at a time. When I am ready to jump scales, I will have some of my trains ready. I don't even have a proper place to photograph them, though I am currently working on building a small diorama for use in future photography.

On a related note, the O Gauge Magazine's online forum sometimes features pictures by a guy named Steve who goes by the handle "SIRT." In his signature block is a link to his photo albums containing hundreds of pictures of weathered three rail, O gauge cars. They are inspirational for someone weathering in any scale, but more than that they show that you can make really credible looking models from three-rail trains.

Sunday, March 6, 2022

Over and Under in North Albany (2005)

One of my first spots to railfan when I moved to Albany in 2004 was where the CSX tracks crossed over the Canadian Pacific tracks in North Albany. The CP (formerly D&H) ran North/South along the west side of the Hudson River, and the CSX (formerly NYC) tracks ran East/West across it. I would park in an abandoned lot in the shadow of the old Central Warehouse and watch the occasional train pass by. Not knowing anything about the local scene, I had no idea of when a train might appear of what railroad it would be. 

As time went on, I found better (and safer!) places to watch trains. Nowadays, the lot is secured with a fence and few trains go by. But, these two shots taken April 20, 2005 show local jobs from both railroads. 

The first up was a CSX train heading west on the upper bridge. I would learn years later that this was the "Troy Local" returning from dropping off covered hoppers at Interstate Commodities. It took me ten years before I spent a day railfanning that local train. I blogged about it here.

The other picture shows a C.P. local heading south towards Kenwood Yard. I don't know where exactly it had been switching but I would guess the G.E. plant in Waterford based on the covered hoppers. Boxcars would usually indicate Mohawk Paper, tank cars would mean Surpass, and some covered hoppers went to Bulk Handlers. Sadly, I wish it had been heading north because then I would have chased it all afternoon. But, it sort of snuck up on my on its way back to Kenwood.

Here is a satellite map facing Southeast. The yellow star is where I would watch for trains. The Livingston Avenue swing bridge is on the left of the map. Someday, it will need to be replaced. The large building in the center is the old Central Warehouse.


Wednesday, March 2, 2022

Structure - Southworth Tractor (part 2 - drawings)

The last big structure needed for the North Menands section of my layout was Southworth Tractor and Machinery Company. I recently built a concrete loading dock for it, and decided it was time to start on the main structure. Like every other building on my layout, it needed to be scratchbuilt. It is a complex building with multiple expansions, roof lines, and details such as door and window sizes. It also had to be compressed in size. Not only because I wanted it to fit the space I had (which admittedly was a lot), but because I wanted it about the same size as the other structures (which were compressed too).

Here is what it looked like in 1984 (facing south). Ignore the blue building nearest the camera... I may model that later. Southworth is the large white building with the three smokestacks behind it.

It was still receiving boxcars in 1984. (Edit: I have since learned that they stopped using rail service around 1981/1982, and this boxcar was being used for storage only).

Here is a satellite image of the building now, facing west. The yellow line is where the spur came in and ended at the concrete dock at the end.

Here is what the south wall looked like in 2010. Look at those large windows (multiple sizes) and several doors.

Rotating around counterclockwise (away from the tracks), here was the first part of the building. 

As you kept heading along the wall, it transitioned from office areas to what I think are vehicle assembly/sales areas. It is currently a Mack truck dealership, and it is possible that the building has been reconfigured since 1984.

The corner that swung towards the north wall had two different vehicle loading doors.

The west wall facing the tracks had some brick walls with lots of windows, doors, and even a chimney!

Then, further down the wall was what appeared to be an add-on structure sheathed in corrugated steel.

This terminated on the south end with another vehicle door. 

Finally, the double-height office area had the mandatory fire escape.

One last neat detail was that it had (I assume) the word "Southworth" along the top of the southern wall. You can just see some of the letters in this 1986 picture. Also note that by this time the track to Colony Liquor (actually, all three sidings) was clearly out of service.

I have been working on the drawings for this building off and on for about two weeks. I don't want to start building it and find out that my dimensions are off. But at the same time, there are so many odd angles and pieces that looking at two-dimensional drawings alone isn't helping me picture it in my mind. 

I started by taking a piece of oversize graph paper and setting it on location on my layout. The track spur leading to the concrete loading dock was traced in, as was the three brass tubes that connected the ground throws at the layout edge with the actual switches.

It was trimmed to size and placed on my workbench. I then took the cardstock building footprint I had drawn up seven years ago for this structure and placed it on the available space. It fit okay, but was actually a bit undersize for what I wanted.

Then came the tedious process of drawing full-size plans. I used castings I had on hand, as well as internet dimensions from casting suppliers, to plan my walls. 

Some castings will be modified to fit the space, or to make more appropriately sized windows.

I divided the building in half (north half / south half) and decided to take my drawings into the next dimension by actually making mock ups in cardstock. This would let me test out my dimensions without cutting expensive styrene. Instead, I used a piece of cardstock I purchased at the dollar store. Then, I glued up the pieces together.
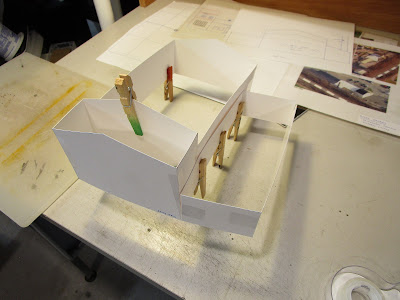
I didn't bother to add roofs pieces at this time. I did add corner triangle braces cut from more cardstock, and also some long wooden braces made from cheap coffee stirrers I had on hand. (Don't use warped coffee stirrers though!). In all, it took about as much time as it would have to do it in styrene... actually longer, as I had to wait about an hour for each tacky glue joint to dry.

In the end, I was happy with my results. Only one-half of the building (the southern half) is now drawn up, and I discovered an error in one of my drawings that is easy to fix. 

I will hold off on drawing the northern half of the structure for now, because I am anxious to start building it.