CP Executive train in Albany

CP Executive train in Albany

Saturday, October 31, 2020

Happy Halloween!

Tonight my wife decided that we should watch Ghostbusters on Halloween. Who am I to argue with that? It IS MY FAVORITE MOVIE after all! I mean, if you could hang out with a bunch of guys and goof off for a bit, destroy stuff with laser guns, and then get paid for it, wouldn't you? 

And for those who believe that the movie doesn't offer a lot of important life lessons, here are some I found in an article online:

1.) Believe Your Own Hype: When Gozer asks Dr. Ray Stantz "Are you a God?" he responds in the negative, despite a nod from Dr. Peter Venkman. That lack of confidence nearly marked the end of the supernatural exterminators. "Ray, when someone asks you if you're a god, you say 'yes,'" scolded Winston Zeddemore. In short? Believe in the best version of yourself.

2.) Live By Your Own Rules: Dr. Egon Spengler warned the Ghostbusters not to cross the streams, but in the end, that was their only option to defeat Mr. Stay Puft. "There's definitely a very slim chance we'll survive," he said. "I love this plan! I'm excited to be a part of it!" responded Venkman. It worked. Sometimes, rules are meant to be broken.

3.) Spare No Details: The Ghostbusters tried to warn the mayor that the city was "headed for a disaster of biblical proportions." What finally drove home their point? A more complete description: "Fire and brimstone coming down from the skies! Rivers and seas boiling! Forty years of darkness! Earthquakes, volcanoes, the dead rising from the grave! Human sacrifice, dogs and cats living together! Mass hysteria!"

4.) Expect the Unexpected: What ended up terrorizing New York City? Mr. Stay Puft, an overgrown marshmallow. "I tried to think of the most harmless thing. Something I loved from my childhood. Something that could never ever possibly destroy us," Dr. Stantz explained, as the giant treat wandered the streets menacingly. "Mr. Stay Puft!"

5.) Know Your Worth: After trapping "a focused, non-terminal, repeating phantasm," the Ghostbusters demanded $5,000 from a hotel manager. When he refused to pay, Dr. Venkman simply responded, "Well that's all right, we can just put it right back in there." He relented, saying he'd pay "anything." Know what you're worth, and don't accept anything less.

6.) First Impressions Can Be Incorrect (But They Matter): Zeddemore thought Gozer was a man. Dr. Stantz declared her to be a woman. "Well, whatever it is," Dr. Venkman noted, "It's gotta get by us." Don't get hung up on first impressions. It's not always what matters most. (Still, Dr. Venkman did encourage his cohorts to "suck in the guts," so hey, make an effort.)

7.) Stay Optimistic: After they were fired from their university jobs, Dr. Venkman refused to get down on himself. "For whatever reasons, Ray, call it fate, call it luck, call it karma, I believe that everything happens for a reason. I believe that we were destined to get thrown out of this dump," he said. "To go into business for ourselves." They did, and it worked out pretty well.

8.) Be Open-Minded: "We're ready to believe you," was the team's motto. It worked. Be open-minded. You never know what you could discover.

9.) It's Cool to Be Smart: And if you try your hardest, you could save your city.


Monday, October 26, 2020

Foam hills for Cut Corner

The prototype terrain here was built up significantly which in part allowed for the state highway to cross the railroad tracks. However, I didn’t want to build the area up too much as I wasn’t going to construct the road and I didn’t want to substitute a non-prototypical tunnel. Some gently rolling hills, covered in greenery and trees, would do nicely. But first, I had to fix a troublesome track joint that worked 99% of the time but occasionally derailed my scale-length heavyweight passenger cars. I decided to fix it now before the scenery went it... always a smart choice.

In the past I have used metal screen wire and plaster, cardboard strips and paper mache, and cloth glueshell scenery methods, but here I decided to try green florist foam as something new. One of the main advantages is that it is easy to stick trees in because you can just shove them down. And, it is easy to cut with a knife and can be even mashed around with your fingers. It sounded promising, so I went to the craft store and looked at their selection of green florist foam. It came in pieces that were 1.5" thick, so that formed the basis of my hill's overall height. 

While it is possible to use a steak knife or a rasp to shape it, I decided to use my small bench-top belt sander. To avoid an explosion of green dust everywhere, I did it outside. And it worked pretty well. Not only could I use the belt's abrasive surface to round things over, by pushing the foam into it at an angle the belt would engage and slice through it like a hot wire tool. Yes, it wasn't precise, but real landscaping isn't either. Though it wasn't dangerous, I am not sure I would recommend it to others. A hot wire tool would be a lot easier, and perhaps cheaper too. And it wouldn't leave your belt sander looking like a giant green furry monster!

The only downside from working 100 feet and a flight of steps away is that I made at least a dozen trips to bring it down to the layout to set it in place and see how I liked it. It was tiring by the end, and I had five different pieces to do. Once I was satisfied with how it all looked, I glued them in place with some Loctite construction adhesive that was safe for foam.

One other thing to point out: along this section of the layout I plan to have a curved backdrop. To give me clearance room between the hill and the backdrop, I drew a curved line that will match the radius of the backdrop. I don't need to carry the scenery exactly to that edge, as a gap will be acceptable. But, just the same when forming the hills I made sure there was a 1/4" or so margin all around the back.
I also wanted a foreground hill which would help hide the entrance to the yard. Also, without it there wouldn't be much of a cut at all and I would need to rename the area. There were a lot of gaps in the foam, and some of the transitions were too steep. I needed to smooth things over, fill in the openings, and blend everything together. Taking a page out of Lou Sassi's books (literally), I turned to "Ground Goop."

Friday, October 23, 2020

Planning scenery in Cut Corner


As my North Albany section was finishing up (backdrops are all that remain for "basic details") I looked towards the next section of the layout, the approach tracks into the yard. My layout consists of four “main sections” and any further layout growth may mean rearranging them with additional modules. The four corners are temporary and do not represent specific areas of the D&H’s Colonie Main. However, I did want the scenery on them to be plausible. The two LDEs that straddle this corner were divided in part by a large embankment and an interstate highway that crossed on a bridge. 

Because of the amount of space available and the odd shape of it (my wife asked me to cut off the rear corner to increase access space to the laundry area behind it) I didn’t want to attempt to model a highway that would be 4-lanes wide, only about 24” deep, and end abruptly at a backdrop. Additionally, there is a small public park that I spent a lot of time at studying for law school and I might model it but couldn't do it justice on this corner. IT is just visible in the upper left picture above. So, instead I modeled the embankments on either side with the railroad tracks (including a curved switch that leads into North Albany yard) passing through in a generic scenic cut. Because of these reasons, I decided to call it "Cut Corner." The below picture shows it facing south in March of 1984. 

There were a couple of considerations in planning the hills. First, I needed a scenic transition from the abandoned yard (North Albany) on the left and the more suburban, commercial scenes on the right (Colonie). I also wanted to hide the curved switch from view as it didn’t fit with the scene. There aren’t many areas of the layout that will be covered with expansive trees and grass and such as most will be detailed to represent track-served industries. I wanted to take advantage of this section to give the eyes some rest from buildings and enjoy New York trees and scenery. Also, the Colonie section has a hill or berm along the back and the terrain on the corner had to visually mate up with them. Finally, I decided to curve the backdrop here instead of having it come together at a 90-degree angle in the back.

So, it shouldn't be a difficult section to build but there are enough new things involved that it will be a learning process. Thankfully, if it turns out bad I can probably just take a putty knife and scrape it all off and start again. And there are no structures to build!

Wednesday, October 21, 2020

Announcement: Athearn ex-Reading patched D&H GP39-2

Athearn has really been helping the D&H modelers recently. In the past couple of years they have released blue-dipped GP39-2 engines and lightning stripe GP38-2 engines, and now they are putting out a few more in the lightning stripe scheme and the ex-Reading patched scheme.

Here is the official Athearn announcement. The lightning stripe engines are too modern for my layout. I already own a couple of blue box Athearn GP38-2 engines in different blue dip schemes, but the green and yellow #7412 is just perfect and would help break up the mostly blue roster I have. Atlas offers it too, but this is supposed to be a better model. 

Monday, October 19, 2020

Looking for Provo Craft scrapbooking scissors for trees

Bill Brown of LARC Products, who is making my custom printed backdrops, recommended these scissors for cutting out the outlines of trees so that they don't have straight edges. These scissors, which his wife found, have a random jagged edge that is great for this sort of thing. The brand is Provo Craft and an online search reveals that they seemingly have dozens of styles of scissors. I looked for this color combination, which I assumed was specific to this cutting edge, but sadly it was not. 

I bought another pair that has a different random edge but would love to get my hands on one of these. If you have any links or ideas, please reach out to me! Thanks.


Thursday, October 15, 2020

Railbiking in North Creek

Last week I was on vacation, and so my wife planned a rail biking adventure up to North Creek to railbike. The program is run by Revolution Rail Company. I had only heard about these companies recently from another friend, and the idea sounded interesting. Apparently, two or four-seat vehicles are set on old railroad tracks and people propel themselves down the line in a parade fashion. At the "end," the cars are turned on a turntable of sorts and then the group returns. It is a great way to view scenery on old tracks, but at least in New York several are located on recently-used scenic railroad right-of-ways. I would much rather take the train.

These things are popular and we could only get a time slot for early in the morning (8:30AM) and North Creek is about 90 minutes from our house. Thus, it was just like getting up for work. To make matters worse, the temperature was a chilly 45 degrees and the faster you propelled yourself the more cold air rushed on you. But, we bundled up and made the best of it.

The scenery was great. It ran along the Hudson River and threw the woods on told D&H line to Tahawus. For some history of the branch line, click here. We went about 3-4 miles south of North Creek, and the mile posts left over from the D&H were marked 89-92 so I imagine that is how many miles we were from Albany. 

The carts themselves were mostly made from lightweight aluminum with composite plastic wheels and were easy to get up to speeds around 10mph. A small bicycle brake on one wheel slowed it all down. The end spot was barely a clearing in the woods with a couple of picnic tables and a (scary) descent down a trail to the river for those more bold than I. Instead, I stayed by the tracks and watched them spin the carts on a small, temporary turntable. 


I enjoyed spotting old D&H remnants like flanger warning signs, whistle posts, mile posts, and evidence of tough trains laden with titanium from the Tahawus mine at the end of the line. The rails were pitted, had slipping wheel burn marks, and the joints bumped.  


The trip took about 2 hours, and the sun came out later on and allowed for some pretty shots along the river. Also, the trees were mid-transition from green to orange and some color was still to be found.


In the end, however, I wish I could have taken the train along these tracks. This is the third time I have travelled along this section of track. I first rode the Upper Hudson River Railroad in 2009 on this portion of the line, and a few years later rode again on the Saratoga and North Creek Railroad. Both are gone, and issues involving politics, taxes, freight revenue, rail trails, and snowmobiles make the return of trains questionable.

Still, I would rather be on a railbike than walking along a paved rail trail... and if enough people don't support things like this that is what will happen. But, I will wait until it is warmer next time!

Monday, October 12, 2020

Blue sky for the backdrops

Here is an issue that has troubled me for the past few months now... what color to make the backdrops. I initially planned to use custom printed ones by LARC Products, who have an extensive selection online. I have met the owner Bill Brown on several occasions and found him extremely helpful to work with. For this project, I feel that he went above and beyond the call of duty. The problem I have is that I want a nice, bright blue sky without many clouds. There are couple of reasons for my preferences. 

First, I am modeling May and at that time of year in the northeast the sky is nice a well lit. Second, I would rather model a pleasant sunny afternoon than a cloudy or gray one. And, whilst I do like clouds in the sky (I am a card carrying member of the Bob Ross fan club!) I find clouds on a backdrop generally distracting. When they look realistic they draw your attention away from the models, and when they look awful... they look awful. The trouble has been getting a blue printed that looks good on the computer screen, good in person on the layout, and good in pictures.

Above are some samples of skies that Bill produced based on my requests (ignore the clouds in them). Some appear nice on my computer screen but severely faded in person. Some appear a bit grayish or purplish in person but again on the computer look great. The two paint splotches on the top are actually the color of my basement walls and they are a vibrant blue. I would like that for my backdrops, but even in the picture above they appear washed out. 

I really don't want to paint backdrops myself, and if I do they will only be plain blue. I would like a few clouds on them, and I don't want to attempt that. I am also building my layout in sections and want the backdrops to match, but they will be purchased over a span of time, so I think having them printed is the best way for consistency. But I don't know.

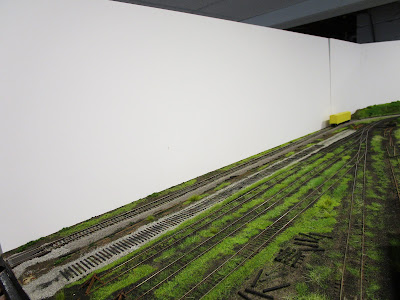
So, my backdrops are currently white... perfect for a stark winter scene, but not much else.

Friday, October 9, 2020

Backdrops from Gatorfoam

In my 30+ years of building train layouts, only one or two have ever had backdrops. These were usually just blue painted pieces of wood running down the middle of tiny N scale portable layouts, and honestly they were more to divide the layout into multiple scenes than to convey the impression of a sky. They were caricatures, in a way, of the sky. For this layout, I wanted to do better. Even though my basement walls are painted blue, there is no hiding the fact that they are cinder blocks. Further, any pictures I take show the laundry area, storage shelves, steps, and other accoutrements that normally accompany a basement. 

I considered tempered hardboard or plywood but after talking with Dave from Gatorfoam.net at the Springfield train show I decided that gatorfoam, or gatorboard, might work. Per his website: 

Gatorfoam is a unique, strong laminated panel with a core of extruded polystyrene and a face made from impregnated wood fiber veneer commonly known as Luxell.... it can be cut with a variety of woodworking tools, Xacto or matt knife. It accepts all types of paints, stains, and adhesives."

It sounded like just what I wanted. I dabbled it in a little when I bought a smaller piece for my T-trak module in January and though I haven't been to any shows to display my module, it seems plenty strong and lightweight. 

Because the layout is set about 50" above the ground, I only wanted the backdrop to rise another 16" or so. Any taller and it might lean, and there really wasn't a need to go up to the ceiling. My layout's benchwork is built from 1x4" lumber, so I figured if the backdrop pieces were 20" tall I could have them extend down to the lower edges of the benchwork and I could clamp them with spring clamps. The bottom 4" of the backdrop would be hidden by the benchwork, and 16" would stick up. Ordering from Dave was easy, except that except shipping pieces 20" x 5-7' long would be expensive. Thankfully, he only lives about 3.5 hours away, so a car ride in the fall would be pleasant. He even offered to meet me half-way, but I picked a workday to drive up during a vacation. 

While the trip through Vermont was picturesque, and there were several notable things I passed by (such as the Ben and Jerry's ice cream plant), I really cared about meeting up with Dave. He took me into his workshop and we quickly had my order sorted out. He also showed me his layout, of which I instantly drew comparisons to the Franklin and South Manchester. Dave seemed a humble man but he is very accomplished. He demonstrated how many of his buildings and urban areas were on lift-out sections of Gatorfoam, and I never would have noticed the seams at all as they were already part of the landscape (road edges, bridge edges, etc.) It is a very nifty trick. For gluing Gatorfoam together, he recommended the adhesive Phenoseal.

After getting my gatorfoam home I used a pair of colorful (and cheap!) clamps from Harbor Freight to hold it in position. A package of 20 clamps cost $5. Dave was concerned the springing pressure of the clamps might deform the gatorfoam and if I were to use stronger clamps I would insert an extra piece of foam or perhaps a thin piece of wood (like a paint stirrer) in between. The clamps held the board pretty firmly but there is a chance it might get bumped or perhaps sag over time. So, I used some 1" metal L-brackets, screwed from inside the layout, to support the bottom. They stick out just enough to catch the board, and yet are easily removed if necessary. They, combined with the clamps, make for an easy to mount, easy to remove, completely reversible backdrop mounting system. And I thought I was in the clear...

Unfortunately, not all of my benchwork has the rear 1x4 so easily exposed. In fact, most have one of the L-girders holding up the layout sections directly below the 1x4. So, I needed another method to mount the rest. In the process, I re-did the first backdrop too. So, I put on my thinking cap and came up with the idea for aluminum U-channels. The inside width of the "U" portion is 1", which is just right for my 1x4's thickness (3/4" thick) and the gatorfoam (3/16" thick). There is just enough slack (about 1/16" to slide the board in easily from the top, and the U-bracket is tall enough to keep the foam vertical. 

I had my metal store cut me 20 that are 2" long, and I cleaned up the edges on my belt sander. Then, I drilled them with holes on one side for mounting screws. 


I slipped them under the bottom of the 1x4 and screwed them to the back of it from the inside. They stuck out with the gap on the back, and the foam dropped in. I might need a small clip to put on the tops of joining pieces to keep them aligned, but that shouldn't be tough.

And wow do I love what they did! They are very tall and very white, but that will change. Now, when I step into the center of the layout I feel like I am in the middle of my own little world. I can't see the stairs, or the treadmill, or the laundry machine. It is such a great feeling of isolation. And, if I ever need to remove them for maintenance or whatnot they just lift right off. 


Tuesday, October 6, 2020

Yard track bumpers

While talking with a couple of friends who happen to be Master Model Railroaders, they recommended that I ditch the nails I had inserted at the ends of the yard tracks and substitute more realistic track bumpers. I had avoided using them because I wanted the tracks to appear to go on, and I thought the black nails were more innocuous, but they do look bad in pictures. And, most people won't understand why I did it anyway. So, I purchased a couple of sets of Peco "Hayes" style bumpers (#SL-8340) and assembled them.

They are easy kits, each consisting of only three parts that fit snugly together. I added a drop of MEK for extra insurance. Then, I sprayed them flat black and drybrushed on brown and orange paint. Finally, they were superglued to the track. I finished off the area by covering the old nail holes with more ballast, dirt, and ground foam.

They do look good, and if it helps me earn my MMR certificate I will do it.

Sunday, October 4, 2020

Newly discovered info on D&H RS-3 #4099

Last summer I wrote up a post about all of the Alco RS3 locomotives that were still on the D&H's roster in May of 1984. At the time, I wasn't sure about the status of engine #4099. I had a picture from 1981 showing it with severely faded "Delaware and Hudson" small font lettering and small numbers on the sides, but I didn't know if it ever received large numbers or not. Further, records showed that it left the D&H's roster in 1984 and was sent to the Cuyahoga Valley Railroad in Ohio but I couldn't be sure when that happened. If it was before May of 1984, I shouldn't have a model of it on my layout. So, I waited for further information...

...and I finally found the slide above! While blurry and over-exposed, it does show #4099 (the lead engine on the right) with large albeit faded side numbers in Colonie on July 29, 1984. So, I can at least confirm that it was on D&H property in May of 1984. What's more, I can now say that the three engines all had different paint and numbering schemes:

#4075 - blue dip with large yellow numbers; 

#4099 - lightning stripe and large numbers; and

#4103 - lightning stripe with small "Delaware & Hudson" lettering, and probably not large numbers.

As for #4118, I don't know if it was still on the roster or not. The search for information continues. I have seen a slide dated 1983 showing the engine in Pennsylvania. However, that isn't conclusive.

Now, I just need Bowser to finally release their long-anticipated RS3 engines!

Thursday, October 1, 2020

Static grass in North Albany

As I started applying static grass to my layout I realized I was now "playing for keeps" and it was scary. Unlike some scenery textures, removing static grass that is embedded in train tracks or around structures isn't very easy. I knew I wanted it to look green, have an assortment of heights and textures, and appear "random." But, I couldn't conceptualize exactly how I was going to get there. So I just got started. 

I applied several different types of grass, and focused on different looks. For the three semi-active yard tracks, I built up the grass and let it spill onto the center and edges of the ties so that it appeared to be was growing up and through the tracks. Rarely would a train car be there to cut it up, spill toxic oil or chemicals to stymie it, or otherwise hamper its growth. But, I couldn't use the really tall stuff because these tracks would be used as part of staging when the mood struck.

In an ironic twist, the tracks that in real life appear to be regularly used are actually the ones that on my layout are just scenic accents. I added spots of grass here and there, but never tried for the green carpet effect. 

After a couple of evening's working on it, I arrived at the pictures above. Nice, but very green. Almost too green. It was prototypical... I have pictures of the yard area just carpeted with grass and weeds... but sometimes we only see certain colors and I wanted to give it a little variety. So, I ordered some brown grass and decided to intersperse it here or there to break up the lush green that I had created. Thinking that nice tall dead weeds would look great, I picked out 12mm stuff. 

I quickly discovered that 12mm is too long for most HO scale applications. Sure, it looks great in ditches or when it is standing perfectly straight, but if it ever leans even just a little bit it looks fake. So, I took an old surplus electric razor and "mowed the lawn" so to speak.

From a distance, the brownish-yellow color did the trick in breaking up all of the green. I just think in the future I will need to order it in 4mm and 6mm lengths to get the effect I want. It reminds me a comment my wife said recently when looking over the layout: "I like how you did the static grass. I didn't think I would like it because it always looks fake on other layouts." I think she means that many layouts use grass that is too long, so that you have lots of patches of weeds that are much too tall to be realistic.

I also used a couple of types of static grass "clumps," focusing mostly on building and detail foundations where maneuvering the static grass machine would be difficult. They were convenient, though again I need to figure out the best selection of colors.

All in all though, I am pretty happy with how this first scene turned out. I plan to add a bit more to it, and a couple of things were ordered from Scenic Express, but compared to my pictures showing just ground foam and ballast it certainly looks closer to what I envision in my head.

And the green grass grew all around, all around, and the green grass grew all around...