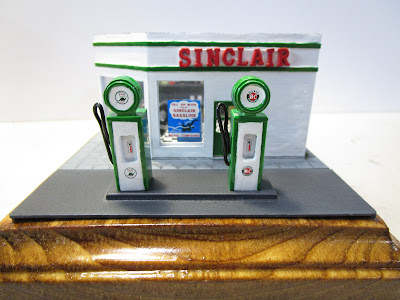
I wasn't intending on starting this structure right away but I was at a stopping point with my other projects and casually looked at the November 1993 Model Railroader article for this neat little building and thought: "I will only cut out the walls. Nothing more until the other ones are done." That was a mistake.
The article had plans for two gas stations of 1950's vintage, and the Sinclair one had a stucco exterior that looked interesting and different so I picked that one. As I began diving into the project though I realized as designed it was much too simple a project. There was no garage door, no window trim, minimal interior details, etc. I noticed that the roof was flat and would likely be easily removable, and instantly thought detailed interior. I also love 50's Chevy Bel Airs and this would let me buy one and feature it in the garage. And, the symbol of Sinclair gas stations was a green Dinosaur that was cute. That, plus all the detailing I could do inside, got this project off and running.
I started by cutting out the five walls and then assembled them on graph paper to keep everything square. I installed small pieces of square trim in the corners for bracing, and along the upper edge to support the roof. I knew some things like bracing would be visible with the roof off and I made no attempt to hide them, but I did try to minimize their visual impact.
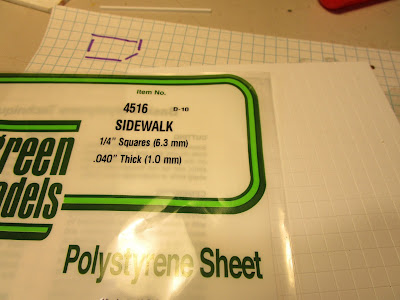
I had some Evergreen 1/4" square tile "sidewalk" sheet styrene (#4516) that seemed like it would work well for the base. It helped keep the walls parallel, and it formed an instant sidewalk on the outside.
The walls featured large windows and door openings which I dutifully removed and filed to size, but based on my recent experience with the O&W milk station I knew that the walls would warp unless I immediately braced them.
I had large, thick clear plastic window glass panes from an old Walthers kit and I used them on the inside to add rigidity to the wall openings.
As I glued up the walls and let them cure overnight, I set a temporary brace along the roofline to keep the tops of the walls parallel and prevent them from bowing in.
The garage doorway was framed with styrene, but I left all other openings empty for now. I knew painting and stuccoing the walls in the future would be complicated with the clear glazing already in place, but it had to be done this way.
The gas station was divided internally by a wall and doorway, leaving a shop on the right and the garage area on the left.
I tested the structure on a wood plaque that I stained and polyurethaned.
Before I went too far I also measured and cut out the roof for a nice drop fit.
It was painted with various shades of gray and some scratchbuilt styrene exhaust vents were added (they are also handles to remove the roof) and joint tar lines were painted on.
Horizontal trim pieces were glued on the upper edges of the walls. Painting them green later will be necessary. In hindsight, I should have waited to install them until I had the lettering in hand.
To hide the oversize window panes I cut "false interior walls" from thin styrene.
Once installed (they are loose in the picture below) they sandwich and hide the glass.
For the store's floor, I drew up a checkerboard pattern in Microsoft Paint and printed it out. It was sprayed with 3M adhesive and laminated to a piece of styrene. It dropped in and I glued it down.
I then started building interior decorations like shelving units, cabinets, and racks. I am especially proud of the display counter with "glass" top.
To stock my store, I dug into my N and HO scale parts boxes and pulled out anything that was small and might work.
Unfortunately, that wasn't enough so I cut up and painted lots of tiny bits of styrene for more inventory.
All my finished assemblies were kept in a takeout container so they wouldn't get lost. The brown sheet was a "linoleum" floor that I sprayed a blotchy brown and lined with a fine marker. However, I went with the checkerboard floor instead. I may keep the brown floor for a future project.
The store's goods for sale:
No service station would have been complete without a tire rack. Tires came from a junked Tyco container truck. A scratchbuilt Pepsi machine (would you believe there are 13 pieces in it?) based on a 1951 Jacobs #50 model, a window ventilation fan, and some green floor mats were also made.
The garage got a workbench, complete with tools.
Because I need to keep track of all commercial parts used in my model as part of the MMR judging form, I kept a list of where every part came from. That was annoying. But I am really happy with how it all came out. From a foot away, it looks pretty good.
The exterior sidewalk was painted a light gray and then weathered. The walls were painted with flat white enamel paint and I brushed it on heavily. This resulted in an appearance with undulations, some cracking, and other patterns. To my eyes, it looks a lot like stucco... which was the look I was going for.
Moving on to the garage, the floor wasn't supposed to be tile so I cut, painted, and weathered a piece of styrene to drop on top.
I built a Tecalemit brand car lift based on pictures of 1950's style lifts I found online. It contains 17 pieces of styrene, including some small I-beams. A cheap auto from the scrapbox helped with dimensions.
It actually supports a car, though it doesn't go up and down! It was later painted silver and weathered.
Garage storage shelves were temporarily propped in position with clothespins until the glue dried. I used Arlene's tacky glue for nearly everything as superglue fumes would cause the windows to haze and fog up, and that would have been a disaster.
The garage door was built from some strip styrene, with a large piece of clear styrene glued to the back to add rigidity.
The shop doors are also styrene, with door knobs made from diesel marker light gems glued on backwards. I also painted the trim styrene along the roof green.
The "Sinclair" lettering in red along the top of the walls is distinctive. The original article called for cutting and filing each letter individually from styrene, which I didn't want to do. So, while the wife and I went to the craft store to look for ideas she found the metal charm bracelet letters below. They looked to be the perfect size. They are the wrong font, and not italicized, and are in all caps... but oh well! Close enough for State work.
They were primed and painted red (I had to make a second "I" from a leftover "T") but when I went to install them they didn't fit. They are 1/4" tall, but I didn't space out my green exterior trim that much because I assumed I would be making the letters to fit. Oh well, I glued them onto a spacer piece of styrene that fit between the green stripes.
They were installed on the walls, and then I used decals from Microscale set #87-969 to add decorations to the windows. The decals not only had red "Sinclair' lettering in the correct font, but also included lettering decals in all caps similar to what I used... so perhaps there is a prototype for what I did.
Ground foam weeds were left to grow along the back two sides of the building where the public normally doesn't see them. The front walls were kept weeded though.
The gas pumps started off as 3/8" square Plastruct ABS tubing that I drilled and filed a rectangular hole in. The round black things are tank car dome parts from surplus Walthers tank car kits in my scrap box. Those kits are a beast to put together, by the way.
Everything was painted white, then masked, and then finished in green. Decals from the sheet added the necessary graphics, and some thin black wire was bent to look like hoses. I then filled the "glass bubble" on the top with clear nail polish.
The pumps had some decals installed in the opening and they were installed on the concrete island base. Cars can now drive up, fill up, pay up, and giddy up! (Note: I made them too large and later had to fabricate new ones).
The last detail to add was the car... a beautiful Model Power 1955 Chevy Bel Air. I didn't do a thing to it as it was such a gorgeous car. And at $15, it cost more than all of the other raw supplies I had purchased for this structure combined. But it was worth it.
The car was installed on the lift and a friendly mechanic I repainted into 1950s colors (jeans and white T-shirt) sits on the corner of the bench and stares at the car. I named him Freddie because he looked like Freddie Mercury.
Another shot of the interior of the gas station.
The same shot as the lead off picture, except with the roof off.
I had a blast building this. I have a couple of ideas for my next structure, but I think I will give the interior detailing a rest for a little bit. This does make me want to turn on American Graffiti though!
Update: I had to make a few revisions to earn enough points for my merit award.


Wow. It seems like just the other day you were starting to blog about maybe going for MMR structures, and now you've turned out more insanely detailed models then I have in my life! Keep up the good work!
ReplyDelete