CP Executive train in Albany

CP Executive train in Albany

Tuesday, March 28, 2023

Scenery around the Agway complex

Now that all three buildings (here, here, and here) were finished, it was time for the scenery around them. When I completed the third building in January 2022, I wasn't even sure if I was going to continue with my HO layout. My heart isn't always in it, and sometimes I feel ready to move on to new projects. But I think I was just burned out on buildings. So I left it to sit for a while instead of tearing it down. Now I feel better, so I picked up where I left off.

The first thing I did was glue down some nominally 1/4" thick sheet cork, which acted as a foundation to raise the buildings up a little. 

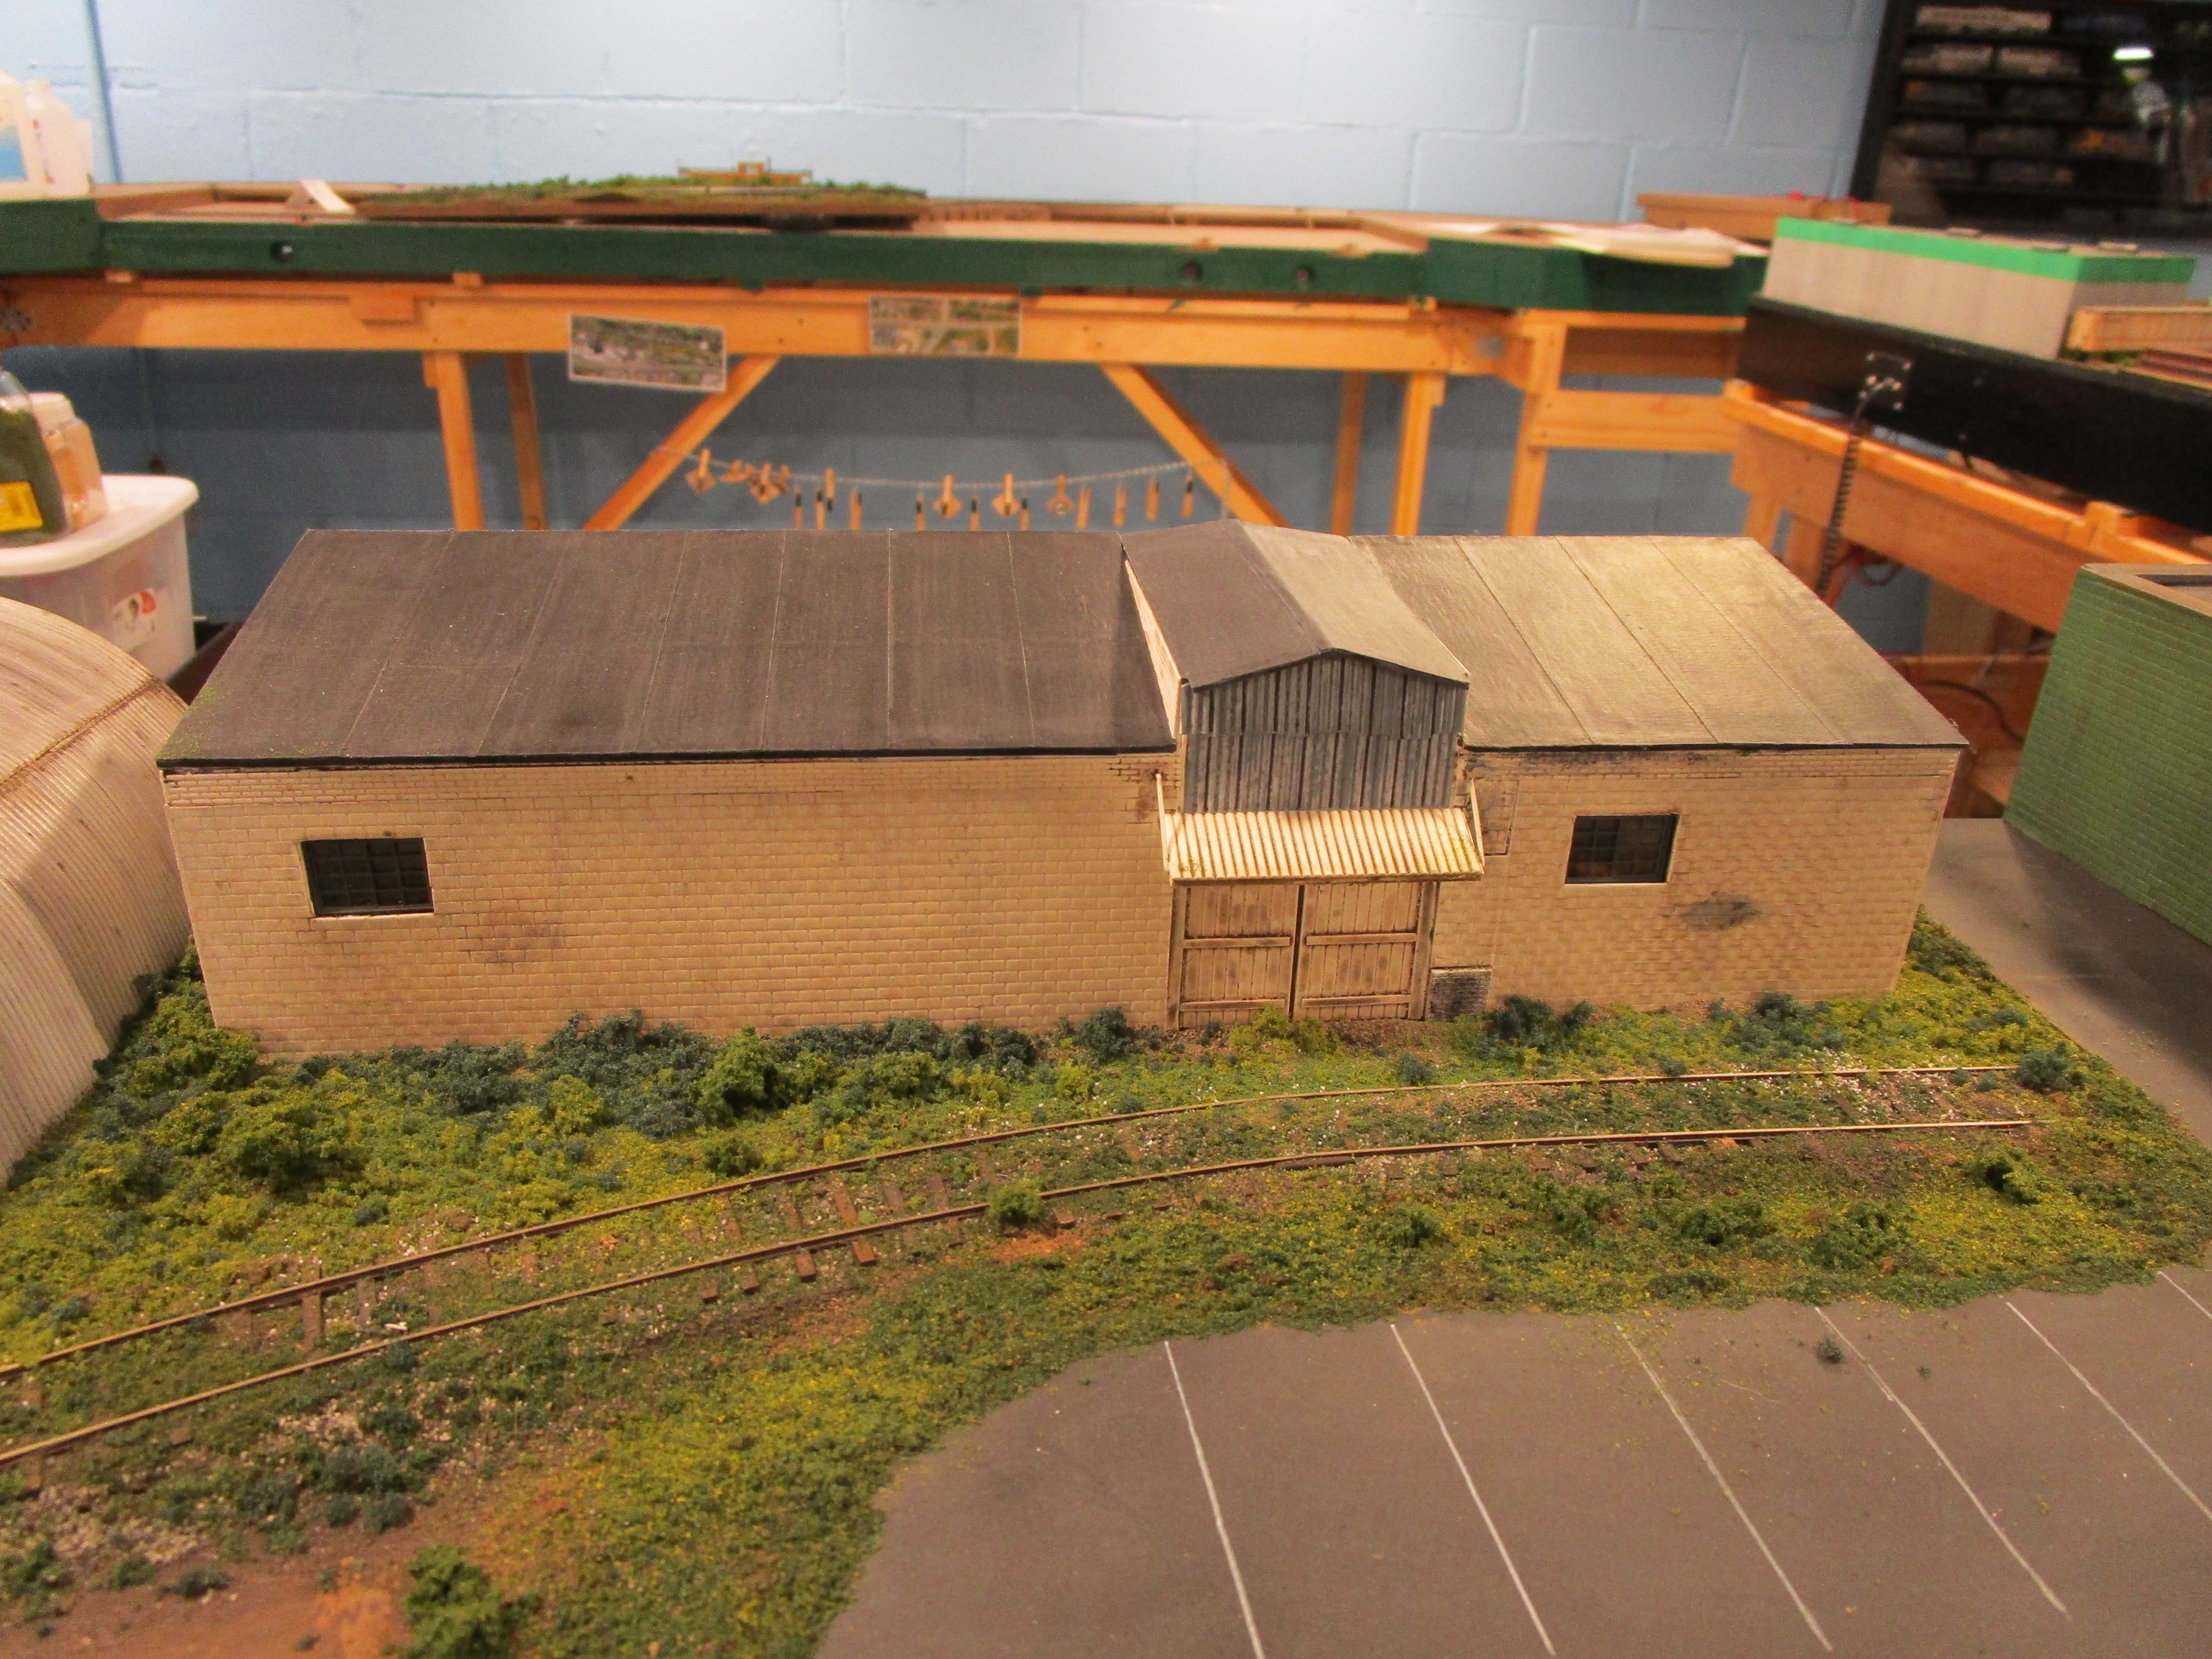
Then, I did a final check with the buildings in place to make sure they looked okay. It had been over a year since I had even touched this area of the layout and I had to get reacquainted with it.

It wasn't a pretty scene, what with the odd curves of the track and pile of old, rock hard ground goop that I had left from a previous session. It took a bit of chiseling to get that off!

Ground goop was really too thick for job at hand, as all I needed to do was add a thin layer of texture around the buildings and blend the track to the area of the structures. What I really wanted was Sculptamold, and that is what Model Railroader usually used for this sort of thing. But when I went to the basemen to get it, I realized I had none. Not wanting to hold the project back, I made up more ground goop. 

The stuff is really thick and despite thinning it a bit with water, it wasn't prefect. Worse, my brand new bag of "fine" grade vermiculite was much coarser than my older stuff. Perhaps different brands have different definitions of "fine". But I pressed on. I put a coat over everything including the sheet cork, then used a scraper to remove it from the cork. This left a very thin layer that filled in the holes in the cork and provided a little adhesive power to hold the buildings down.

Some gaps were left around the building, but they didn't last long. Besides, they were on the backside of the buildings which can't be seen anyway. (Note that car was only used to help space parking lot lines... it won't stay on the finished layout!)

Next, real dirt and various colors and textures of ground foam were dumped around and between the buildings. 

Soon enough, the gaps in the foundation were hidden.

Larger pieces of vegetation were planted behind the buildings. In real life, this area is massively overgrown.

Then, rubbing alcohol and matte medium were applied in copious amounts to hold everything in place. Note that the triangular area at the bottom is due to get some trees, but I still need to make them.

In the alleyway between the buildings, I hid pieces of stripwood, old castings from my parts box, cut up sprues, and other junk. Instead of making them all visible, I put more ground foam on top so that they peeked out from amongst the weeds. I think this is more realistic.

The end of the row of buildings near the entranceway to the parking lot got the same treatment.

Finally, I went around the edges of the building with the same gloss black paint that I used on the fascia.

Friday, March 24, 2023

Spring cleaning my Scenery cart

I decided to start working on the layout again, but it was a mess. Lots of projects over the past two years in multiple scales had left piles of this and that all over the place. Also, my scenery supplies were scattered and buried. So, one of the first things I did was clean and reorganize my scenery cart. I couldn't believe how many types and colors of ground foam (middle box) and static grass (right box) I had. Lots of ballast and different sizes of dirt and coal were in the left box. Underneath, larger bags of materials for ground goop and garbage bags, as well as my various sifters and sheet cork filled the space.


After about an hour, I was more prepared and invigorated to continue working on my layout.

Monday, March 20, 2023

T-Trak Japan: Aokigahara Forest

On the left side of my layout is a forest scene with a relaxing Roykan (traditional Japanese inn) at the end of a long, winding trail. At least that is what I wanted it to be. It supposedly represents Aokigahara, Japan's most famous forest, which is about 70 miles west of Tokyo. It was planned to provide a nice balance to the bustling city scene on the other side of the module. However, it was a bit barren at this point. All I had was some dirt and ground foam, and a gap in the concrete retaining walls for a stairway up to the path. It was time to get some landscaping done and first was the stairway.

I started scratchbuilding one from styrene pieces laminated on top of each other a year ago, but I couldn't find it now. What I did locate was a 3D printed staircase I had purchased at the start of my project on Ebay for cheap. It was from the earliest of printers and had lots of layering marks. It was also insanely huge... I only needed the portion at right, and I later cut that down even more to shorten it and remove the railings.


I then built up its height with scrap styrene, and added sides from thin styrene. A quick test showed that it fit perfectly.


Then, it was suitably painted and installed in the gap of the wall. The excess stairway part is on the right. What a waste.

The trees were next. I mean, what's a forest without trees? Several years ago I had purchased many bags of extremely cheap "N scale" trees from China on Ebay. However, upon arrival they looked terrible so I set them aside. You can see in the picture below the Ebay trees on the right... and I have bags and bags of them!


Scenic Express makes wonderful tree kits, but they aren't durable enough to survive moving my layout around. So, after recent consultation with some local N scalers I went with JTT tree products (#95616, #95619). They aren't very expensive (about $12 each delivered) and they are a lot more durable than homemade trees. I bought two packages and liked them enough to buy two more. 

Getting them out of the package without bending their wire branches was tough because they were packed in really tight. The color of their trunks was also too bright gray for my liking so I drybrushed several shades of brown and that toned them down. Tip: do this before installation!


Then, I drilled holes in the layout scenery base and started gluing them in. I quickly discovered that the trunk was much too long so I usually trimmed it right where the lowest set of branches started to diverge. Clothespins helped hold the trees up while the blobs of tacky glue cured.


I would drill and glue 2-4 trees, then sprinkle some ground foam over the blob of glue that was at the base of each tree. This helped hide the white plastic sign residue and the green oil paint chips which came up with the drill bit. Rinse and repeat. By sprinkling on the ground foam, I also added other various shades of green to the trees. If I had drilled all the holes (and marked them with toothpicks to remember where they were) I could have vacuumed up all the debris before planting the trees, but I wanted to add them a little at a time.

Finally, everything was sprayed with alcohol and then lots of matte medium was dribbled all around and through each tree. This secured the ground foam onto the tree branches and around the base of each tree.

Several days later, I went back and painted some more of the exposed gray branches with brown. For me, the light gray just looked really fake.

There are three packages of trees, about 45 total, on this section. My wife thought that I used too many, but I wanted it to look like an actual forest and not just a few trees here or there. I kept one package in reserve in case I wanted to add a few along the front. 

My path through the woods has two little diverging branches. At the end of one I installed a tiny Shinto board for posting Ema onto. I made it from made from, of all things, a signboard in my scrapbox that originally came from an N scale church kit which I painted red, black, gold, and white.


I really like the look of the large red and black Shinto shrine gates ("Torii") that are located throughout Japan. I don't know if it would be appropriate for my layout... at least where I planned to locate it... but I decided to add it anyway. I considered scratchbuilding one but first reached out to a friend who loves to 3D print things. After describing what I wanted, he looked around online and we settled on this one. He then printed it out twice, once with his filament printer and again with his resin printer. Naturally, the resin one looked a lot better.

The resin one on the left looked a lot cleaner than the filament one on the right, but there were two issues with it. First, the base on one leg was deformed. Second, the end of the crosspiece on one side had shifted during printing and looked strange. By cutting down its height and removing the bases, and trimming off the crosspiece and then rebuilding it stripwood, I overcame these issues. 

Then, it was a "simple" matter of painting it. Which went like this: sprayed everything in dark maroon, only to find out that it was "glitter" maroon. And, the wooden piece took the paint differently then the resin. So, I then repainted everything in white primer. Then, I brush painted Tamiya red paint but realized it was too bright a red. So, I sprayed everything another shade of dark red which looked good but was really glossy. The black parts were then brush painted flat black. After looking at them, I decided to repaint them with some gloss black.  Finally, everything was given a couple of light sprays with Dullcote to kill the gloss sheen. Wow, that was a lot of work for one piece!

Finally, just when I thought I could install it the unthinkable happened: I dropped it and it shattered into pieces. Stupid resin. And my friend's 3D printer was broken, so I couldn't replace it in time for the show. That's how it goes.

It operated well at the train show (I forgot to take pictures) and several people were curious about it. I still have a lot to work on, but I am happy with it.

Thursday, March 16, 2023

D&H plow working the line (1993)

Here is a shot of a plow extra working the main line north of Sunbury, PA on March 16, 1993. Note the engines are painted for the Union Pacific but the lettering on the hood is "GATX". And speaking of paint, that is one sharp looking plow! 


Sunday, March 12, 2023

The Troy Branch Local (1996)

Here is a shot of the local D&H train working the Troy Branch in March of 1996. I have previously written railfanning the Troy Branch in 2015, though at that time it was run by CSX. In 1996, when this picture was taken, a Guilford engine was used for power. Perhaps CSX assumed operation of it later. I like how it still warranted a caboose, even though by now crew sizes were probably only 2 or 3 crew. 

I have tried to place where it was taken but I can't be sure. The bridges in the background are pretty distinctive and the only thing that exists now which could be them are those that carry High Street (the "Troy Menands Bridge") over the Hudson River. The below satellite has South on the top and all of the bulldozed property in the bottom-right corner could have once hosted the large concrete tank shown in the picture above. If not, then I am at a loss. Oh well. 

Thankfully, when I drive along the highway and look across the river I can still see covered hoppers of salt are still moved around on the branch. So it isn't dead yet.

Wednesday, March 8, 2023

Then and Now: D&H offices in Albany (1984)

At one time the D&H had office buildings in downtown Albany. No, I don't mean the famous building at the bottom of State Street that is now owned by SUNY. I mean offices at 40 Beaver Street, Albany, NY 12207. When I saw these slides showing the old D&H building dated March 10, 1984, I knew I had to buy them. Note the name of the railroad spelled out on the side. It is a garish juxtaposition between the white painted bricks and the natural reddish bricks.

Here the street side view of the building. Note that the building next door appears to be only three floors high. Note the "Delaware and Hudson Railway Company" spelled out on the banner board.

I headed downtown with my camera in mid-February 2023 to see what the building still looked like. As you can see in the below images, it is there but some windows have been added and now more of the wall is painted white (likely to hide the scars from the window work). 

Note that in 2023, the building next door is a lot taller than three floors high. I guess it was expanded upward.

If you are interested in renting part of this building, check here. Just think... you could be sitting and working in the space space where forty years earlier employees of the D&H sat and did the same thing (or idly looking out of the same windows)!

Saturday, March 4, 2023

T-Trak Japan: Farmer's Market and City Details

In April 2022 I had finished (or so I thought) all of my structures for my MMR certificate so I pulled out my Japanese T-Trak module to work on it some more. In the previous 12 months I had ordered more supplies from Japan which, because of the shipping delays due to the pandemic, arrived in fits and spurts. Some I lost in my basement and only found again months later. But, I had a clean workbench which was just the motivation I needed to jump start this again. I hadn't touched my T-Trak module in a long time, and I couldn't remember exactly where I left off. 

Since I wanted the center of my module to be a bustling festival or farmers' market scene, I needed a good base for it. The first step was making a paper template of the exact area to be covered.

I then cut a piece of 0.060" styrene to size and laid it on top of some oversize graph paper. A series of 1/2" lines were drawn on the styrene with pencil, and then the lines were scribed with the pointed tip of my compass tool. In one area the tip slipped, so I needed to hide that with something later.

Based on the good results obtained for my Albany Steel scene on my HO layout, I then painted the styrene with tan paint and used alcohol washes to bring out the cracks. 

For the food market vendors I looked online for suggestions. There are several inexpensive ones available as paper/cardstock kits but I was concerned about their durability on a traveling module. Faller made an excellent "Market Stands & Cart" styrene kit (#272533) which is European themed but I thought I could make it work. Unfortunately, it was expensive and hard to locate and I had to order it from Germany. That was one reason the project slowed down.

I wanted to personalize everything to make it more "Japanese", so much of it was repainted in bright colors and redecorated for Asian products. For example, the food trailer was painted orange and rethemed as a Ramen noodle vendor.

However, I only got about a week's worth of time into my module in April 2022 when two things conspired to shut it down again: first, I acquired some Lionel passenger cars and they took priority. Second, my son Harrison arrived three weeks early. So, once again I set my T-Trak module on hold and it wasn't February 2023 when I dug it out again!

With my wooden engine house complete and the offer to exhibit my module with the local T-Trak club's layout at an upcoming March train show I decided I had better work on it again. So, during the Super Bowl weekend I pulled it out and took stock of what I had, what I could work on now, and what I needed to order.

The most glaring needs were: (1) trees for the left hand side of the module, and (2) the market scene in the middle needed at least something done. Less pressing were automobiles, figures, and backyard details installed behind the structures on the right.

I had started working on the Faller kit and enjoyed painting and assembling everything. However, the pieces were really tiny and difficult to hold when painting. Also, even though I enjoyed every minute of the process it took about 10 hours to assemble and paint them (not including drying time). Nothing makes me happier then sitting at my workbench totally immersed in a project like this but free time is difficult to find these days.


Finally, some of the pieces were ready for installation. Can you imagine that everything together would easily fit onto an index card and not look cramped?

I spread it all out on the area and then slowly moved things around until I had an arrangement that looked pleasing to me. I wanted to make sure that the viewer of the layout could see all the interesting parts, so most everything faced forward.

Then, it was all glued in place. I only took up half the area for now, and I am not sure exactly what I am going to do on the left side. I am hoping to do some sort of Japanese festival scene there, but I doubt it will be ready by the train show later this month and I have plenty of other things to focus on.

The finished farmer's market area.

As much as I like painting details, I absolutely hate painting figures. I have done it for my HO layouts, but will gladly fork over my money for good looking tiny people. What aren't good looking are those wretched discount ones you can find on Ebay (well, you do get what you pay for). I do like Tomytec figures which are about $1 a person (not including the shipping), and if you combine shipping on multiple packages it isn't too bad. I had purchased sets of school children, business employees, standing people, and people in traditional yukata robes for my retreat at the top of the hill. 

I thought I had plenty, but the layout just sucked them up! I added lots here and there in meaningful groupings but soon ran low. I have about a half-dozen reserved for future scenes, but I sure do need to purchase more. Sadly, I don't think any American vendor stocks them and importing them from Japan is crazy expensive.

My buildings were given further details like rooftop appliances, antennas mounted on the sides of buildings, and junk in the alleys. It all came out of my scrap box and I have no idea what they all represent, but once painted and glued down (and viewed from 2 feet away...) they look fine. 

I scoured my HO and N scale scrap boxes and took anything that might even remotely resemble some sort of detail. Having done the same thing for most of my HO scale scratchbuilt structures, the stash was running low. At the next train show I should look under the tables for cheap junk to resupply with.

The row of stores along the side were given some figures and plants but not as many details in the alleys because they aren't readily visible from the front of the layout.

The rear sides of those buildings are very visible, however. They are the backyards of shops and I left plenty of space to create mini-scenes there, though I am not yet sure what I am going to do. 

The front building has a scene with a man walking (or fighting with) his dog. 

The road crossing area had been left open from the start because I didn't know what I wanted to do there. I could have just continued the styrene "pavement" over the gaps but while watching Japanese television shows I noticed that they frequently use concrete or rubber crossing guards. They are commercially available in N scale and I considered buying some, but figured I wouldn't lose much by trying to make them myself. 

I first took some thin styrene rod that I had on hand and filled the gaps on the outermost edges. 

I took some 0.015" thick styrene and cut it into five pieces. Extra clearance was left at the flangeways because some T-Trak operators might still be operating old equipment with "pizza cutter" wheels and I didn't want them to derail on my crossings. The thin styrene was also just low enough from the top of the railhead that a Brightboy wouldn't scuff it up while cleaning the track.

The styrene was then scribed to represent joints in the rubber panels that are bolted down. I didn't bother to research prototype dimensions but instead just divided the 75mm wide pieces by three. Thus, each block is about 25mm wide and 7.5mm deep. The large middle portion divided perfectly into these dimensions as well. 

For the final touch, I used the point of my compass to emboss "bolt" hole details. There probably should be more per panel, but in N scale you probably couldn't even see them anyway if modeled correctly to scale.

The panels were painted a dark charcoal gray paint. Black would have been better, but then the detail would be lost. Over the gray I lightly misted flat black paint, which dried as tiny black droplets on the surface. This looked just like the textured rubber panels I saw in pictures, which was perfect. Some clear spray finished them.

I then painted all of the areas underneath them with black paint so that any gaps in the road panels wouldn't show through as white plastic. There was no turning back now!

I was about to glue the panels down when I noticed that the molded-on spike heads were preventing the styrene from laying completely flat on the ties. And despite them being only 0.015" thick, I was concerned that gluing them down onto the spikes might cause bumps from the flanges of passing trains. So, I took a tiny chisel blade and cut away the spike heads. You can see in the picture all of the light gray plastic where the black paint was pried away.

After testing, and painting the newly exposed raw plastic black, the panels were glued down with thick superglue gel. Testing with some trains confirmed that the wheels safely passed, while rubbing a track cleaning block over the crossing didn't scuff the road. Perfect! Not bad for about 25-cents worth of materials.

My streets needed some cars, but all I had were the cheapo Bachmann and Life-Like N scale autos that use to be loaded on the auto-rack flatcars. Years ago I repainted a bunch, and even added diesel classification light jewels to the tops of some to make police cars and ambulances. I think I got pretty good at it too (my efforts are the 20 cars on the right), but they weren't really correct for a Japanese themed layout.

So, I turned to Ebay and surprisingly the cheapo offerings are pretty decent. You can get 50 of the cars on the left for about $12 delivered to your house. That's about a quarter each. And they look good with shiny finishes, black window "glass", painted hubcaps, etc. They are based on modern Japanese cars but that is perfect for my layout. Note the white block of styrene I glued to the bottom of the flipped over black car on the left. Once painted black, it is invisible but it offers a much larger gluing surface for attaching the cars to the road.

The streets were then filled with cars... left-side driving don't you know. I wish I had a nice bus to include, but that will have to wait. I did leave a space for it prominently in the road though.

Next up is the left side of the layout.