CP Executive train in Albany

CP Executive train in Albany

Thursday, November 26, 2020

Structure - Colony Liquor (part 2)

Picking up where I left off, I worked on the boxcar loading area next. When gluing the cement block sections to the rear wall, I didn't bother to add them to the area that would eventually become the loading dock alcove. Note that some of the block wall joints aren't perfect and that is because it is tough to join them at their edges, while at the same time adding the back-reinforcing braces, while not having any of the glue seep through the joints and smudge the block faces on the outside. This was the best I can do. It is scruffy looking, like the prototype, and can't be seen. But, I won't use small block wall pieces to make large walls again. Lesson learned.

The loading dock area was built by measuring out various angles and testing things with an actual HO scale boxcar on my layout. Because of the thickness of the block wall sections, getting the angled joints perfectly aligned was difficult. The prototype had messy corners, and mine does too. The traditional method of hiding a corner gap in a block wall by scribing mortar lines in the filler wouldn't work here. I just filled them up with strip styrene. 

For the loading dock door, I used another one of the Walthers' doors. They are great. I framed many of the exterior wall edges and roof edges with strip styrene. It was otherwise impossible to hide the thickness of the block sections, and it gave everything a clean look. 

Unfortunately, I estimated the height of the building incorrectly and when it came time to test it on my layout (a process I did over a dozen times to ensure everything fit the way I wanted it to) I discovered that the loading door overhang area was too short. Oops! I had to fix this in two ways: I lowered the roadbed into this area and relaid the track, and I built up a foundation around the perimeter of the building with HO scale cork that was later blended into the rest of the scenery with ground goop.


The roofs were supported by styrene braces mounted just under the roof's edges. I used straightedges and levels to get everything properly supported, as I didn't want a sagging or slanting roof (which might have been prototypical). The roofing material added a lot of rigidity to the whole assembly.

Like everything else, each roof piece was cut one at a time to fit the actual measurements of the building.

Then, the edge seams of the roof were framed out with more styrene. This gives the impression that the block walls are the actual thickness of blocks and not just thin sheets laminated on. It also provides a cap to the roof. And, most importantly, it provides a nice clean appearance.

The inner portion with the lower roof, and the one oddball wall section, were lined out with block sheets and then framed like the rest. 

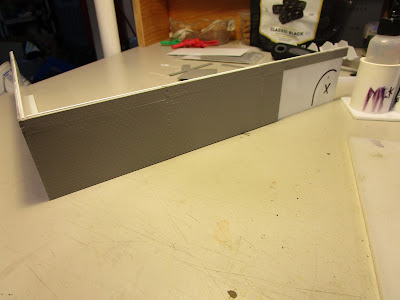
All told, there was a lot of styrene involved in this building. But, I am really happy with how it came out. Unfortunately, looking at the picture below on my blog is the only way people will see this side as it faces the backdrop. 


The interior of the building has a lot of extra bracing that I added as extra insurance to prevent the very large roof from sagging. When you buy your styrene in 4x8' sheets, you can afford the luxury of going overboard with it!

The details on the roof were a bit of creative interpretation. If you look at the two pictures in the introductory post to this area you can see that the details on the roof changed in the ten years between when the shots were taken (2010, 2020). Also, part of the building is now covered in solar panels. What existed in 1984 is anybody's guess, but I decided to use pieces from two of Walther's Cornerstone Roof Detailing Kit (#3733) to add some vents and an air conditioner unit. I really wanted something small and square, but didn't want to scratchbuild them. The Walthers kit comes with a tremendous amount of things, and I should be set for the future.

I used some short round vents for the larger part of the building and some short square ones (that I cut down even more) for the side building. I also built up one of the smaller air conditioning units to put in the narrow trench on the roof. I might add some more things there too.

Now, all I need to do is finish the model by painting it.

Saturday, November 21, 2020

Structure - Colony Liquor (part 1)

The first building I tackled for the North Menands section was Colony Liquor. Its most interesting feature to me was the boxcar loading dock area, which consisted of part of the rear corner of the building being cut away at an angle and a loading dock installed in the gaping hole. Then, blocks were installed around the door at an angle to frame it. However, above the door the building's walls and roof kept their original shape! The track extended beyond the door only just enough for a boxcar to be perfectly spotted against the bumping post with its doors aligned. If you went too far, you went off the track! I assume the D&H had to extend the siding by 5' to accommodate the transition from 40' to 50' boxcars.

These two pictures from early 1984 show the warehouse. I note that it too, like the Iroquois Millwork building, was painted in a drab green. That color must have been all the rage back then. Note in the pictures how close the boxcar is to hitting the doorway! Beyond the boxcar is another portion of the warehouse that I had to compress in length. In in the distance over the tracks is the expressway that could have been part of Cut Corner.

The shot below, taken in September of 2010, shows how overgrown and grassy the area is now. It is looking North, while the pictures above were taken facing south. 

The doorway in the corner alcove section has since been bricked closed with a regular steel door and a rickety wooden stairway installed in its place. 

The rear concrete block wall was in pretty bad shape. Also, note the wall along the right side of the lower-height roof area has smaller bricks instead of blocks. That is an interesting detail to model.
The northern most wall will be visible from the aisle, and I chose to focus on the truck loading door. I didn't have enough room to model the far portion with all of the windows.

So with the prototype research done, I turned my attention to how I was going to model it. Because of the size of the building, the various types of styrene sheets and molded walls, and tools required it consumed my workbench! The structure was built over the course of a week, with lots of breaks to ponder the next steps so that I didn't "paint myself into a corner" so to speak. 

Because of all of the angles, roof heights, and siding materials I thought drawing up a full size sketch would be too difficult so I roughed out some measurements based on pictures I had and just started building it one wall at a time. That would later prove to be a problem.

Since a majority of the structure is concrete block walls I again used Rix Products #541-1004 wall sections. Though I really liked working with them the last time, they were not a good choice for this building. The reverse side is molded in such a way that you need to install 0.040" thick styrene blocks in the middle of the sections to build up their thickness to match the thickness of the edges. However, when cutting up lots of the small wall sections and joining them together over the course of the building's substructure it gets difficult to make everything come out right. And, if you have to cut the sections midway you aren't left with a clean line because the inner reinforcing 0.040" is visible. 

In retrospect, I should have used concrete block sheets that were much larger and would have required fewer joints. The saving grace is that the most interesting angles of the building, which also required the most difficult joints, face away from the viewer and are nearly impossible to see.

Speaking of which, the prototype pictures showed that the rear side of the building had many old doorways and windows that were filled in with non-matching blocks. It really looks neat to see in person, but on my layout they are not visible at all so I just modeled that side with solid block walls and no "ghost openings." The side of the building did have a truck loading dock, and I installed another of Walthers' modern doors in that opening.

As the building's walls slowly wrapped around the exterior of the structure I had to be mindful of the middle area which featured a lower roof line. While I braced the upper and lower edges with 1/4" thick square styrene, I first had to add the inside walls so that they weren't blocked out by the square bracing. I bought a large bin of colorful plastic clamps for $5 from Harbor Freight and they were very useful here. Keeping everything square and preventing it from turning into a rhombus (I haven't used that word since high school geometry class!) was a challenge. Sometimes, I build my models on oversize graph paper sheets which let me spot at a glance when things are off. Here, I used rulers and squares to double check all measurements.

Large areas that needed stronger bracing were fitted with 45-45-90 degree corner pieces of styrene.

Stay tuned to how this thing gets finished...

Wednesday, November 18, 2020

Planning Scenery in North Menands

Even though my "to do" list on my layout keeps growing I decided to turn the corner (literally) and start working on my next layout section based on North Menands. That is a great thing about this hobby... I can work on what I like when I want. So, while backdrops and trees and detailing still await their turn I can focus on something new.

I could write again what I wanted my area to look like but I already did that five years ago! So, I will only add that this is going to be one of my favorite areas of the layout. From a model building perspective, I will need to scratchbuild or kitbash at least four different buildings or parts of buildings, including a warehouse, an Agway, and a quonset hut. It should be a lot of fun. Additionally, there is a small hill (on the very right portion of the above picture) on one side of the tracks, and a tree line with a cemetery on the other side of the tracks. It is a lot to squeeze in seven linear feet, and a lot of compression will be required. A little of the track remains if you look hard enough, but most is gone.  

On the plus side, all three industries still received rail service in 1984 and this area will be the primary switching area for my layout. It will be a fun winter to build it.

Monday, November 16, 2020

Railfanning: Steamtown in 2019

Last summer I visited my childhood best friend who lives in Montrose, a small Pennsylvania town just south of Binghamton. While there, he suggested we visit Steamtown (he was a train fan too) and having never been there before I jumped at the idea. Being 2019, it was 150 years since the completion of the transcontinental railroad and there was a large indoor exhibit focusing on that. Must of the museum was well done, though like all museums they have too much stuff and not enough time/money/indoor space/insert other stuff here.

They did have a fully restored, and operating, roundhouse and turntable which was neat to see. And, they had many large and impressive steam locomotives including Big Boy #4012. However, that wasn't my favorite engine in their exhibit. 

Here are some pictures I took during the trip, which included a ride in a coach behind their shop steam engine. 


For lunch, we walked over to the Steamtown mall via a large trestle that crossed over the yard. That is how I was able to obtain the overhead shots above. Inside the mall was a Delorean, my favorite car! Naturally, I had to get my picture with it!

Friday, November 13, 2020

MMR Civil and Cars - Picture for banquet

As I have mentioned on my blog, for much of the past year I have been working on my Master Builder - Cars certificate as part of the Master Model Railroader program run by the NMRA. I had my cars judged over the summer by several MMR judges and each car was found to be worthy of at least 87.5 points, enough for a merit award on its own.  Also, about a year ago, I was also awarded the Model Railroad Engineer - Civil certificate. Due to Covid, I haven't been able to receive the certificates yet in person. But, there will be a virtual recognition of the awards at the Northeastern Region's Virtual Convention

I was asked to submit a couple of pictures... one of me and one showing some of the work I did as part of the certificates. I will spare you the headshot, but below is one I took showing trackwork (Civil) and rolling stack (Cars) that I built for the two certificates. 

My wife is holding the just-received backdrop which I mounted on the Gatorfoam, and because it is so light it was easy to switch to the other side (inside) of the layout for this shot. The first, blurry car is an O scale caboose, the second car is my On2 boxcar, and the rest are mostly HO scale (an OO scale cattle wagon is also pictured). Someday I will learn how to make all parts of a picture sharp, but for now this is the best I could do. 

Seeing them all together really brings home how much enjoyment I had building them. It was a lot of work, but I learned a great deal and had a blast in the process. Each car took about 20 hours to do, and the increased modeling time was one of the few benefits of Covid.

EDIT: link to the video of the virtual banquet presentation (I am at 1:15:10). I have no idea why the picture above wasn't used, but there is a picture of me.


Tuesday, November 10, 2020

Favorite Engines - Conrail SD80MACs

There are some engines that you just see and go "wow." I remember visiting the Steamtown museum last year with my friend and seeing Big Boy #4012 and thinking that. It was just huge. I respect that. There are other engines though that jump out at me because they have striking contours, or flashy paint jobs. The first example that I can recall personally coming in contact with were the Conrail SD80MAC engines. While most modern EMD and GE locomotives are big... especially compared with older first generation, four-axle engines... these not only seemed huge but very boxy and brutish. Here is an interesting website about them.

December 25, 1998


They were special for a couple of reasons. They were Conrail's first alternating-current (AC) traction engines, the first 5,000 horse power units, sported 20 cylinders instead of the typical 16, and featured EMD's radial truck design. And, Conrail was the only railroad to order them (though CSX and NS eventually inherited them) with a roster of 30 total. All nice, but when I saw them for the first time I didn't know or care about any of that. What I did see was a striking paint scheme of blue with a "white face." Conrail had designed a special livery just for them (which I asked about on Railroad.net) to signify their uniqueness and it worked.

June 22, 1996


They weren't frequent visitors on the Conrail mainline that cut through Rochester, but I definitely saw them a couple of times. I always wanted a model of one, and in 2002 Kato released an HO scale engine that I quickly pounced on. I had trouble installing a DCC decoder in it, so I drove across town to the NCE factory and they let me walk in and after we toured the place they personally installed a decoder for me. Now that is service.

Postcard of six (!) SD80MACs in Chatham, NY


I tried to run the engine on the college model railroad club's layout I belonged to but it always derailed in one place because they chose to run the mainline through the curved leg of a switch instead of the straight leg. Never, ever do that! Eventually, when I migrated to N scale I sold it. But now Athearn has announced that they are releasing them again in HO scale. And they are super detailed with DCC and sound! Yes, I know they are 12 years too late for my layout, are for the wrong railroad, and never operated on the territory I am modeling. And yup, I am going to get one. I mean... just WOW!


Saturday, November 7, 2020

Blue skies on the horizon

After struggling to select a shade of blue that I really liked, I bit the bullet and ordered a section to test it out full size. Bill at LARC Products printed it pretty quick and within a week or so it was in my hands ready to install. I went with the vinyl, as opposed to the cloth, because the color saturation on the vinyl was a bit brighter. From most viewing angles you don't get a glare on the sky from the overhead lights. Those problematic points are at the very top of the sky, and when you look at it from the end... neither of which is in my primary sight lines. I used our laundry table to layout it out and attached it per Bill's instructions of taping it along the top to maintain alignment and then slowly peeling it back and pressing it on. The wrinkles went away when I did that.

Once it was installed, I trimmed a slight overhang along the top and then set it up in my U-brackets that I described building earlier.

It is only 60" long, but again it makes a tremendous improvement over what was previously in area of sight... basement steps, storage shelves, and utilities. 

The joints between the Gatorfoam sections are currently held together with small clips I made by gluing up styrene pieces into a U-shape. I may paint them blue in the future.

Wednesday, November 4, 2020

Greenery for Cut Corner

Like my previous section, I added static grass to this area too. I purchased a longer type (12mm) and chose a straw yellow color. I wanted something besides all of the green I was using, and I was hoping it would look like reeds and tall weeds that can be found in ditches and such. However, it was a bit too long for my HO scale layout and some of the strands bent over in curved profiles instead of standing up straight. So, I spent a bit of time ripping them out. In the picture you can see the backside of the rear hill and the smaller foreground hill where I added some foam but didn't spend a lot of time adding static grass. Those areas can't be seen once the backdrop is up.

Speaking of which, I also added a three-piece backdrop to Cut Corner formed from three pieces of Gatorfoam which I glued together and reinforced in the rear with gussets cut from more Gatorfoam. The blue tape is temporarily holding it all together while the adhesive dries.

To add the blue sky graphics I plan to cut a piece of long styrene and curve it around the inside of this shape. However, until then I have a white, segmented sky. 

I ordered a tree starter set from Scenic Express, which will be the next step for the hills. The light green I used is also very light green and sort of looks like toxic waste oozing up! I hope that the trees, and some more muted colors of grass, will tame it a bit.