
After building the milk platform and having a lot of fun making its platform support bents, I thought making a small trestle might be a good next step. Casting a look at my list of scratchbuilding articles, I found a set of plans in the December 2012 Model Railroader by Harold Russell for a small N&W Railway coal unloading trestle. There was an accompanying construction article for a similar model, but many liberties were taken with the details and construction methods and I wanted to stay true to the plans so I just focused on them. It wasn't very long trestle- just the right length to hold two 40-foot hoppers- and it wasn't very tall either. Apparently, the coal would be dumped on the ground underneath and a conveyor belt would lift it up and load it into trucks.

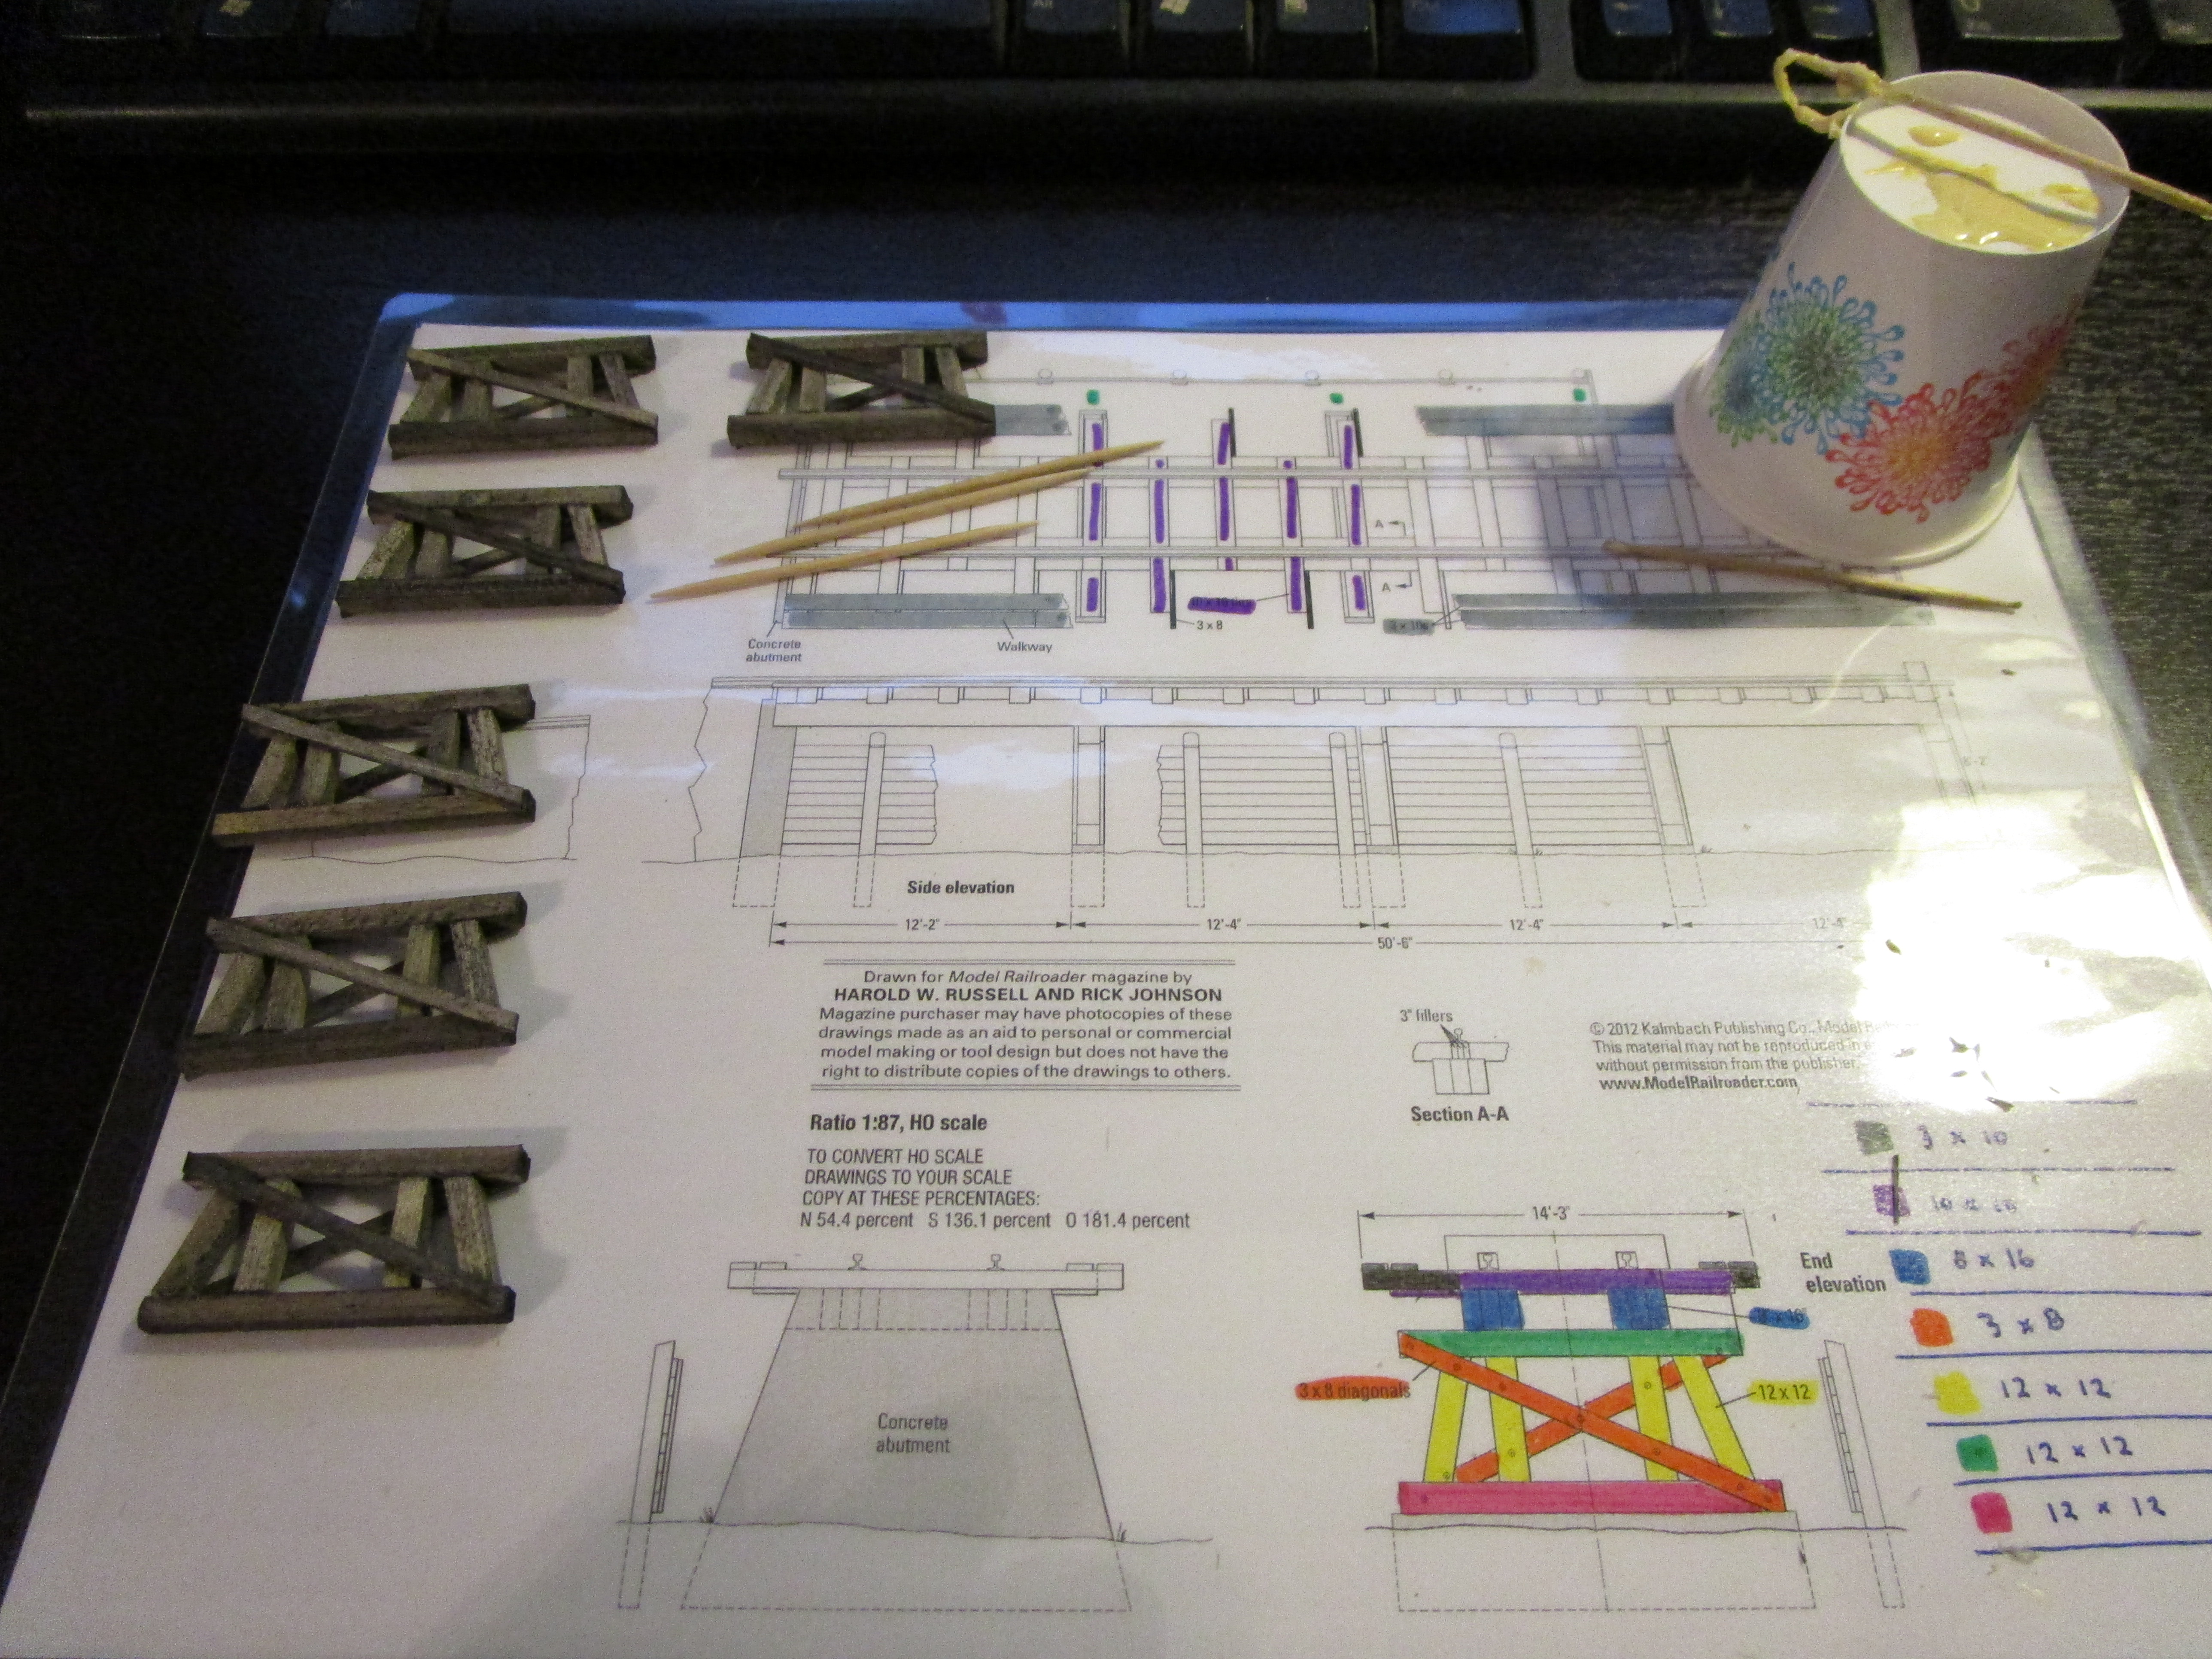
I started out by using markers to color-code the plan and determine what HO scale lumber I needed, and then I placed an order with Northeastern Scale Lumber. I mostly bought wood prepacked in bags because they had handy labels on them but I did need to order two pieces of 24" long stripwood. Sadly, the first order had the wrong size in it and the replacement order was damaged in shipment by UPS but I managed to get by.

As I cut the stripwood I stained it in a very dark mixture of black India ink and alcohol. I ended up dipping everything twice in the liquid.

The ink pigments broke in the alcohol and left black particles on the wood that I thought looked a lot like coal dust, so I intentionally carried out this affect on all of the wood.

As the wood dried I sorted it in a bin with colored labels to help me keep track of it all.

The trestle bents were fabricated first, and I didn't use a jig. I just glued them up right on the laminated plans. I did this at my computer while participating in our local NMRA Division virtual meeting. I built six but only needed four, so I can select the best ones to use for my model.
I was ready to add nut/bolt/washer castings, but they were delayed in the mail for weeks so I moved onto other areas of the structure. During the wait, I worked on the longitudinal beams that connect the trestle bents together. They run the full length of the trestle under the rails and the track ties attach on top of them. The prototype was made of three pieces of wood per rail that were bolted together to support the weight of the heavy hopper cars. I stained the six pieces individually and then glued them together into two units.

The trestle ties needed to be squarely attached to the longitudinal beams, and that required building a jig. I enjoy this sort of thing. I built it upside down by mistake so when I flipped the finished trestle assembly over everything was reversed. It looked fine though.

The wood was then loaded into the fixture and glued up.

Between the ties, and under where the rails go, is wood to support the weight of the railroad cars so it isn't born solely on the ties. Otherwise, when a wheel was between the ties the rail would sag down. The prototype called for three lengths of 3" wide wood to go on top of the longitudinal beams between each tie. Instead of three small pieces per gap I used one larger piece per gap, and the picture below shows where the last one has to go. They were too light in color so I stained them again in situ.

The walkways were supported by small wood extensions that projected from the ends of the ties. Harold Russell surmised that this system was probably cheaper than purchasing wider tie material, though I sure would be nervous walking on them! I glued the small wood extensions on (this view is of the trestle upside down).

The picture of the trestle showed two walkway boards next to each other on each side of the tracks. Each of those boards was two lengths end-to-end, so four pieces were needed per side. However, the actual plans show lots of smaller pieces cobbled together in various lengths that all ended on the extension boards. Perhaps over time the boards were damaged or worn out and only the broken bits replaced, hence the odd lengths. Because it was more interesting and because it was shown in the plans, I cut lots of smaller boards as seen below.

I glued on a couple of walkway pieces, flipped it over, and applied weight so that they dried flat. It took a while to do, but I didn't want warped wood (even though that would have been prototypical too). I tried adding nail holes to the boards but the "coal dust" weathering I had added made them invisible.

The trestle top was nearly finished, but as of yet trains couldn't get onto it. Something had to be done.

It was time to add the rails to the top of the trestle. I took a piece of sacrificial Micro Engineering flextrack and clipped the ties to free up the rails. They were then spray painted brown and superglued to the trestle, using an NMRA gauge to keep them the proper distance apart.

I then used a #60 drill to create some holes for Micro Engineering spikes I had on hand. The wood was soft, but I didn't want it to split so drilling was important.

Each tie received four spikes, and then I painted them a rusty brown color. If my nut/bolt/washer castings had come in I might have used them, but they hadn't so I substituted Life Like track pins (which are extremely delicate) to "bolt" down a tie at the end of the rails to stop the cars from rolling off. Believe it or not, this was what the prototype had so I copied it.

I had scribed and filed joints in the rails and added Micro Engineering fishplates from my parts pile. This detail might get me an extra point during merit judging.
Moving to other things, I worked on the foundation next. The "concrete" trestle bent piers that support the structure are styrene strip that I cut to length and roughed up with sandpaper to look like worn concrete. The concrete abutment that goes on the inner end of the trestle was actually fabricated from 18 pieces of styrene. It doesn't show it, but they are all there.

It is hollow inside, so to give it more rigidity I filled it with lead shot and then squeezed in the runniest superglue I could find.

Everything was then painted gray and weathered with oil paint washes. The abutment had some rust tones added because the metal hardware above would drip down onto it.

The prototype trestle had an earthen ramp leading up to it at a very steep grade. I didn't plan to include this on my base, but I didn't want the trestle to just exist in a vacuum. So, I took some of the leftover green florist foam I had and cut a piece matching the concrete abutment.

This was covered with ground goop and sprinkled with real dirt, ground foam, and cinders. Some Mt. Alberts Scale Lumber ties were embedded into the goop and the rails will be spiked to them when it all hardens up.

I then attached the rails to the wooden ties on the foam. I predrilled the holes even though the sharp metal spikes easily cut into the foam without resistance. And all I needed to do was wait for the n/b/w castings to arrive.

At this point, I was ready to finish the trestle but I still needed the n/b/w castings. Finally, they arrived. I used Grandt Line nut/bolt/washer castings (#5066) which is what the M.R. article called for and wow, are these things are tiny! I am not sure they actually add much to the finished model. I installed six per side in each bent in pre-drilled holes, and it took almost a minute to add each one. My shag carpet mat under my workbench ate several during the process.

The concrete piers were then attached to the bottoms of the trestle bents.

Finally, the trestle bents were glued to the underside of the trestle and it was complete.

Along the back of the trestle was a wooden fence, presumably to corral any spilled coal into a pile. It consisted of horizontal boards whose joints were hidden behind vertical boards in the front.

The back was heavily reinforced with round posts that probably were made out of telephone poles. I couldn't find any wooden rods in my supply (chopsticks were too big, skewers were too thin) so I substituted sturdy 12x12" square posts. The tops were cut at an angle per the picture of the prototype trestle. I used dark Minwax "Jacobean" stain to look like creosote instead of regular, aged wood. I later discovered a stash of painted and weathered wooden HO telephone poles I had made 10 years ago for a gondola load that were just sitting around. Doh!

The posts were then glued onto the back of the fence, and an L-shaped extension which connects to the trestle was also built.

I knew my model would need lots of coal spilled and piled here and there, so I took some real coal that I have collected (from the Arcade and Attica Railroad) and bashed it with a hammer. It was then screened through two different size sieves. It was messy, but due to the snowy and cold weather outside I had to do it in my basement.

My finished coal, in two different sizes.

I couldn't find a plaque base that was long and thin, so I cut a piece of 1x4" lumber and used my belt sander to round the edges. I then scribed registration lines for the trestle bents and concrete abutment. Finally, it was stained and polyurethaned as normal.

The base was spread with a thin layer of ground goop (my batch from November is now depleted, so I will need to make more) and the trestle bents and abutment on the end were gently embedded into it. The fence was put on next. I used a toothpick to maneuver the goop where it had to go.

Real dirt was sprinkled/poured on, as was ground foam, and matte medium was dripped onto everything. I let it dry for a day before adding the coal.

The coal was then poured in through the top of the trestle and it flowed into the areas below. The finer grade went into the left two areas, and the larger stuff went to the right. I made sure to have some spill on the trestle ties, and some naturally would be on the track on the grade.

However, I was careful not to bury the trestle bents in coal because I wanted them to remain visible for judging. So, perhaps this is of a trestle that has sold about half its supply already as there are piles here and there but certainly not a hopper car's worth.

Thankfully, the wall in the back worked to keep most of the coal in place... just like the prototype.

From this angle looking down from the top, the trestle looks dangerously spindly.

One of the requirements of the MMR: Structures certificate is that one of the twelve structures must be a bridge. While this coal trestle is arguably a bridge, I don't want to parse words and I am not going to consider it one. A bridge to me goes from somewhere to somewhere, not somewhere to nowhere (or down if you push the hopper too far!) Besides, I have another bridge project picked out. I really like how the MMR program forces you to try new things and this was a lot of fun to build. I really enjoyed working with strip wood in this application, as there was practically no warp (unlike wood sheets). This was a very satisfying project.
No comments:
Post a Comment