In my files I had the article from Harold Russell from the December 1981 Model Railroader magazine for New York, Ontario and Western Railway milk stations. The plans showed the stations in three lengths, but they all shared common architecture. They were essentially three-walled buildings with the open side facing the tracks. The side facing away from the tracks had a sliding door and farmers would drive their wagons adjacent to the door, open it, and push their cans of milk into the station. The train would stop by the platform and load the milk. It was all elevated on a platform four feet off the ground, and the plans showed no way to get up on top via stairs or a ladder. Hmmm.
The article indicated that no prototype existed, nor even pictures of them. However, that was in 1981 and a lot has changed in 40 years so I reached out to some O&W modelers for guidance on painting. I also found out just as I was finishing my model that Tichy Train Group offers a kit (#7017) for the exact milk station I was building. The platform is missing some cross-braces and it is unclear whether the rear door was modeled but you can tell it was derived from these plans.
The base was a cheap wooden plaque that I stained and polyurethaned. I then used a ruler and machinist's square to scribe registration lines where the platform bents would go. I wanted everything to line up nice and neat.
The platform called for five different sizes of wood, which I had on hand from previously building the wooden House on the Hill. Too keep them organized I colored in the plans, applied color labels to paper cups, and as I cut the pieces to size I put them in the appropriate cup. These were then stained with Minwax "Jacobean" stain which looks just like fresh creosote.
I used my laminator to protect the scale drawings and then built the platform bents right on the plastic with wood glue. It worked really well. The diagonal braces added a bit of strength.
The bents were then glued to the base (since only three of the five had diagonal braces, I had to keep them in proper order) and then a light weight was put on top to hold them in place until the glue cured.
The base was tipped on its side and taped to a metal square so it wouldn't fall over, and then I attached the rear diagonal braces.
The individual deck boards were glued onto the top and more weight was added. Spare metal pieces I keep around for just this reason came in handy.
A piece of Micro Engineering flextrack was cut up and glued down to the base. I then painted the ties in various shades of gray and black, the rail was painted brown, and the base was sceniced with ballast, real dirt, ground foam, and static grass clumps. This was the struggling O&W Railway, so I made it look a little ragged.
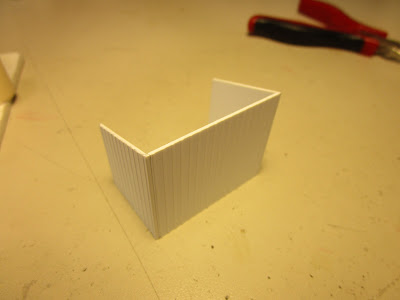
The station started off as Evergreen board and batten sheet styrene (#4543).
To give the interior the appearance of individual boards, I planked the inside with strip styrene. By the way, it was a little after this moment that I realized I was building the three-sided station backwards! The middle wall was to go on the short sides of the end, and the roof slanted up towards the tracks, not the rear wall. But, it was easily corrected.
The doorway was opened up with a knife and "Nibbler" tool, and then the roof was added. I avoided any square styrene bracing at the corners as it would all be visible, and instead quickly glued the roof on to give it rigidity and prevent warping.
The interior was detailed by planking the underside and adding rafters. Horizontal trim was applied to the sides and the rear.
The outside corners and doorway edges were framed out with strip styrene.
Sadly, the open doorway caused it to warp anyways at the bottom. I hadn't glued the door on yet because I planned to paint is separately, and as a result the building twisted. I had to add a floor inside the station to straighten out the walls, and because they were bowed several clamps were required.
It came out all right, but I have to hide the slight elevation of the floor inside later. I cut away a portion of the front and I might tray and ramp the inside floor down to match the rest of the platform's height.
The scalloped bric a brac on the front was built from individual styrene boards. I aligned them next to each other and glued a cross piece far away from the edge I planned to use. It kept them together and I would trim it off later.
I took a piece of 1/4" square styrene and held it in place, and then used my chisel blade to clip off the corners of each board up to that brace.
The brace was then removed, I calculated how long I needed the pieces to be, and I glued a board onto the back to hold them together. Once cured, it was trimmed to its final height.
It was then installed on the front of the station.
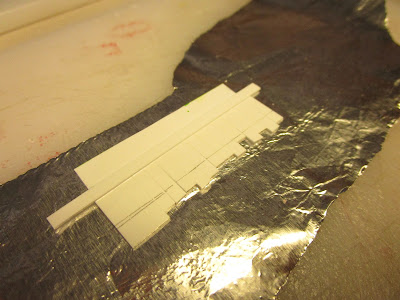
The door is a sliding type with hardware on the top suspended from from a metal track. The door is made up of four vertical boards, with the two outer ones wider than the two middle ones. I copied this out of strip styrene, and also added cross and diagonal braces like the drawing. The sliding track hardware is pieces of Evergreen C-channel cut into thin pieces and glued to the top of the door. The "track" is a piece of styrene where the knife blade is pointed. A test door that proved to be too narrow is to the right of the final door.
It was then ready for painting. I consulted with several known DL&W (sigh) modelers on the proper shades of green and headed over to the local hobby shop. It is dimly lit inside and picking out paint colors in the poor light is tough. I bought some Tamiya acrylic paints that worked really well on other projects and began painting the station green. I discovered it was gloss, and not flat (I guess one should assume a Tamiya paint IS GLOSS unless the bottle specifically says flat) and it required three coats for good coverage.
I then realized that the shade was too dark for a DL&W station, went to do some more research on the proper shade, and came to the heart-stopping realization that the drawings were NOT for a DL&W station but instead for a NYO&W station! OOPS. After consultation with several O&W modelers I was pointed to suitable shades of yellow and green for my station. However, after several coats of yellow I decided that there were just too many previous coats of paint. It was all stripped off and yellow was applied again. However, I couldn't get inside to remove it all easily without breaking the roof rafters so some build up was left. The shade was Krylon "Warm Sun."
The green on the front was a custom blend of green and yellow craft paints. I looked at the train store for a "Depot Green" color but didn't see anything suitable, and only needing it for this one area I decided to use craft paints. The stuff is thick and gloppy and hid some of the board details.
I asked around and the roofs of these buildings were sometimes tar paper, sometimes metal siding, and occasionally metal panels. Having done two buildings with tar paper, and since I already had glued on board and batten siding, I went with a metal siding roof. It was painted silver and then weathered with a black oil paint wash to look like years of coal smoke and soot. It was further drybrushed with brown acrylic paint to show rusting and corrosion.
It was at this point that the project really got frustrating. I wasn't happy with the paint (still) but I couldn't strip it and paint it again. Doing that would only make it worse. Since the O&W was a financially struggling railroad I decided to weather this building a bit and hope to hide some sins under a coat of dirt. One of the photos of a completed Tichy model from an O&W modeler showed this too, and so I wasn't without precedent. But I prefer my buildings nice and clean. The milk cans came from Model Tech Studios. I added dirt and rust to most of them, but I painted two bright silver to look like brand new milk cans. The hand dolly was a Walthers casting I painted.
I reasoned that train crews might somehow need to get on the platform without a train being there, and climbing on the deck trusses would be dangerous. So, I painted and added a ladder. I don't trust it to hold much weight though...
 |
One of the reasons I picked this model was that it was drawn by Harold Russell, so I can check that off my bucket list. Another reason was that I have never built a bridge before and I wanted to try my hand at staining wood planks, assembling them into bents, and building up a pseudo-bridge structure. I actually enjoyed building everything on the laminated plans and found it relaxing. What wasn't much fun was the painting of this structure, and I am not happy that I had to bury things under a heavy coat of weathering. But, sometimes these things happen. Also, I am a bit dismayed to discover that Tichy has a kit for this exact structure. I was hoping for something unique, yet for $10 anyone can have this model on their layout. But, it is done and I am proud of it.


No comments:
Post a Comment