My layout building hasn't ground to a halt yet, but it surely has slowed down. And not, I would argue, entirely due to me. It was getting a bit humid in the basement so last year I bought a good dehumidifier. However, its bin would fill up at least once a day and that meant I had to empty it once a day. Unfortunately, that entailed going up the stairs to our kitchen or bathroom... once a day. Lugging water isn't fun, especially with a golden retriever at the ready to trip you.
So, I hired decided to install a mess sink in the basement last summer. But, we had trouble figuring out how to tie it into the plumbing. So, this year I hired a professional to do it. Unfortunately, plans outside of my control have kept the plumber away from doing it. Once the sink is in, I can have the dehumidifier drain directly into it. This will save me wear and tear going up the stairs... and the basement will be truly dry.
On the bright side, the plumber I hired is located in one of the buildings served by the D&H on the portion of the layout I am modeling! He is located in the old Agway, right between the Colonie Liquor and the Southworth Machinery. He offered a tour of the place, which I will accept in the near future.
It is hard to justify spending a whole day in the basement when the weather is nice and there are chores to do. So, the layout sage continues...
CP Executive train in Albany

Monday, July 24, 2017
Monday, July 10, 2017
WW&F #3 coach build (part 2)
 I went to the store and bought three quarts worth of 91% isopropyl alcohol and a plastic shoe-box sized container. Then, I put all three frames (one lengthened) and all the roof parts (including the scraps) in the bin and covered them with the alcohol. I snapped the lid on and went to bed. When I woke up the next morning, not only was the paint coming right off but the glued-together frame hadn't fallen apart or warped. I used a toothbrush to strip off the old paint and it took a bit of time because it was red paint on top of red plastic, which is hard to see. Then, I set everything aside to dry.
 I noticed the frame was sagging a bit. Clearly, the styrene wasn't as strong as the wood, nor as thick. I then cut 0.060" styrene pieces to fill in the gaps in the underframe, thinking it might help. It didn't but it didn't cure it. So, on top of the 0.060" I laminated a piece of 0.040" styrene. But, when I glued it on I took care to gently bow the frame and then I glued it on. Once the glue cured, the bend counter-acted the sag and the frame was straight. I help hold it in a bow while the glue set, I suspended the frames between two paper cups with a glass on top to add a little weight. It was a pretty scientific method.
I then used small square styrene strips to rebuild the frame members on the underside. I didn't bother to do the ones along each side of the frame, as they will get cut off in the table saw. Once the frames come back, I will glue styrene strips along all of the edges to restore them.
 I wasn't sure about what to do with the original metal weights that were installed in the floors. The kit has that area cut away for the wooden floor to allow for the weight, but I didn't want to remove that much from the styrene and jeopardize its strength. Per the NMRA, the recommended weight for an On3 car that is 11" long is 9.75 ounces. If I want to include any sort of interior (and I do, because there are a lot of windows, I won't be able to just glue nuts or lead shot or anything else. I could cut thin lead to cover the entire floor below the seats, and perhaps even scribe it to look like wood. But, I will try something else. I noticed the underside of the molded interior has hollow seats. I am going to fill them with lead shot hope that this will do the trick. Since motive power will be tiny Forney engines it isn't in my best interest to make the cars too heavy.
 While that was drying, I decided begin working on the body. It consisted of of 10 pieces that made up the sides and ends, plus some interior and roof braces. The wood is super thin and the laser scribed nice board detail, and I had to be careful not to break or crack it. I had heard that wood kits warped like crazy so during the painting stages I tried not to load up one side with paint, or use a really "wet" paint mix. I used wood glue to assembly the two-part sides and ends together. Then, I took a plastic ruler I had and laid it along the entire length of the side or end and evenly applied pressure to get out any remaining air pockets or excess glue. A toothpick proved useful to help scrape away any excess that seeped out.
 The exterior of the pieces were give several light coats of Krylon #7733 "Dark Hunter Green." I think this is the right color under most lighting conditions. They had a Hunter Green that wasn't as dark which would probably look good if I was representing the sunniest of days, but it bugged me. We all have been there while looking at a paint rack, going back and forth between two close colors. I am happy with what I picked though. It went on well even without a primer (I was concerned a primer coat might fill in the laser-burned wood board detail) and without warping anything. It is really shiny which matches the well-kept appearance of the prototype, but I might apply Dullcote down the road.
Thursday, July 6, 2017
Benchwork: corner sections
 I took a week off from work and part of the time I decided would be used for my layout. I knew I was going to need to build some corner sections for my layout... four specifically. They wouldn't have to be super fancy, but the framing would definitely not be like what I had built for the main sections. Since I have a tendency to not only over-think things but also make careless mistakes when I rush, I decided to combine these two impulses together by drawing a full-size plan of the corner sections on some poster board I had.
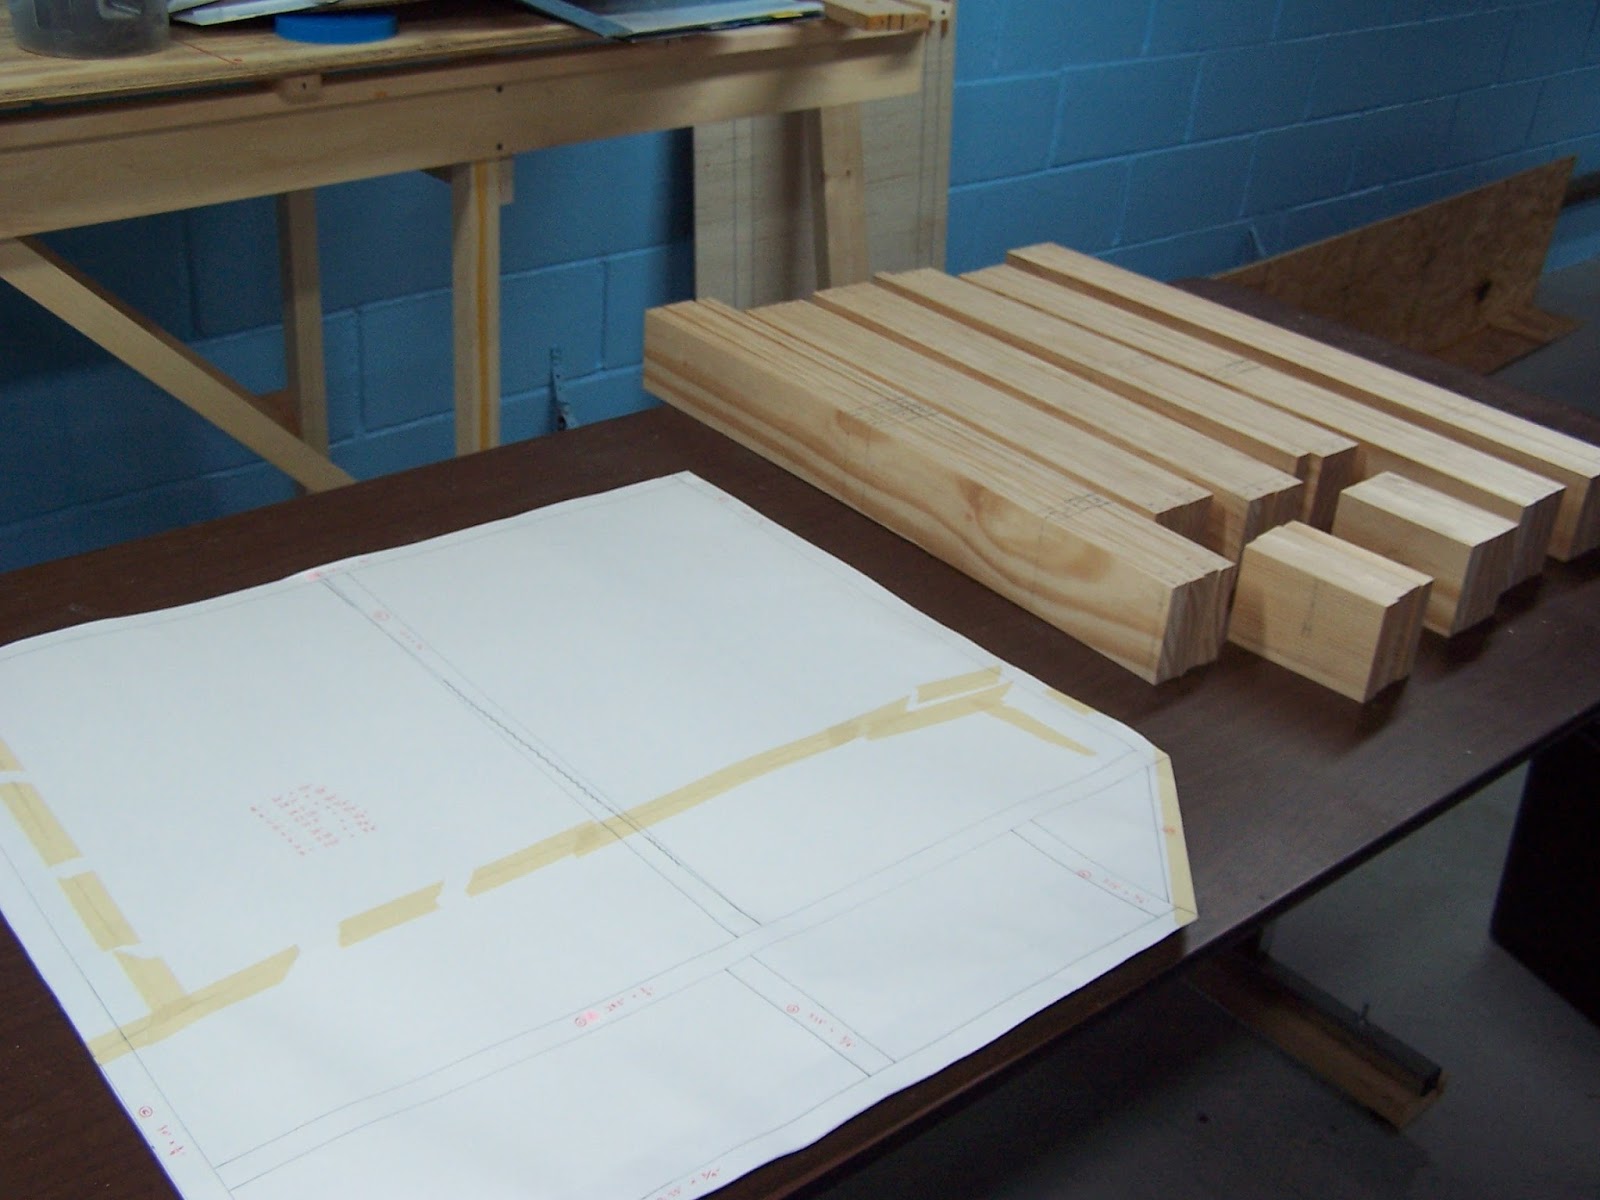 Not only could I identify each piece and where it fit into the plan, I could also take measurements directly from it and double-check my numbers to ensure that everything added up. And, since it didn't sound like it was going to be a lot of fun to build I also decided to make all four at the same time. That meant I needed to cut four of each piece, pre-drill all of the required holes for the wood screws and any wiring clearance holes, and label them to keep them from getting mixed up. It was an enjoyable 4-5 hours spread out over two days.
 Then, I built them up in an assembly-line fashion and discovered that for the most part things went exactly as they were supposed two. A couple of wrinkles did come up though. First, one of the boards I bought from the store was too bowed to use and so I laid out everything else to make it all fit on the remaining 7 good boards and some scrap 1"x4" I had on hand. Second, I cut all the pieces correctly but one didn't look like it fit right so I assumed I messed up on measuring it and I cut all eight small boards a 1/4" shorter. I then tried them and discovered they were 1/4" too short. I don't know how I made that mistake, but I suddenly again found myself short on lumber. So, I used one piece of 2"x4" in each corner section instead of two 1x4" pieces. I labeled it "UP" to keep track of which side of the corner module is supposed to be oriented up.
Total cost for the four corner sections: $85 for the 1"x4" lumber, and $19 for the plywood, for a running total of $586. I have often wondered if I should have bought pre-made Sievers benchwork. For each of the 7-foot modules the cost would have been about $106 (a 48" long piece and a 36" long piece) and I would have needed four sides for a total of $425. Four 30" corner modules would have been $225 total. Shipping would have been $130 (20% of order). So, about $780 and that doesn't include the plywood top, or the legs, or the L-girders. I would also need to adjust cross-brace spacing and angle the corner sections. But, the benchwork would be perfectly square. Did I make the right decision? I don't know. Quality benchwork is an investment, and it isn't all about dollars and sense. Because I am making mine sectional, there are a lot more joints and plenty of room for error. But, I wanted to be able to say I built it myself. Before I lay any track I will finish all the benchwork and take stock at whether it is to a high enough standard to proceed. If not, Sievers it is.
Wednesday, July 5, 2017
WW&F #3 coach build (part 1)

Online Resources
As for online resources, there are two great links. Scot Lawrence, a railroad historian and modeler with many diverse interests, bashed to Bachmann coaches together to come up with a SR&RL RR coach of the proper length. His coach construction website contains many helpful tips and tricks, and he has also offered to help me with my project. Eric Shade, a frequently contributor to Garden Railways magazine, is building the same coach in 1:13.7 scale to run on Gauge 1 track. His build thread contains lots of pictures as well as some great drawings he made. Blue Mount Model Co. also makes some WW&F freight car kits which might be a fun diversion too in the future.
Beginning Construction
 With that being said, I had to make a pretty big decision upfront when ordering: do I build it a scale 7.5' wide which will match the other Bachmann On30 equipment, or 6.5' wide to match the true Maine 2-footers? The engine I plan to use, a Bachmann Forney, is a scale 7.0' wide which is just right for a medium-sized Forney. D.R.L. offers the kit with ends of either width and you need to specify when ordering. I choose the "narrow" ones. I will mount the cars on standard On30 trucks (which will allow me to run the car on HO track) but should I ever decide to convert the cars to the proper On2 it will just mean swapping trucks.
 It is a really nice kit, and only the second laser-cut wood kit I have built. It uses Bachmann On30 coaches as donors for parts. Specifically, for each 2-foot coach you needed one and a half Bachmann coaches. This is because the Maine cars are 46' feet long, but the Bachmann coaches are much shorter. The kits essentially involve taking the Bachmann cars apart, splicing the roof together (4 roofs will yield three finished 46' long roofs), and also splicing the frames. The kits come with instructions on where exactly to cut to do this, and they provide wooden spacers for the frames. But, it all relies upon those Bachmann coaches and I had none. So, after looking on Ebay I was referred by D.R.L. to the On30 Swap Meet Yahoo group. Bingo.
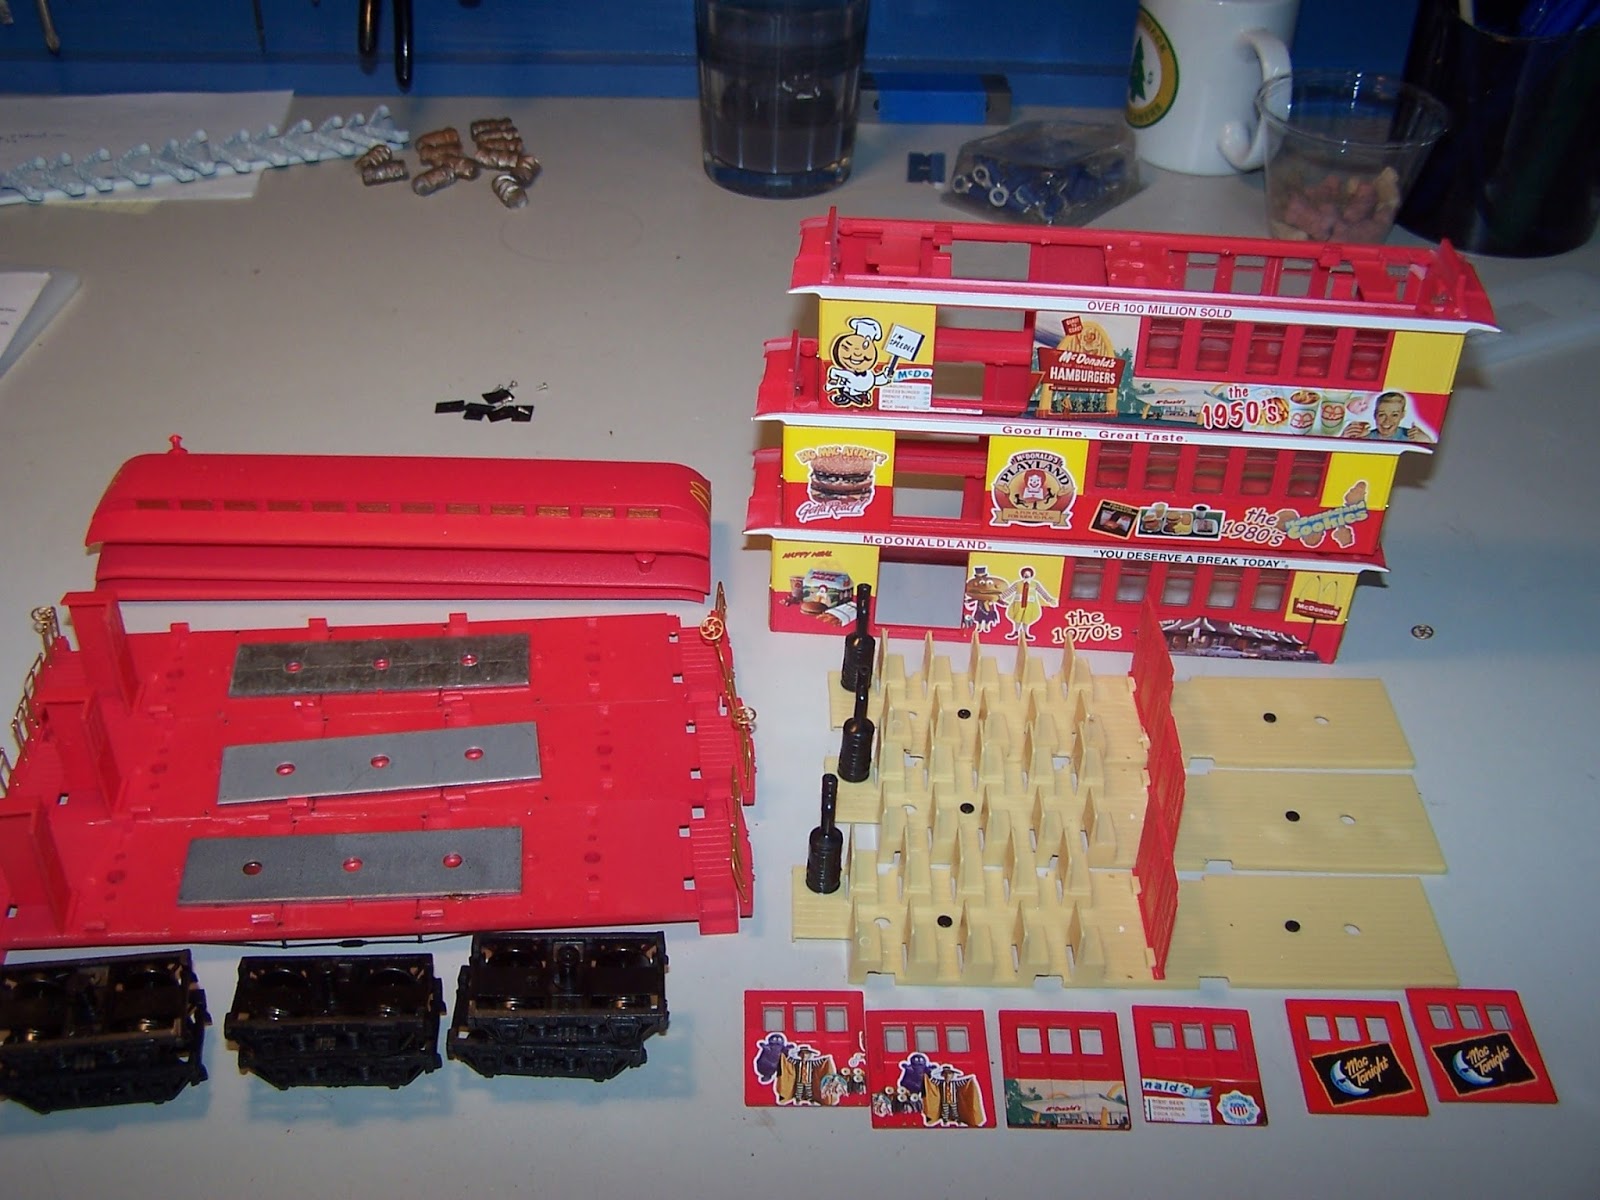 I saw a listing by someone there for cheap ($20 each) On30 coaches, but they were painted in various unrealistic "Collector" schemes. I didn't really care what I got, but I did want them to all have the same color clerestory windows (thanks Scot for the head's up!) I bought three cars- it doesn't matter if they are coaches or combines- from the seller and waited to see what arrived. When I opened the box, I was surprised to find McDonalds cars. Apparently, they must have authorized a special train set. The cars were decorated to celebrate different eras in their history, and there looks to have also been a caboose offered. I used to work as a manager at a McDonalds, and I got a kick out of them.
 Then, the kit provides you with small pieces of wood to glue to the bottom of the frame spacers to represent the floor beams. They were a nice gesture though they seemed a bit oversize for what they were supposed to do. I still used them, but likely once everything is painted black and hidden in the shadows of the car they will not even be visible. The kit is also designed to reuse the existing truss rods and end railings, but I elected to just clip them off. The railings were bent anyway, and trying to remove them was tough. I figured I would break them anyway, so I will replace them with Grandt Line parts (#3821) and wire in the future. All in all, this part of the project went pretty smoothly.
 The roofs were going to be a bit more complicated. To end up with a scale 46' long roof, I needed to combine two. Also, since the cars are going to be narrower than the stock Bachmann cars, I would then need to slice the roofs lengthwise and remove portions, and then glue everything up. I knew I didn't have the knife skills for the narrowing, so I contacted Scot (he had the website linked above) and talked with him about it. He has a miniature table saw that he purchased when he was building 2-foot coaches, and he readily agreed. The cuts to the roof are specifically called out, and the final roof is supposed to have the same spacing along the clerestory sections. Using those as a guide, I put some tape on the roof and then used a machinist's square to start the cut. I tried to hold the saw as vertical as possible.
 The first cut went pretty well, and I labeled each roof piece so I wouldn't mix them up. Because Scot was gracious enough to help, I figured I might as well make a second roof up in case I built another car in the future (or screwed this one up)! The second one didn't come out as nice. However, plastic putty and some sanding should take care of hiding the seams for the most part. I then used some styrene from my supply to reinforce the roof joints. The kits come with a piece of wood to be superglued in place, but I wanted to use styrene because the plastic welded joints would be stronger than the superglue. I didn't want the roof coming apart while being put through the table saw. I also reinforced the sides of the roof.
 I was feeling pretty good at this point when I decided to read the instructions about narrowing the roof. That is when I realized they weren't in the kit, and a sick feeling came over me. I rushed to my computer upstairs and went to the DRL website and found the instructions on not only narrowing the roof but also narrowing the frame. At this point, my frame was pretty well put together and I didn't want to take it all apart to remove a 1/4" strip down the center. The only other option I had was to just build the cars the same width as the Bachmann cars (7.5 scale feet) and order wider ends from D.R.L. However, Ed talked me off the cliff and suggested I just remove 1/8" from each side of the frame. While not an easy thing to do, Scot again offered to do it with his table saw. So, I think I am back on track. While the instructions for narrowing the roofs and frames are on the website, it would have been helpful if D.R.L. had included in the kits with narrow ends. Perhaps in the future?
Also, I plan to strip the paint before sending the pieces to be sawed. The roofs should be easy to do in 91% isopropyl alcohol, but the frames are another matter. I should have stripped the paint BEFORE building them. If I soak them now, the thin wood will warp and twist. However, I may risk it anyway because if it warps I can always replace the wooden pieces with styrene, which I prefer over wood anyway. And, the weld joint will be stronger than the superglue joint. Many things to consider...
Tuesday, July 4, 2017
New Book: Building a Sectional Layout
I was flipping through my most recent issue of Model Railroader magazine and they had a full-page advertisement for a new book by Pelle Soeborg titled "Building a Sectional Layout." Hey, I thought, I am building a sectional layout! While I think much of what is in this book probably has appeared in MR already (I remember an article from a couple of years ago by him discussing his benchwork), it seems that I might get some useful bits of advice from him.
 Specifically, I am really concerned about my benchwork joints. Some of my sections didn't come out perfectly square, though until I clamp them all up I won't really know the extent of the problem. If I were going to cover everything with a layer of foam then I could hide the joints below. While I will certainly be flipping the sections over to do the wiring, once that is done I probably will never take the pieces apart again except for rare situations (moving to a new house, remodeling the basement, etc.) Certainly not on a regular basis like an NTrak module. So, it might be easy to hide the joints with scenic "Ground Goop" and just let it be.
But, the track joints will still be an issue as far as expansion and contraction. I have seen several methods ranging from removable track pieces to soldering rails to PCB ties at the joint. I have an idea what I am going to do, but I want to do some more research. This book will help with that.
Admittedly, he models the west and mid-west regions of the USA. I think he does a fantastic job of it, but that area of the country doesn't really interest me. I think it is because I find Union Pacific railroads to be somewhat boring and overdone. But, I have several of Pelle's other books on freightcar detailing and weathering and he is a good author and excellent photographer. In short, I can't wait to get this book!
Monday, July 3, 2017
Arcade and Attica Railroad - 100th Anniversary

 Originally a three-foot narrow gauge railroad in the late 1800s, it went through a series of corporate changes (and a widening of the gauge) until 1917, when it formally became the Arcade and Attica Railroad. Primarily a freight hauler, in 1962 the railroad decided to reacquire a steam locomotive and began running excursions using ex-DL&W "Boonton" combines which, from what I understand, are pretty rare. It later purchased some coaches too. The A&A still uses the same passenger cars to this day, which is a pretty remarkable accomplishment.
So successful was the conversion from steam to diesel power in 1941 that General Electric famously featured the A&A in their promotional material for their 44-tonner engines. In 1988, the A&A decided that it didn't make sense to keep two steam engines running for excursion trains so ten-wheeler #14 (former Escanaba & Lake Superior RR) was holed up in the engine house and consolidation #18 (former Boyne City Railroad) became the primary motive power for the passenger trains. They also have four centercab diesels: two 44-ton engines (#110, 111); one 65-tonner (#112), plus an 80-tonner (#113). Though two aren't used anymore, it is still a large stable for such a short railroad. The primary freight hauled is agricultural products for the area farms, usually in covered hoppers and tank cars.
 I have been riding and photographing the line for decades, even though it hasn't changed a lot. By now, I pretty much know all the good photo opportunities. Rarely do the train consists change either (I would love to see a boxcar in the mix sometime) and the steam engine always faces North. However, after rebuilding the wye in Arcade recently the railroad decided to turn the train engine around for a couple of weekends. One was their official 100th anniversary celebrations during Memorial Day weekend (sadly, I was in Maine), and this July weekend was the other. I couldn't pass up the opportunity.
 My wife and I decided to take pictures of the first train of the day, and ride the second. It was raining off and on during the first trip, and I questioned our logic. But, the decision was made so away we went. There had been a lot of rain over the past week and various areas were flooded, making some pictures challenging and others impossible. But, we made the best of it and my wife has really turned into a great helper for me. She will have the camera ready for when I jump out of the car, or point out good places to shoot from. She has connections to the railroad too, as her grandmother lived a couple of houses down from the enginehouse.
  We rode the second trip and spent nearly the entire time in the open-air gondola. Whenever we go on train rides, we always try and get to the open car if possible because it is so much easier to take in the sights and sounds of the passing countryside. It used to be open at the top and you would get covered with water and coal bits that came up the stack, but now there is a roof. That reminds me of the time we rode it on a date ten years ago and she wore a lovely white sweater... oops! The roof also provides some shade from the hot July summers, and it is a welcome relief.
The A&A's gondola is the same car that I rode in 31 years ago, and just as loud! My wife had to cover her ears for every road crossing whistle. When I was a kid I used to as well (that's me on the right in the white shirt with the blue sleeves... in 1987!) The locomotive has had several whistles over the years, which was discussed in an interesting discussion on an online forum. They use an even quieter ones for in town and use the louder one only for out on the main line.

Everyone has a "dream house" that they would like to live in. My dream house has always been a little place in Arcade, with a railroad that cut across its driveway. It doesn't look like a dream house, but the idea of seeing a train every day always makes me smile. The large parking lot next to the house belongs to the Arcade Fire Department, so I imagine the homeowners get to hear a lot of loud noises between the trains and the fire alarms. The steam engines burn wood while in town to cut down on the black smoke from making the houses and laundry dirty, which is a nice gesture.

The picture on the right is me standing on the pilot of #14 in 1986, resplendent in solid black with yellow trim. While many consider that paint scheme to be the worst one that the A&A used (with perhaps the Halloween scheme of solid black and orange a close second), it is actually my favorite. I am sure that is entirely because it is what I remember from my childhood. Also, on the right are the wooden steps just behind the fireman, which were used to allow passengers to walk through the cab and get a tour of it. They recently brought that back, which is pretty awesome. I went through the cab on this trip but didn't take any pictures.
 When we arrived in Curriers we decided to take a picture before the engine cut off. We assumed we would have the front of the locomotive to ourselves, but beside my lovely wife is Dean, the fireman on our trip. I guess he managed to sneak into our picture! All in all, it was good to be back. I also got to talk to my friends down there and meet up with some people I knew only from online chat rooms and such. This little railroad is one of the most important things in my life. It is impossible to be in a bad mood when riding the train. It is my favorite place that I have ever been to. Even as I step off the coaches I fondly look forward to the next chance to ride it. A big "thank you" to Brad, Dean, Pat, Brian, Matt, and the rest of the gang at the A&A!
Subscribe to:
Posts (Atom)