Having finished my wooden house, I wanted to work on another small, quick building. It might not be "Merit Award" worthy but at least it would count towards the six scratchbuilt buildings total that was required. And, after building the house from wood I was ready to go back to styrene. It isn't a perfect material but by now I generally know what I am doing with it. And, I had a pretty good inventory of it already where as I had to go out and buy every piece of wood from the store. That isn't convenient if you run out on a Sunday afternoon.
So I thought about what type of scene I would love to build but can't justify fitting onto my layout. A small campground scene jumped into my head. Every year, I go with some guys to a rustic cabin in the Thousand Islands and play board games. It has electricity and water, but it isn't a quaint cottage by any means. I wanted to build something even more rustic for my next project, and the May 1992 issue of Model Railroader had plans for the perfect thing: a tar paper shack.
I started by building the floor and decking, using individual Evergreen dimensional HO scale styrene strips. It was pretty fun laying it all out and gluing it up, and I got to use my new superfine point brush that I bought just for MEK work. The actual floor portion that faces up is Evergreen scribed siding.
The walls were cut from styrene and I used my HO scale ruler, which I rarely had need for. Now I realize why all plans always specify HO scale feet in 3" increments... that is what the ruler graduations are! I also cut out the window and door openings.
The walls were glued up onto the base, and braced with small (0.060" square) styrene. This time, since it would be possible to look inside the shack, I didn't use my 1/4" square stock for bracing. It would just be overkill. I also added some horizontal exterior bracing for future awnings.
Though it really can't be seen, for extra points I built an interior. There is a bed, complete with mattress, a green sleeping bag, and a fluffy pillow with pinched edges. In the corner is a small wood burning stove. All were scratchbuilt from styrene or pieces of sprues.
The outside walls were sheathed in "tar paper " made from single-ply tissue paper soaked in the runniest superglue I could find. Once dry, the edges were trimmed. Perfection wasn't required. I did each wall one at a time, as trying to wrap soaked tissue around once it had glue on it was a recipe for disaster.
Once dry, the tissue paper was painted flat black and it instantly took on the appearance of new tar paper. Clamped in the clothespins are scale wooden 1"x2" lumber (real stripwood) painted gray for use later as battens. For something so small, wood worked better than styrene as paint flaked off the plastic too easily but was absorbed readily by the wood.
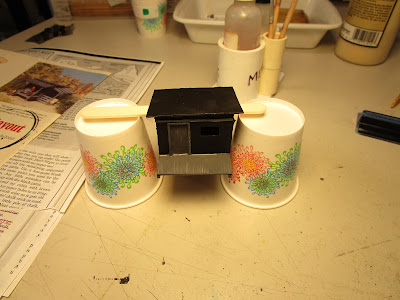
The porch, and door frame, and any other wooden supports were painted gray. I suspended the shack while drying as I was running out of safe places to hold it.
To secure the tar paper to the sides of structures, wooden battens are nailed in place. I simulated them with the gray painted stripwood, and no attempt was made at perfection because this was a rustic shack and some online photos I found showed the same level of "craftsmanship." This Old House would not be pleased.
The roof battens required bracing and pressure at times, and a collection of metal weights came in handy.
I simulated roof rafters by adding wood beams peaking out from the roof overhang on the front.
The front porch was built up from strip and sheet styrene.
The side fenced in area started off as strip styrene that I assembled on an index card for handy reference lines for parallelism.
Then, it was put together and painted gray and mounted to the side of the building. The white patch was where my clothespin held it while painting it. I touched it up later.
The two new roof assemblies were tar papered like before. I was concerned the superglue fumes would turn the black paint a hazy white but this never occurred. I knew I could always slap on some more black paint so I did it this way, but nevertheless for finished models I would be careful about doing it in this order.
One thing I discovered in this process was I was constantly touching up spots either black or gray. I would add a piece of wood and forget to paint the ends before gluing it on, so I would use a toothpick to make them gray. But I would mistakenly touch the black, so I would get another toothpick to restore the black color. Back and forth, over and over. It was maddening. But, I knew if I cut the stripwood into tiny bits and then painted the ends I would end up losing them during the drying process.
The wooden foundation posts are stripwood that I first dyed with an alcohol and India ink solution. This didn't look right, so I then used Minway "Jacobean" colored stain to turn them blackish-brown. It looks just like creosote, smells like a petroleum product, and dries to a semi-shiny appearance that is just perfect for what I want. I usually use it to stain railroad ties.
The posts were glued to the foundation of the building. Then, I smeared some "ground goop" on a wooden plaque base I had stained and polyurethaned and set the shack in place. After that, real dirt and ground foam were sprinkled around the edges.
Windows were covered by wooden panels, covered in tar paper, and propped open with wooden sticks. No window glass, no tight fitting windows, and lots of draft. The shutters started off as pieces of styrene that I covered in tissue paper.
They were then trimmed, painted black, and glued in place. Small slivers of "new" wood (treated with India ink and alcohol instead of gray paint) were used to prop them open. I used various means to keep them in place until the glue dried.
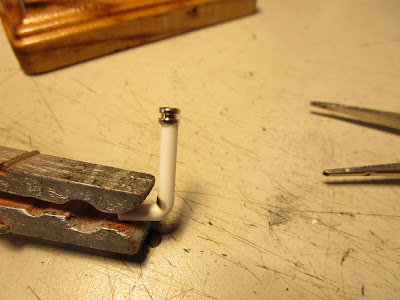
The smokejack out the back started off as a piece of round Evergreen rod that I bent over a small flame and then let cool. (I frequently burn candles in the basement as I find it relaxing... here it also proved handy).
The metal ball end of a guitar string was glued on the top. I always save guitar string ends (I play guitar) as they are very useful for different things. Being turned metal, they look and shine like metal.
A flange was made by drilling a hole in a piece of styrene, cutting a square shape around it, and gluing it onto the smokejack. I then painted it all silver.
I drilled a hole in the back of the shack and glued it on.
Some exterior details I added included static grass clumps and a load of firewood split from actual twigs I collected outside.
The front staircase was an extra one I built for my "House on the Hill" building that turned out to be too narrow. Here, though, I think it is just right. Castings from old Atlas kits in my scrapbox (a table, a bench, and a shovel that I painted) completed the scene. I threw some old boards underneath as well to clutter it up a little bit.
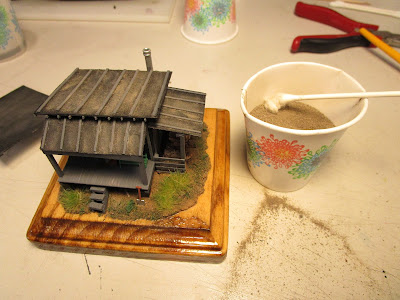
I weathered the tar paper using finely sifted real dirt that I ground into the tissue paper. The rough texture helped it grab. More weathering was applied on the roof, and less on the sides. I was careful not to hit the battens and knock them off.
The front porch was given a dark oil paint wash to look like dirty, old deck boards losing their paint.
The smokejack got an oil paint wash of rusty burnt sienna.
I have decided I like building these small structures. They aren't massive like my Albany Tomato Company, and don't suck up dozens or hundreds of hours like huge craftsman kits from companies such as Fine Scale Miniatures. They allow me to detail little scenes (referred to as "cameos" in British modeling magazines) without getting burned out. They aren't impressive with their mass, but they do allow me to build things I otherwise wouldn't have need to. I have already started on my next one.


No comments:
Post a Comment