Yay! I hit the point on my layout where my trackwork was finished and wired up again which meant that mentally I could move onto other things. And, it wasn't a moment too soon as it is getting cold outside which is the perfect weather for "work bench projects" where you can sit down at your work bench and just relax and plug away at whatever strikes your fancy. I have three scratchbuilt cars in various stages of construction, an engine project in the works, and a couple of other things teasing me from my storage shelves. So, it was time to get cracking.

I hadn't touched my D&H bobber caboose in nearly 10 months, and part of that was because I turned my focus to my live steam (1/8 scale) engine and caboose projects. But, this little guy needed some love too. The last thing I remember I needed to work on when I set the project down was installing four wire "hooks" along the sides that would hold the marker lamps. For this, I had purchased a mini-drill chuck for my Dremel tool as well as a speed controller (
later determined to not be compatible) to drill the holes. So, I used the miniature chuck in my new battery cordless drill and the four holes were made. It took all of a minute.

Then, I focused my attention on the roof. I had procrastinated how I wanted to model the tar paper roof. In fact, I can't be sure the prototype had tar paper but I assume it did for such an old caboose. Besides, no one else probably knows either. Two ways to model tar paper are to use single-ply tissue secured with glue or paint, or masking or painter's tape struck directly on. Either requires the surface to be clean, and both make it tough to fully wash the caboose after, so I first gave it a bath in soap and water. Then, I went with the painter's tape because I had it on hand and liked the texture of it. Tar paper comes in rolls 36" wide, so I cut my tape into strips 11/16" wide which is pretty close when scaled up. I then overlapped them by what looks like about a scale 6".

I could have drawn lines on the roof where I wanted the edges of the tape to stop, as that would have given me perfect stripes without the chance for errors. But, in real life I don't think they do that and I was pretty confident I could get them "close enough." I made sure to burnish the tape down hard on the roof, and especially by the edges, as any peeling up (
though realistic) would not look very good. Having cleaned the body and roof first, I was pretty sure this stuff would stick fine. I did this once for a G-scale freight car roof and it has held up for over 10 years without any peeling. Masking tape, which is even stickier than painter's tape, would probably work even better.

For the area around the smoke jack, I cut away a semi-circle from the edge of the tape before peeling it off my cutting surface. Then, it was just a matter applying the tape with the cut-out portion around the jack. I did this from both directions, and by sure happenstance it all worked out fine. I will go over the area with something, perhaps yellow glue or thick super glue gel, to represent tar that is hand brushed around the cut areas. This will not only look realistic but also secure the cut edges of the tape. Then, the tape was firmly pushed down all over again and the sides were trimmed along the edge.

Now, it was the moment of truth. The body itself is now complete except for two added details: I need to fabricate a three-legged seat for the top and I also may build or purchase some marker lamps. Neither of which will hold up the painting, and getting it red will give me the push I need to start the harder parts like fabricating the handrails or end platforms. So, I first game everything three or four light coats of Valspar gray primer from a spray can. I didn't focus on complete coverage for the coats and instead just made sure I was careful not to flood the car with paint and get drips. I first worked on the windows and overhang areas, and then the sides. With a white body I am not sure the primer is even necessary, but I figured it would help.

Then, looking over my selection of red spray paint rattle cans (
I don't own an airbrush) I settled on Testors Flat Red. I assume that because it is Testors and not Rustoleum or Valspar or Krylon that the pigment will be much finer. Since this car is scratchbuilt and I don't know how to strip Rustoleum paint, I couldn't take any chances with the painting. Any drips or build-up will instantly get noticed during NMRA judging. Again, various slight mist coats were applied until I was happy with the red on the sides. I was really pleased with the shade of red, which looks pretty close to what the D&H caboose is.

The roof needed to be painted black, but as per usual I had run out of black paint (
unless I used black sparkle paint, which didn't seem to be the look I was after). So, I ordered some and when it arrived the roof was brush painted. The edges came out pretty clean but I had to touch up the red a little by spraying the paint into a cup and then brushing it. I may do a second coat of black but I am not sure yet. I finished by replicating a "tar seal" around the smoke jack by running a thin ring of wood glue along the bottom, then painting it black. Then, after several days (
weeks actually) of letting it all dry I gave everything a nice coat of Testors Glosscote in preparation for the decaling.

 I hadn't touched my D&H bobber caboose in nearly 10 months, and part of that was because I turned my focus to my live steam (1/8 scale) engine and caboose projects. But, this little guy needed some love too. The last thing I remember I needed to work on when I set the project down was installing four wire "hooks" along the sides that would hold the marker lamps. For this, I had purchased a mini-drill chuck for my Dremel tool as well as a speed controller (later determined to not be compatible) to drill the holes. So, I used the miniature chuck in my new battery cordless drill and the four holes were made. It took all of a minute.
 Then, I focused my attention on the roof. I had procrastinated how I wanted to model the tar paper roof. In fact, I can't be sure the prototype had tar paper but I assume it did for such an old caboose. Besides, no one else probably knows either. Two ways to model tar paper are to use single-ply tissue secured with glue or paint, or masking or painter's tape struck directly on. Either requires the surface to be clean, and both make it tough to fully wash the caboose after, so I first gave it a bath in soap and water. Then, I went with the painter's tape because I had it on hand and liked the texture of it. Tar paper comes in rolls 36" wide, so I cut my tape into strips 11/16" wide which is pretty close when scaled up. I then overlapped them by what looks like about a scale 6".
 I could have drawn lines on the roof where I wanted the edges of the tape to stop, as that would have given me perfect stripes without the chance for errors. But, in real life I don't think they do that and I was pretty confident I could get them "close enough." I made sure to burnish the tape down hard on the roof, and especially by the edges, as any peeling up (though realistic) would not look very good. Having cleaned the body and roof first, I was pretty sure this stuff would stick fine. I did this once for a G-scale freight car roof and it has held up for over 10 years without any peeling. Masking tape, which is even stickier than painter's tape, would probably work even better.
 For the area around the smoke jack, I cut away a semi-circle from the edge of the tape before peeling it off my cutting surface. Then, it was just a matter applying the tape with the cut-out portion around the jack. I did this from both directions, and by sure happenstance it all worked out fine. I will go over the area with something, perhaps yellow glue or thick super glue gel, to represent tar that is hand brushed around the cut areas. This will not only look realistic but also secure the cut edges of the tape. Then, the tape was firmly pushed down all over again and the sides were trimmed along the edge.
 Now, it was the moment of truth. The body itself is now complete except for two added details: I need to fabricate a three-legged seat for the top and I also may build or purchase some marker lamps. Neither of which will hold up the painting, and getting it red will give me the push I need to start the harder parts like fabricating the handrails or end platforms. So, I first game everything three or four light coats of Valspar gray primer from a spray can. I didn't focus on complete coverage for the coats and instead just made sure I was careful not to flood the car with paint and get drips. I first worked on the windows and overhang areas, and then the sides. With a white body I am not sure the primer is even necessary, but I figured it would help.
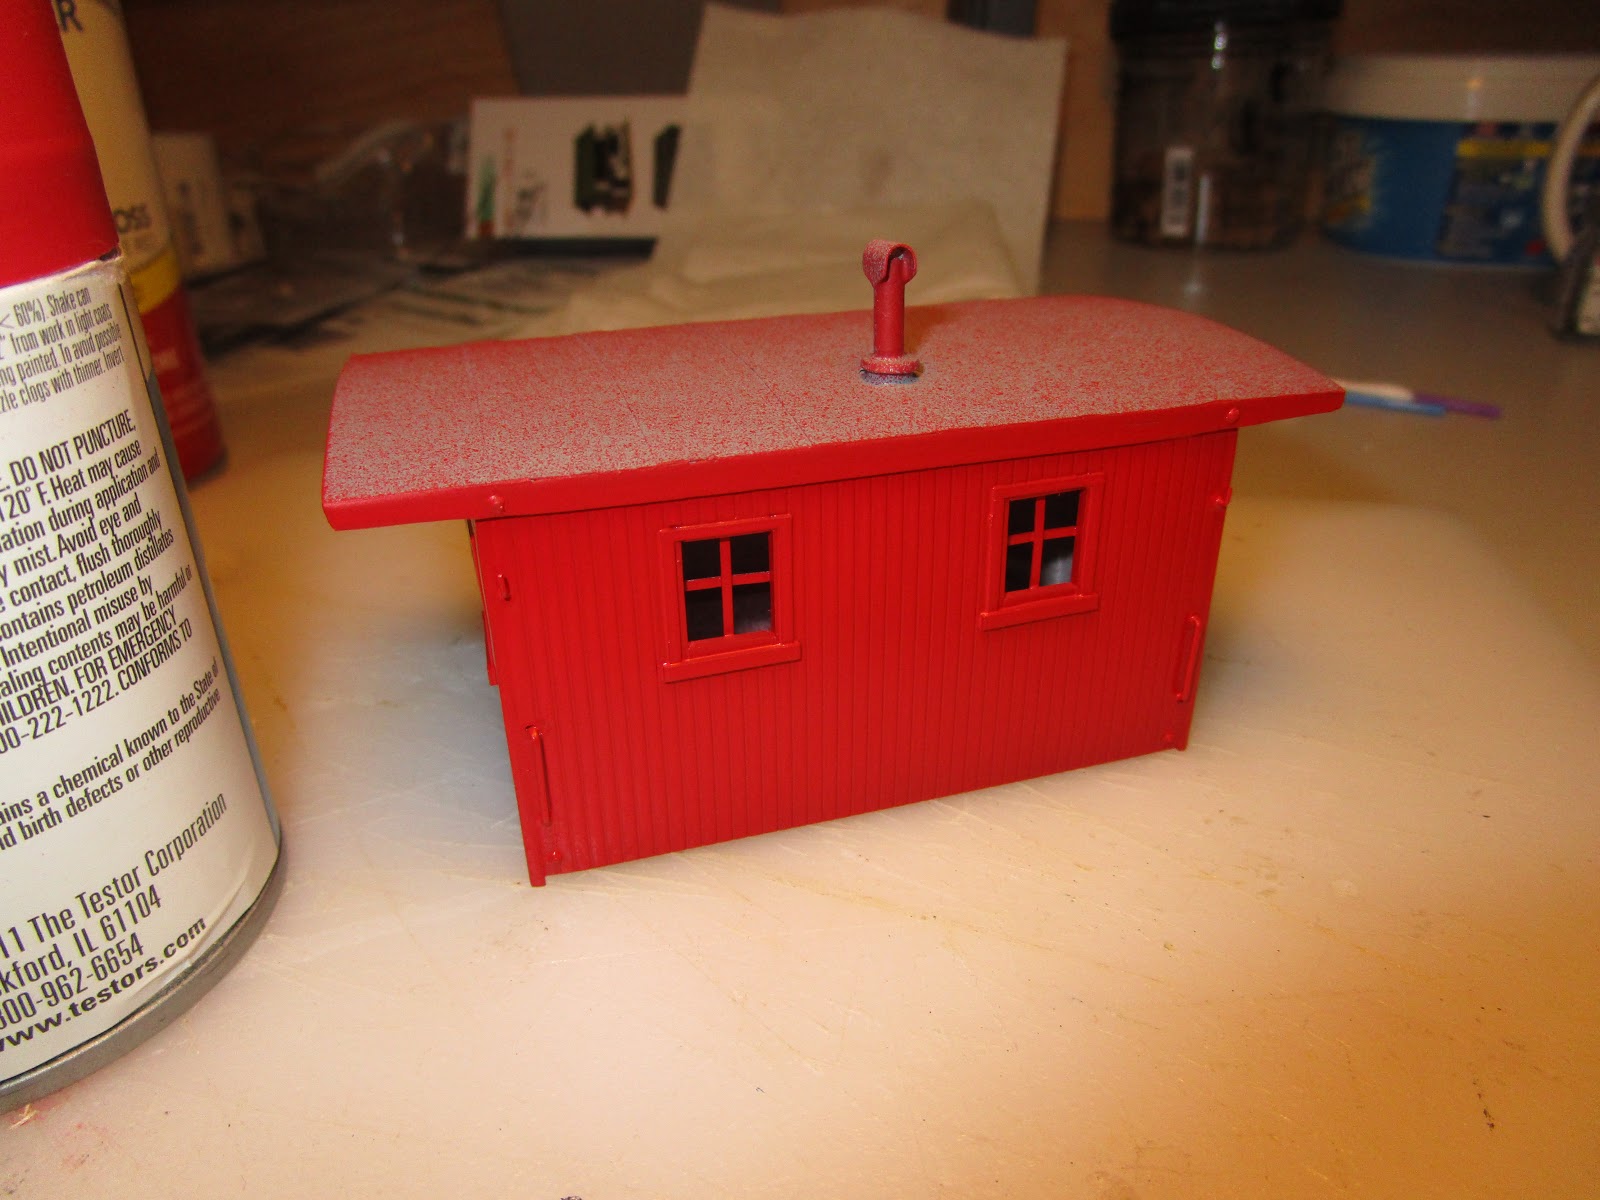 Then, looking over my selection of red spray paint rattle cans (I don't own an airbrush) I settled on Testors Flat Red. I assume that because it is Testors and not Rustoleum or Valspar or Krylon that the pigment will be much finer. Since this car is scratchbuilt and I don't know how to strip Rustoleum paint, I couldn't take any chances with the painting. Any drips or build-up will instantly get noticed during NMRA judging. Again, various slight mist coats were applied until I was happy with the red on the sides. I was really pleased with the shade of red, which looks pretty close to what the D&H caboose is.
 The roof needed to be painted black, but as per usual I had run out of black paint (unless I used black sparkle paint, which didn't seem to be the look I was after). So, I ordered some and when it arrived the roof was brush painted. The edges came out pretty clean but I had to touch up the red a little by spraying the paint into a cup and then brushing it. I may do a second coat of black but I am not sure yet. I finished by replicating a "tar seal" around the smoke jack by running a thin ring of wood glue along the bottom, then painting it black. Then, after several days (weeks actually) of letting it all dry I gave everything a nice coat of Testors Glosscote in preparation for the decaling.
No comments:
Post a Comment