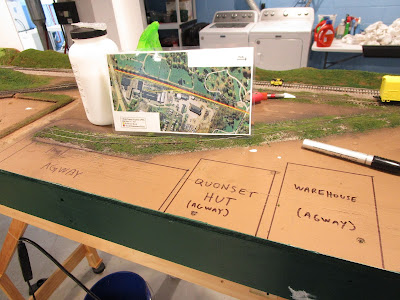
With a full three-day holiday weekend available to me, I decided to really get serious about working on the North Menands section of my layout. I redid some scenery, added ballast, and started planning in full size how my structures would go. This included the Agway complex, which contained at least three buildings. For an overview how they all fit into the area I am calling "North Menands", see here. This is what the complex currently looks like. You will need to imagine a railroad spur leaving the mainline and cutting through where the thick trees are to run parallel to the larger building on the right.
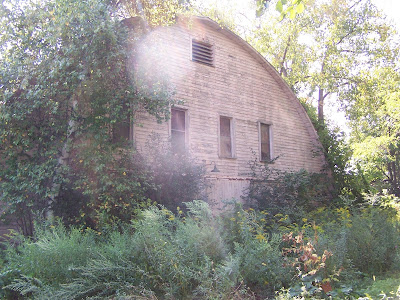
This Agway still was receiving rail service in 1984. I didn't have many good pictures of how it existed at that time, and this is the only one showing it:
While drawing up my plans for these buildings, I realized that most of their square footage would be cut off by the aisle. I had to selectively compress everything, but the Quonset hut (the middle building) was especially difficult because they are generally built to a common set of proportions and if I made it too thin then its height would need to be reduced accordingly, making it look extremely silly.
So, I started with this building. Plus, my wife was using our computer and I couldn't easily access the pictures I took of the other buildings. This led to an issue later on that only reinforces this important rule: always have reference pictures available when you are building something!
I determined that a width of 4.75" inches and a depth of about 5" would produce a building that was large enough to give the impression of what I wanted without dominating the scene or looking too small. Its height would be determined later. The prototype picture below shows it to be a pretty neat looking building but sadly I couldn't build it to size.
I then looked in the recent Walthers' catalog to see if there were any commercial kits that would work. Rix had one (628-410) but it was too small for what I needed. I found a Busch "Airplane Hangar" (189-1408) that looked promising but it was too big and the curvature of the roof arch didn't match that of a quonset hut. One kit was too little, one kit was too big... I needed one that was just right. So I decided to scratchbuild it.
I assumed that the end profiles were essentially half-circles along the roof line. Perhaps the area where the arch intersects with the ground it actually straightened but I wasn't sure. And I didn't have access to the internet. So I forged ahead. Styrene is cheap (did I mention I bought another two 4'x8' sheets of 0.040" recently?) and I was in the mood for cutting and gluing.
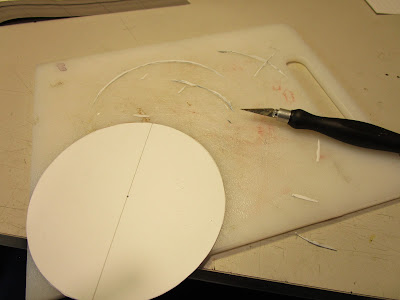
Based on my width dimension of 4.75", I pulled out my trusty compass and drew a circle on some styrene. This was cut in half and then I had the two ends marked out. I cut close to them with a knife, and then used my belt sander to go right to the pencil mark. Some sanding sticks smoothed over any areas that needed a touch up. One end was used as a template to mark a middle interior brace.
The two ends were then glued to a piece of styrene that I had cut to the dimension of the base, and the interior joints were braced with pieces of 0.25" square styrene.
The middle brace was installed the same way, and then two more pieces of square styrene connected them at the top to prevent collapsing when the wrapper was installed.
At this point I installed vertical styrene corrugated siding pattern sheets to the ends, which matched most Quonset huts I had seen in my life. Unfortunately, the prototype is not like "most" and it actually had horizontal wooden siding installed on the ends. The picture below is of the side facing the tracks. My compressed size of the building makes modeling it with all of the windows impossible, but I decided to add some detail. If you look carefully just below the two innermost windows you can see a green gooseneck lamp that is hanging above a sliding door (hidden by the brush). I may add that light, because it will give my scene extra points for the MMR scenery certificate.
The first roof layer was made from a long piece of 0.040" styrene, cut to width allowing for a little overhang on the ends and taped to one side. It was then bent over the curve and pulled tightly, and then the other non-taped joint was flooded with MEK and allowed to set. I had to hold it in position for a good ten minutes while it dried. I then ran MEK along the curved arch and let it set. The next morning, I removed each piece of tape one at a time, added MEK to the joint, and retaped it. Once cured, it was nice and strong. Any gaps along the roof will be hidden later.
Before going on, I set it on the layout to check its relative size and see if it was what I was looking for. It was fine, though I really wish I had room to make it larger.
I then decided to strengthen the roof by laminating on another plain piece of styrene. I cut it a little wider than the first one to give me some extra overhang on the ends. To mount this one, I decided to go with the Pliobond contact cement I had used over the summer. I remembered that it had worked well (though it smelled terrible). I applied two coats to each surface, let them dry, and then in one smooth movement bent it over the existing structure.
However, this idea was a bust. Even though I carefully followed the instructions it never formed a nice solid bond. My Pliobond was only 6 months old, which should have been "fresh enough" to work. Maybe I should have scuffed up both pieces of styrene first so that the contact cement would have had something to grip. Regardless, I resorted to MEK and superglue.
As noted above, I then rushed ahead and glued on some styrene Embossed Pattern Sheets brand #97402 corrugated styrene sheet vertically on the ends. I later discovered this was all wrong for the ends, which had horizontal wooden siding. It didn't stop me from sketching out where the sliding door and upper air vent would be located. I plan to add these details on the track-facing side, but left off all of the windows.
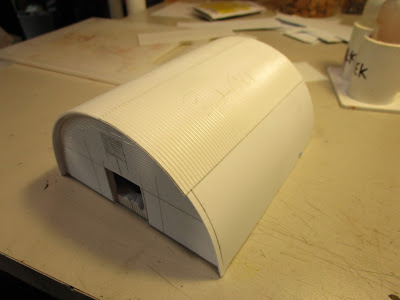
I then glued on some Evergreen O scale freight car scribed siding #2067, which was perfect in size for the large HO scale wooden siding. There were some gaps along the edges of the joints where the contact cement had not fully secured the pieces together, but they were hidden behind a trim piece of 0.060" square styrene that I bent around the entire curve and then secured in place with MEK.
On the trackside end, I cut a square hole in the subwall before gluing on the horizontal siding. The door on the end will be removable, and behind it will be a hole which will allow me access to run the wires from the gooseneck light through the building to the benchwork if the bulb ever burns out. At least in theory that is why I did it this way.
After looking at more prototype pictures (finally!) I noticed that the roof was made up of lots of panels running the length of the roof, but with seams every so often. I simulated this by cutting more of the corrugated styrene into strips about 2" wide, and then gluing them along the roof.
It took a while to get all the joints in place, as I had to hold the edges down with a metal straightedge to avoid fingerprints marring the soft plastic and there really was no easy way to clamp things.
I installed some details on the trackside end including a sliding door track made from some styrene I-channel and L-angle, as well as a vent along the top made from a Pikestuff casting (#541-1009). Then, I washed everything in soap and water in preparation for painting.
Assuming that masking the roof would be easier than masking the ends, I painted the roof first. The prototype roof looks like it the corrugated metal was left in its natural silver color, and it weathered or corroded to a whitish finish. In addition, the dips in the corrugations trapped water, dirt, and rust and left interesting weathering patterns. I started by spraying the roof with Rustoleum "Silver Metallic" #7271, which I thought would be a good silver color. However, upon spraying I could see silver flake particles floating in the paint and they pooled in areas. Once I weathered it they went away, but a non-sparkly silver would have been a better choice. After that I drybrushed the entire roof with "Dolphin Gray" acrylic paint, which allowed some of the silver to show through. It was just the effect I was after, and now it looked like chalky, weathered metal.
The roof was then given a shot of Dullcote and weathered with brown and black oil paint and mineral spirits.
For the wood siding ends, I first went to the hobby store and bought a bottle of tan paint but when I tried it out I realized it was too "orangish". So, instead I used some Valspar tan spray paint whose color was called "Rugged" (#84230) that I had lying around. After masking the roof, I applied several light coats and it was ready for final weathering and detailing.
Weathering was done with oil paint washes, mostly focusing on brown to represent the years of dirt that would blow against the sides and wear down the paint. In the 2010 pictures above, the paint was heavily peeling and the rubber-cement trick would be a good way to replicate it. However, I don't think the building was as in such bad shape 26 years before so I just left the paint dirty with only a few peeling/worn spots.
I still need to install and wire the gooseneck lamp, and then glue the sliding door on and plant the building. I am looking into the light now. And I think I have a nifty trick for powering it up. Stay tuned.


Excellent write-up! Seems like a scratchbuilding project maybe I could even handle, especially following your article. Thanks and keep up the good work.
ReplyDelete