CP Executive train in Albany

CP Executive train in Albany

Friday, April 30, 2021

Commercially available Arcade & Attica Railroad models

I moderate a forum on Railroad.net devoted to the Arcade & Attica Railroad, a shortline in western NY. One of the threads is a listing of models that are commercially available painted for the A&A. There are times when I want to quickly see what I have in my collection so I decided to make this post on my blog that I can easily access. It won't mean much to non-A&A people, and it really shouldn't be on a D&H blog... but it is my blog. The information below is not only for my personal archival purposes but also to record the history behind the manufacturing of the models. Anything highlighted is an item in my collection.

N Scale:

 Boxcar: 40', Orange & White scheme, Road #501 - ConCor (item #01001T) 
 Boxcar: 40', Orange & White scheme, Road #533 - ConCor (item #01001T)
            *note same item number, but different artwork and road numbers!
 Boxcar: 40', Orange & White scheme, Road #506 - Micro Trains Lines (item #024 00 330)


HO Scale:
 Steam Locomotive 4-6-0 "Casey Jones" lettered for Arcade & Attica - A.H.M. (item #5151-C)                         *Below is a scan of an AHM advertisement!

 44-Ton Diesel - Bachmann models custom painted as A&A #110 and #111 by KVAL Hobbies in Buffalo in black/orange "crew cut" scheme.

 44-Ton Diesel - Rapido models custom painted as A&A #111 for Factory Direct Hobbies (item #048536). (Due out in 2024)

 Boxcar: 40', solid blue scheme, Road #512 (Bowser, item #41760)
 Boxcar: 40', solid blue scheme, Road #517 (Bowser, item #41761)
 Boxcar: 40', solid blue scheme, Road #522 (Bowser, item #41762)

 Boxcar: 40', Orange & White scheme, Road #505 (Bowser, item #41275)
 Boxcar: 40', Orange & White scheme, Road #507 (Bowser, item #41276)
 Boxcar: 40', Orange & White scheme, Road #510 (Bowser, item #41277)

 Boxcar: 40', Orange & White scheme, Road #501 (Athearn/Tioga Trains, item #____)
 Boxcar: 40', Orange & White scheme, Road #503 (Athearn/Tioga Trains, item #____)
 Boxcar: 40', Orange & White scheme, Road #504 (Athearn/Tioga Trains, item #____)
 Boxcar: 40', Orange & White scheme, Road #506 (Athearn/Tioga Trains, item #____)
 Boxcar: 40', Orange & White scheme, Road #510 (Athearn/Tioga Trains, item #____)
 Boxcar: 40', Orange & White scheme, Road #512 (Athearn/Tioga Trains, item #____)
 Boxcar: 40', Orange & White scheme, Road #513 (unknown manufacturer, #____)                   Boxcar: 40', Orange & White scheme, Road #540 (JMC, #____)

 Boxcar: 40', Blue & White scheme, Road #231 (Athearn/Bev-Bel, item #1064)
 Boxcar: 40', Blue & White scheme, Road #234 (Athearn/Bev-Bel, item #1064-1)
 Boxcar: 40', Blue & White scheme, Road #238 (Athearn/Bev-Bel, item #1064-2)

▪ Caboose: wide vision, maroon and cream scheme, Road #100 (Athearn model)                                             * custom painted and sold on Ebay, but it is a fantasy paint scheme.

 Caboose (Keystone Locomotive Works, item #395-114)    
               * Listed in the Walthers 1988 HO scale catalog on p.100. No picture, price is listed as "TBA." There is a sad history on this. Originally conceived in the late 1970s, a lot of research was done in preparation of this model. KLW was a business run by a couple. However, when the husband passed away in 1983 the kit was put on hold and never materialized. The wife still runs KLW. She wasn't sure why the item was still listed in the Walthers 1988 catalog.

 Sandhouse: Arcade Sandhouse structure kit - Freshwater Models
           *Announced on Railroad.net in 2006, but for different reasons it was never produced.

S Scale
 nothing known

O Scale
 Boxcar: 40', Orange & White scheme, Road #507 (MTH, item #30-74009)
            * Note: I own the MTH factory prototype car as well as a regular production model.

 Tender: black with orange lettering, no Road # (U.S.T.T.C., item #201)

 Coach: orange with black lettering, Road #504 (U.S.T.T.C., item #501)

 Gondola: black with yellow lettering, Road #301 (U.S.T.T.C., item #301)

 Boxcar: yellow with red roof and trim, Road #403 (U.S.T.T.C., item #403)

 Caboose: center cupola, red with black roof, Road 901 (U.S.T.T.C., item #901)

 Caboose: end cupola, red with black roof, Road 901 (U.S.T.T.C., item #901)

 Station: orange with black/white trim and paper label that says "Curriers" (U.S.T.T.C., item #____)
            *See here for an online forum discussion; here for a discussion of the USTTC; and here for a detailed history of a USTTC (but perhaps not the same one that made these cars)

Buffalo Creek Graphics cars

 Boxcar: 40', solid blue scheme, "standard" lettering, Road #512 (BCG, item #OH121)

 Boxcar: 40', solid blue scheme, "assigned service" lettering, Road #517 (BCG, item #OH121)
 Boxcar: 40', solid blue scheme, "assigned service" lettering, Road #521 (BCG, item #OH121)

 Boxcar: 40', Red/Black, Road #411 (BCG, item #_____)                                                  

* Buffalo Creek Graphics made only 5 total of the red/black cars for the 2009 NKPHTS Convention and as special gifts!

Roberts Trains / Kris Model Trains

▪ there is an extensive amount of cars in body colors of yellow, blue, white and green shown here

Large/G scale

 nothing known

Decals (all scales)
 Walthers: O scale, #279-10; set for Orange & White boxcar

▪ Walthers: HO scale, #934-279100; set for Orange and White boxcar
 Modern Rails: has decals available in several scales for A&A equipment.
            *Engines below are 1:29 scale and were painted and decaled for me by Modern Rails

Tuesday, April 27, 2021

Structure - Benton Station in N scale

I wanted to do something different for one of my MMR structures. O scale would have resulted in a large building, and I had already built a few models in O scale already, so I thought small... N scale. Every N scaler is aware of the online "N Scale Encyclopedia" database and its accompanying railroad blogs where the modeler, Mark, has scratchbuilt lots of N scale structures. I have followed his website for over 15 years and decided that I would draw inspiration from him and do something in 1:160 scale myself. 

Casting a net for a suitable prototype to copy, I knew I wanted it to be something that would have railroad track near it. That meant stations, depots, MOW structures, and/or rail served industries. Having done several brick buildings recently, I wanted a wood sided structure (though built from styrene, which I prefer). I searched Model Railroader magazine and found an article by Howard Lloyd in the January 1997 issue for a simple passenger station. It looked promising, and it had nice roof lines and windows which made it more than a four-walls-and-a-roof proposition. One of his pictures showed it on his layout where he had added additional extensions to make a Maintenance of Way (MOW) facility. I liked it a lot. When he mentioned that that the prototype station was based in Benton, Wisconsin, I was hooked!

Going about it backwards, I first asked my friend Doug for a piece of Atlas code 55 flextrack. He is an excellent N scale modeler and I wanted to use something nicer than the Peco code 80 track that I had lying around. Wow, was this stuff good looking. Atlas did a great job with it. Then, I photocopied the HO scale plans to N scale and picked up some Evergreen v-groove styrene siding (#4040). I laid out the walls on the stuff and cut them out. 

It turns out I made the first three walls incorrectly with the wood boards running vertical instead of horizontal. But in N scale, that meant very little was wasted as each wall was about the size of a quarter. This was kind of fun! As I cut out the window and door openings I installed the castings, which were so small that I had to use microfiles to clean out the openings. Tichy window (#2509) and door (#2503) castings were used throughout.

The walls went together quickly and I used small, square bracing in the corners. One end has a sliding doorway with a door made from some grooved styrene rotated 90 so the boards ran vertical, and glued on.

The edge joints and roof joints were braced with more square styrene. I had to be careful not to install any where it would cause interference with window castings, other walls, or the roof. I didn't bother to follow the instructions in the article and just figured it out as I went along.

I was concerned that the building would warp if I left it overnight unfinished, so I assembled it all in one session (about an hour total). I built it on graph paper to keep it all nice and square. I added thick styrene braces connecting opposite walls together to hold them in alignment, but I didn't add a floor at this point as it would have prevented me from inserting the window glazing from the bottom after the outside was all painted.

The large double window on the front was supposed to be a larger Tichy casting, but I bought the wrong one. So, I took two of the regular window castings, filed the inside edges slightly thinner, and glued them together in the window opening. 

By the end of the first night I had a pretty simple looking depot. The extension on the front was a bit of trial and error, because I rounded all of the wall dimensions to the nearest board, so some were a little taller than called for. And the cutaway for the window casting on the end at the corner was a bit complex and I had to think it through. But it came together pretty well.

For perspective, here is what the station looks like next to a dime. Tiny, eh?

The roof was a little bit more complex than a regular roof because of the front extension. The image below has both sides cut and ready to be bent down the middle.

The roof over the extension took a little bit of cutting and filing but nothing too difficult. Everything is so small that it was hard to get it perfect, but the roofing material will hide any gaps.

The corners then received some Evergreen 0.080" L-angle (#292), which was a bit oversize for N scale but anything smaller didn't hide the corner joints sufficiently. I had to notch it out to go around the end window in the corner. And yes, that window on the end in the corner is one board higher than all the others on the station. I wonder if you would have noticed if I hadn't said anything?

The roof joint was braced with round styrene rod I dropped into the gap and then secured with glue. You can also see the bracing I used to keep the walls aligned. It isn't pretty, but it works.

The end sliding door that I referenced earlier was framed out with tiny strips of styrene. They were roughly the size of the diameter of a piece of mechanical pencil lead. 

The MOW shed that adjoins the station was originally built with plain styrene to look like steel walls. But, I didn't like the corner joints or the lack of rivets, and I certainly didn't want to attempt adding N scale rivets...

...so I sheathed the sides with more V-groove siding, but this time I oriented it vertical to distinguish it from the station. I then added trim at the corners and under the roof eves.

A cheap Life Like N scale boxcar was cut up because I wanted the door. I later realized that I should have used a 40-foot boxcar with a smaller door, as this one was a bit larger than I was expecting.

The boxcar door was glued on, and some tiny Evergreen 0.060" c-channel (#261) was attached above it to look like a sliding door track.

The end of the MOW shed that attaches to the station had some styrene applied where it would be visible, and a scrap metal door from a Tomix kit was added. But, most of the wall that attaches to the station was left a bit rough as it won't be seen.

I had intended the shed to be a lot shorter in height than the station building. But, I had primed the station building white and it was off drying, so during the entire construction of the MOW shed I never compared its actual size to that of the station. Instead, I based all my dimensions off of that boxcar door. When I finally stuck the two buildings next to each other, I saw that my shed was a monster and nearly as large as the station itself! But, it is uniquely mine and I am sticking with it.

To fill in the seams at the peak of the roof I used superglue gel. Honestly, once the shingles are on I am not sure how noticeable it would have been but it was easy to do. I then primed the shed white and later painted both it and the station with Krylon "Terra Cota" colored paint. I didn't want another red building nor did I want another brown building, so this seemed a good compromise. I then started to hand-paint the window castings a different color to make it a little bit more fancy but that was a disaster. Even with a tiny brush, the color breaks would blend together so I quickly washed it off. Now I understand why Mark (of the Spookshow websites referenced above) grumbles so much when he does it. It is impossible!

I wanted to model tar paper roofing, and I had some large Avery self-adhesive labels, so I cut them into strips and pressed them on. I figured the texture of the paper would look more in scale than rough strips of masking tape, and because they were self-adhesive I wouldn't need to mess around with glue. 

Sadly, they wouldn't stay down. Rats! So, I brushed over them a coat of thin super glue. Oh well, it was a nice try.

The smoke jacks are Tichy castings (#2548) that I inserted into holes drilled in the roof after threading them through cardstock squares to look like steel flashing.

The roofs were painted dark gray and then drybrushed with various shades of gray and black, while the smoke jack was highlighted with brown. The sides of the building were given a black oil paint wash to bring out the details of the grooved boards.

Clear styrene was cut into tiny pieces and used to glaze the windows. Then, I took some black painted cardstock and rolled and/or folded up pieces and wedged them inside the station. These effectively blocked the view through the windows, but when you get up close and look you can see the shapes and outlines of something... anything... inside. I went this route instead of trying to make curtains or drapes for the inside of a MOW station. 

I also cut some 0.040" styrene pads to sit under the buildings and raise them a little up off the cork. These were painted black and then the station buildings and their associated pads were glued to the base. Because the stations are elevated a little bit, I was able to surround the structures with ballast and dirt and it didn't look like they were sinking into the mud.

The base is another wooden plaque that I stained and polyurethaned. I then attached some N scale cork roadbed down where the track and station's foundation would go.

The Atlas N scale code-55 flextrack was sprayed it with flat camouflage paint before painting the railheads a lighter brown. Painting the tiny rails was a challenge.

I next applied Woodland Scenics' fine gray blend and cinder ballast to the track. I glued the buildings down and then applied cinder ballast around them. Doing one side of the wooden base at a time, I also applied cinders and ground foam right up to the edge. I love ballasting and found this step a lot of fun and relaxing for some reason I cannot fathom. 

To aid with ballasting into tight areas I developed a special ballast spreading tool. It might look like a cut up drinking straw but don't be fooled... it is much more sophisticated than that...

Finally, it was time for details... the fun part. I started with an Atlas telephone pole in my scrap box. It was painted brown, weathered, and the top cross bar was trimmed off. I then painted the insulators and diagonal brackets silver, and finished it with Tamiya translucent paint. Pretty nifty. I considered adding some string to to line... but then came to my senses.

I had a speeder car of unknown origin in my parts box just waiting for some future project, and this was it. I had previously painted it yellow with silver trim, so all I had to do was weather it up. A piece of flextrack was cut up and mounted to make a storage track for the speeder, and some stripwood was cut up to go between the ties. 

A freight car truck was cut up and the wheels and sideframes were painted brown and weathered. Some Model Power barrels were painted silver and dry brushed rusty orange (they originally came molded in blue... who at Model Power thought that was a good idea?), and a Bachmann road crossing sign was modified and weathered. 

The last detail was a pile of old, creosote soaked railroad ties. I took some stripwood and split off pieces that were about the same dimensions at the Atlas track ties, and painted them up. After gluing them into a random pile, I was ready to call the building finished.

This was a fun structure to build, as it really allowed me to "cut loose" and detail it using some of my N scale things I have been hoarding onto for years like that speeder car. But, it also was a reality check that I made the right decision to focus my D&H layout on HO scale. There are many times when I wonder if I should have built it in N scale so that I wouldn't need to compress my scenes. I could model full structures instead of partial ones that abruptly end in the aisles, and I could let the structures spread out more instead of having things so cramped together.

However, building just this scene showed that I don't like working in the smaller scales. Oh sure, if you mess up a part it isn't very expensive to redo it as the buildings only take up 1/8 the size of an HO scale building (1/2 the length, 1/2 the width, 1/2 the height). But the room for error is so much smaller. File a window opening a little too much and the window castings falls through. Get the corners a little off from 90-degrees and the L-angle trim won't hide it. And forget about trying to paint things like window trim and brick-a-brack. Since scratchbuilding is something I really enjoy, I would be very frustrated if I had to attempt it in N scale. And most likely I would give up on my plans of modeling the D&H and just use generic "fill in" structures. That would lead to a lack of satisfaction.

I hold N scale modelers in very high esteem now. People like Mark at the N Scale Encyclopedia who scratchbuild nearly everything must be out of their mind. I can now understand what he goes through to make realistic buildings. My friend Doug, whose layout I visited on Friday night and woke up early on a Saturday morning inspired to build the Albany Tomato Company, has built a tremendous layout and every time I look at it now I will better appreciate all that he has accomplished. I will stick with HO, and someday plan to move up to high rail O gauge, but I am glad I built this.

Friday, April 23, 2021

Structure - Albany Tomato Company (part 9)

The Albany Tomato Company has been an on-again, off-again project for the past five years. I definitely bit off more than I could chew when I started it, and looking back now I can't imagine what I was thinking. I wanted to build it (my first scratchbuilt structure) to such a level of detail that it would win "best in show" during a modeling contest. I intended to scratchbuild all the windows, add an interior vignette scene at the loading dock, and perfectly paint and weather it. What was I thinking? 

The past three months have been spent in painting it. I really wanted to rush and "finish it" but that would be a sure fire way to ruin what I spent so much time on. So I took it slow. In my opinion, it is the billboard artwork (as shown in this 1963 shot) that really make it special. So I wanted custom decals made. But the only image available had telephone wires running through it, the bottom was obscured by the reefer, and it was taken at an skewed angle. I would never be able to use it as is. I needed to reach out to a custom decal maker to see if he could produce graphics for the side of the building. Lance Mindheim, an excellent modeler who makes broad use of decals himself, referred me to William Brillinger at Precision Design Company.

Bill took my image and played with it for a bit, filled in missing pieces, and adjusted the size of it until we had artwork that worked for me. He was fast, responsive, and honestly went beyond what I was expecting. He emailed me some test proofs and I mocked them up on the side of the building to make sure they fit. We decided that I would paint the white border (and black background) behind the image instead of using a white border on the actual decal, which I think made sense. I then washed the building to remove five years' worth of dirt, dust, grease, etc. and spray painted the building with several light coats of white primer paint. This hid any marker lines and pencil smudges, and filled in some of the minute cracks and gaps. I left it alone for a week, and then masked the area of the sign that was to remain white.

Next, I sprayed the rest of the building with Krylon Colormaster "Pimento" red paint. Part of the red seeped under the masking tape onto the white, but I expected this. I also noticed some spots that I missed with the red so I had to repaint those areas with more light coats, and that added time. Either because I was stalling or playing it very safe and letting the paint cure, I was waiting 7-21 days between spray sessions.

But, it was starting to look like something! I was getting excited.

I actually intended to use a darker shade of red on the non-billboard sides, similar to how the building looked in 1984. However, I changed my mind. I suspect this dark, purplish color shift is mostly to due to the age of the slide film and since I can' t be sure what color it should be I stuck with red and heavily weathered the sides to darken them. 

I next brush painted the roof gray. I avoided spray painting it because the masking wouldn't have been perfect anyway with all the corners and edges, and I would still have needed to touch it up. I chose Tamiya "Light Gray" (XF-65) paint and went around the edges of the roof tops, then the insides, and then the roof itself. 

It went pretty quick, though I needed to add several coats to build it up. The Tamiya paint is a bit thick and sets quickly, and if you go over an area you painted only a couple of minutes ago it will lift it up a bit. It also smells strangely sweet, like fruit cereal. I have noticed that with all Tamiya paints I have used, though I somewhat enjoy it.

I then laid the building on its side and used a microbrush to paint the edges of the roof trim pieces. I tried various positions to hold my wrist perfectly in line with the part I was painting, but some sides had trim at three different levels which complicated things. 

I then started painting the various windows and doors. To give myself a steady hand rest, essential when using a fine brush to paint straight lines such as the window sills, I set the building on top of my garbage can and laid my elbow on my desk. It worked really well, though I had to rotate the building four times for each window to get perfect coverage. I didn't trust myself to paint towards myself, and always wanted to paint left to right, so round and round the building went for each window. 

It took four sessions (each about 10-15 minutes) to get it all done. I took frequent breaks to clear my head and also wash my paint brush. It wasn't too bad, though my "assistant" Clover would sometimes get in the way. She is trained to go under my desk, sit at my feet, and get a treat. In this picture, you can tell which step she is at!

Painting the larger doors wasn't difficult either, but I can now confidently say that Pimento red paint is a terrible primer for the gray I was using. The larger doors required multiple coats for good coverage, yet I was careful not to pool it on as I didn't want it to bubble or slop around.

The roof windows were done the same way, except that those middle windows were especially tough to paint. The upper window sashes took some real maneuvering with the brush to apply the gray without hitting the red bricks. From all sightline it is nearly impossible to see if they are gray or red, so I erred on the side of caution.

The lower windows on the right corner had a solid styrene backing (meaning, I wasn't going to glaze it) so I had to treat them differently. I first painted everything inside the window opening gloss black and let it cure fully. Then, I picked out the window frame itself in gray. The black sort of looks like dark glazing... I had no other good options. If I were installing this on a layout there definitely would be bushes in front of them!

Two coats of gray paint on the roof gave it a mottled appearance with obvious brush strokes. However, I think that will come to be an advantage when weathering it as perhaps it will look like a brush-applied tar mixture. 

I also used a small brush and some more red and white paint to clean up the edges of the billboard area on the side. Eventually, I had to say "when" and just stop because it was an otherwise endless battle of adding red, then adding white, then adding red, and so on.

Boy, let me tell you it was a really stupid idea to glue the air conditioner units onto the roof before painting. I should have left them off, as they need to be painted silver. I had to carefully do it with a tiny brush and it wasn't easy. Thankfully, the silver went over the white and red overspray paint easily and covered well with one coat.

I used a fine brush to pick out the pipes and some of the other small details with silver too. Here I had to compromise, as I mostly focused on the edges of the pipes facing out and ignored the sides of the pipes. From a foot away it looks great, but upon closer scrutiny you can see the sides are red. There is just no way I can paint them perfectly silver without getting silver on the red walls. Perhaps I should have waited to glue them on, but in the prototype pictures they don't show up so I assumed that they were painted the same color as the side of the building. Weathering will help tone them down. I also painted some of the roof vents silver, but left others gray for contrast and to make it look like the A/C units on the larger building were updated more recently than the older, gray ones.

Two and a half months after I started painting the building, I finally bit the bullet and worked on the black and white area where the billboard advertisement will go. I cut fresh edges of blue masking tape and embossed them down with a toothpick into the brick mortar joints. For the area by the loading door awning, I did the best I could but assumed that I would need to do some touchup there.

I then lightly brushed on two coats of flat black paint. I avoided spray paint because I wanted more control along the tape joints.

Despite my best efforts, the black leaked beneath the tape. Instead of trying to touch it up with a brush, I instead ordered some Microscale white 1/8" wide decal stripes (#PS-1-1/8"). In preparation for them, I sprayed this wall with Glosscote and the rest of the building including the roof with Dullcote.

I then applied the white decal stripes, which worked pretty good. Because I had to lay the building on its side and its center of gravity made it tipsy, I clamped it to my workbench. 

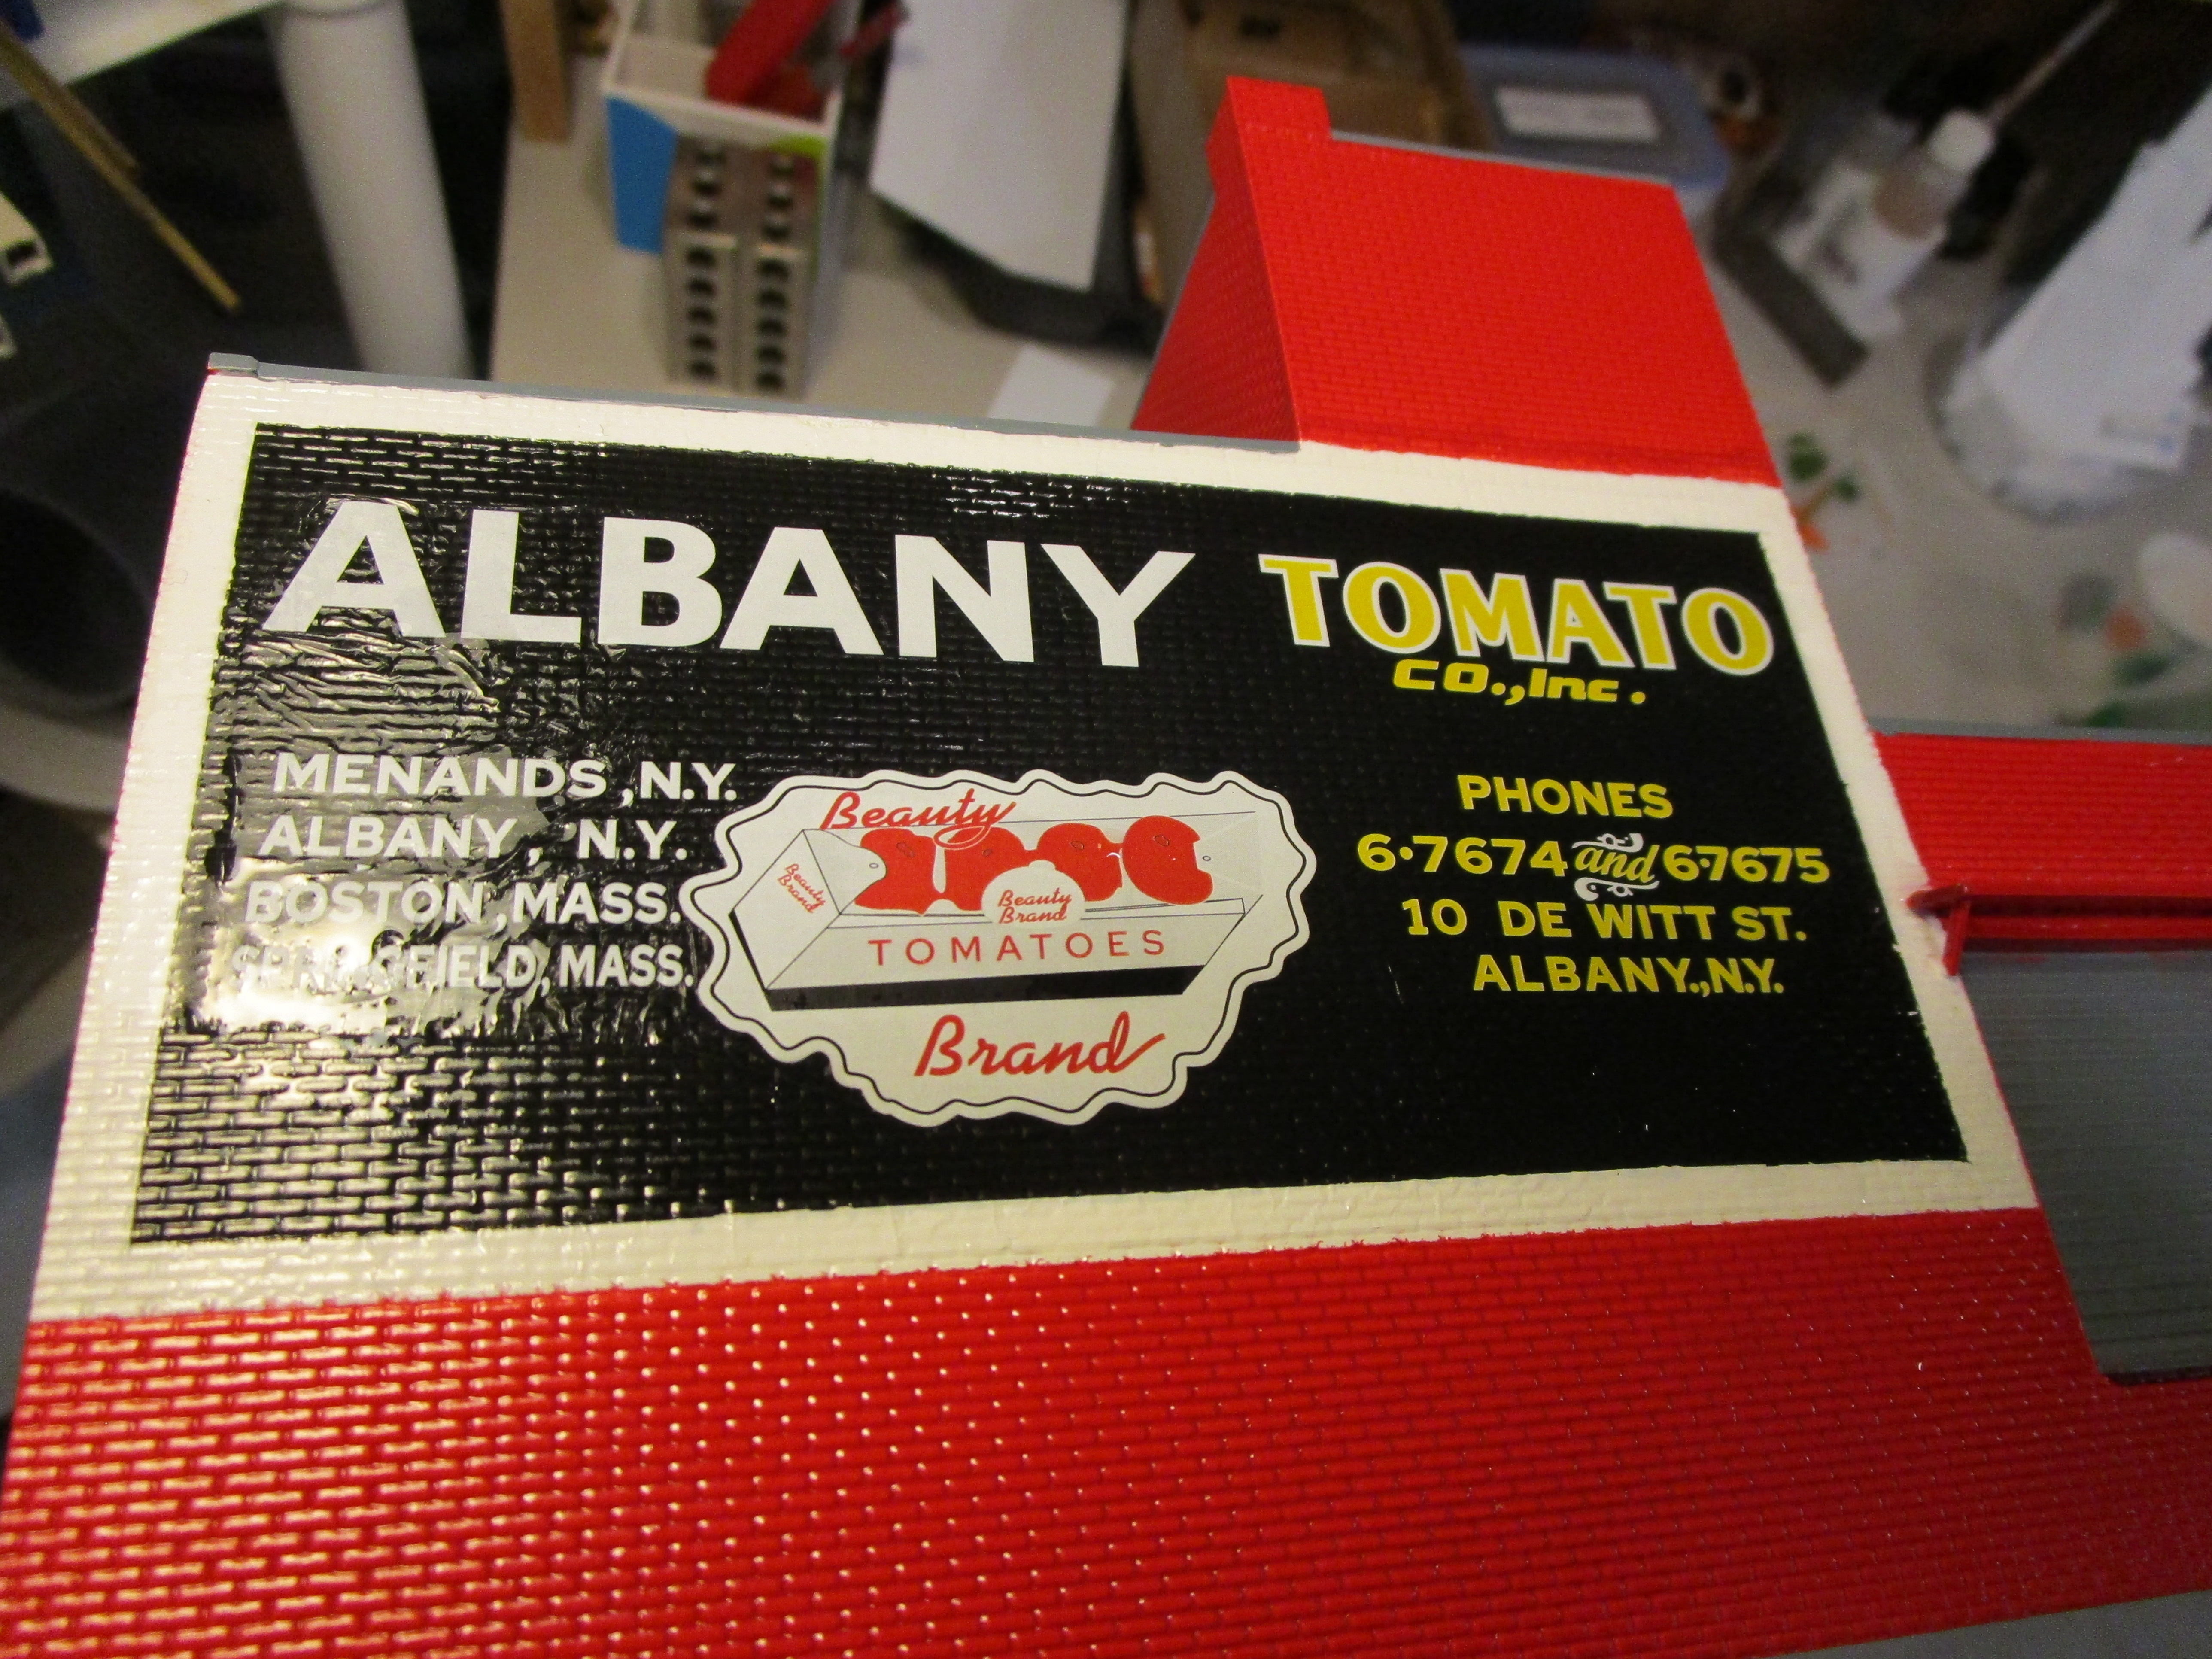
Finally, it was time for the custom billboard decals. I trimmed around their exterior with scissors but they were still pretty large. I then soaked it in water and it just wrinkled up. The water might have been too hot, and/or I let it soak too long. Grrr. Thankfully, I had ordered two sets of decals for just this situation. The second set was soaked for less time, in lukewarm water, and it went on pretty good. One edge rolled over on itself and I had to fix it, but overall I was very thankful about the whole process. Then, lots of light coats of Microsol were brushed on to help the decal snuggle down into the brick mortar joints.

I am pretty well pleased with it. Compare to the picture in the book on the right. William Brillinger did an excellent job with artwork.

It was time to weather the model, and I didn't want to screw it up right at the last step! I had earlier mounted some scrap brick sheet to a piece of styrene and painted it the same red as the building, and figured I would use it as a test area for various shades of oil paint wash. I mixed black and brown oil paint in mineral spirits and applied it to one area of the test piece. Too dark, so I watered down some of it in a separate container. Too light, so I added more of the concentrated stuff. Just right. 

Note to self: in the future, I should look into weathering powders as they would have probably been perfect for something like this.

Three sides and the roof were weathered, but the billboard side I left clean. The weathering looked blotchy so I smoothed some of it out a day later while it was still wet with paper towels. Honestly, it looks better and more subtle than in the pictures.

With the weathering done, there was only one detail left: the front entrance stairway. The steps were built months ago but needed to be painted, yet I held off on this at the time because I planned to drill holes and insert a railing, and that railing had to be built. I was going to use a commercial railing from Walthers but it didn't include a 90-degree bend, and modifying it would be as much work as fabricating one from scratch. So, I drew up some sketches of what I needed and started to cut brass rod to solder it up.

I quickly realized that I could build one faster from styrene. It wouldn't be as strong, but likely it would be cleaner and certainly easier. It is delicate, but it only took me 30 minutes to build so if I break it I can make it again. Instead of drilling holes and gluing it in, I designed it to attach to the outside edges of the stairs.

During construction I added lots of extra cross pieces and bracing while assembling it, which made it sturdy as I added piece by piece. Then, once it cured I cut away everything I didn't want and I had my railing. I attached it to the stairs and it was done. It only needed to be painted.

The stairs were then spray painted red, the handrails were picked out in silver, and I applied weathering washes and drybrushing to make it look dirty and a bit rusty.

Once I attached the railing to the front of the building, the workers could get in to start processing tomatoes. 

The HVAC units on the roof were drybrushed with brown and rust colored paints, and I applied a black wash to the grill areas. You can see in this shot how the black oil paint washes made the gray painted roof look like old, weathered brushed tar. At least I think so.

The windows were glazed with clear styrene, attached with canopy glue. I wish I could have used real glass but trying to cut and fit odd sizes into the window areas was just a non-starter.

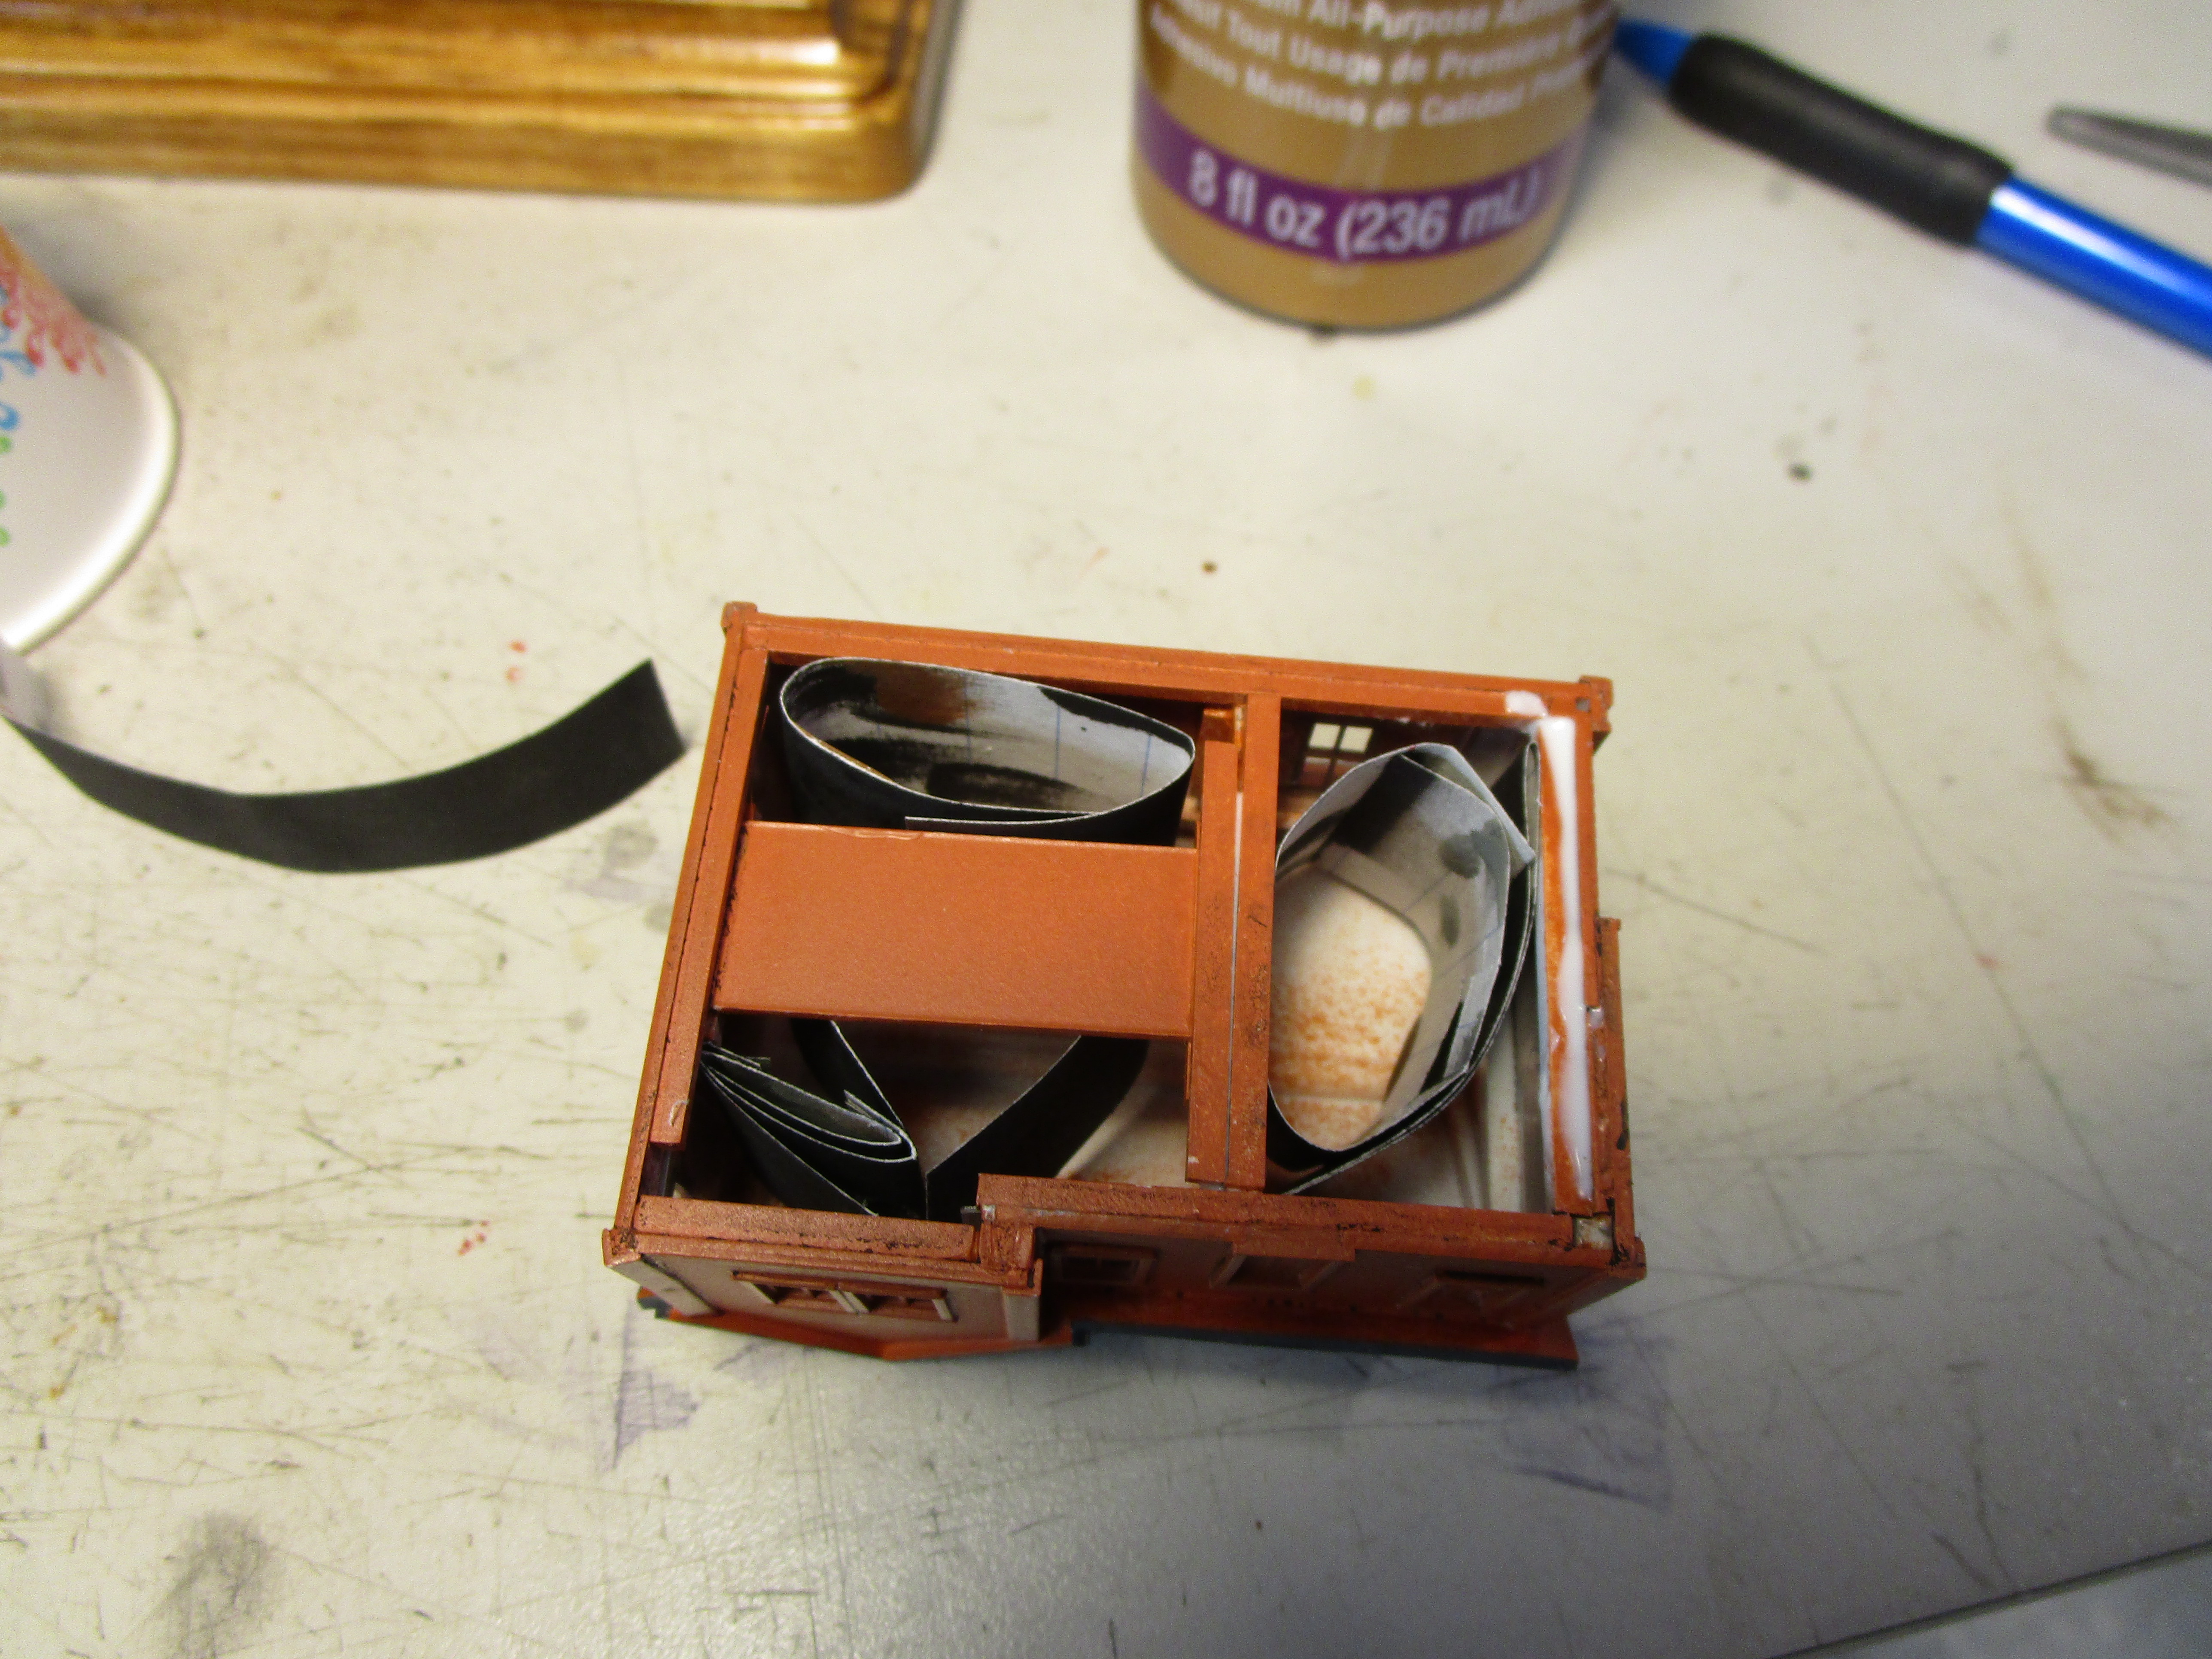
I wasn't sure what to do next about the windows. They were nice and clear, but that just let everyone look inside and see nothing but empty space (and pen marks, and paint overspray, and styrene bracing, etc.) I considered painting the backs of the windows black, but that seemed a bit permanent and if I didn't like the look I was stuck. So, I spray painted some index cards black, cut them into strips, and lightly tacked them in place on the inside with tacky glue. They work, but now the building looks a bit fake. Spraying the inside surfaces of the glass with Dullcote is another option I might consider, but for now I am okay with this. Access to the inside is easy, and prying off the index cards which are minimally attached wouldn't be difficult. 

The last thing I did was add a little mini scene on the roof. I used Walthers crates and Preiser pallets, along with some stripwood, to create a hang-out for the employees to go on their breaks. I may later add figures, but for now this is it. And, I am happy to say, the building is finished.

I am very proud of what I built. Though it wasn't intentional, I looked at the drawings again this morning and realized that some of them are dated 4/23/2015. I remember waking up early (something like 4AM) the morning after visiting a friend's layout and being inspired to start work on this project. That means it took six years exactly from start to finish. 

The structure is currently resting on a wooden base I made five years ago to protect the bottom edges of the building from cracking or breaking. I really need something nicer, but for now it works. However, the staircase is hovering above the ground and I need to add something underneath it to support it more.

The Albany Tomato Company was a long and winding road, filled with bumps along the way. I was way too ambitious at the start in attempting a complete scratchbuild with no experience. I had to frequently stop and take breaks to research things, and several times I left it alone for periods measured in years, not months.

But I can't wait to show my friend, who helped inspire and aided me on my building. I am sure he will be proud of me, and of it. 

I only wish I had a place on my layout for the Albany Tomato Company!

PS: Here are two clippings from the old Knickerbocker Newspaper in which the Albany Tomato Company placed adds. The first is from 1951, and the other is dated 1/21/1969.