CP Executive train in Albany

CP Executive train in Albany
Showing posts sorted by date for query roster. Sort by relevance Show all posts

Wednesday, May 21, 2025

End of the Line (May 21, 2015 - May 21, 2025)

Note: this post has been a log time coming. I actually wrote it in May 2024 but decided to wait a year before posting it in case I changed my mind. But I didn't...

I have been dissatisfied with my layout for several years, yet I struggled to find the strength (guts?) to tear it down completely. It isn't that I don't love the subject matter... I am still firmly in love with the Delaware & Hudson (though side research projects into the Boston & Maine, Maine Central, and Bangor & Aroostook have exposed many good things they offer a modeler). I think it was because my layout wasn't fun to operate, and I don't think it ever was.


I had several goals for my layout:

1.) I wanted to accurately model something to the best of my ability. 
I was well on my way to accomplishing that. Every detail on my layout matches the D&H Colonie Main to the best of my knowledge as it was in May of 1984. This proved to be a two-edged sword. I didn't have the hard decision making process of what to put where: the prototype already took care of that for me. But, if I didn't have a photograph of a certain area I was essentially "stuck" until I could figure it out, and the reality was I might never research the answer. 

Plus, I couldn't really freelance anything on my layout- whether it be naming a business after a family member, or running equipment out of my designated time frame, or building a structure that I wanted just for fun. I scratched that itch instead with my MMR structures. When talking with author Michael Tylick about this, he said "Of course you can build what you want and run what you want". True... but not if I want to stick to my vision.

In short, my striving to be as realistic as possible had trapped me. It wasn't all bad, but I wish I had more freedom. 


2.) I wanted a layout that would be fun to run AND prototypically operate. 
As it turns out, running trains in circles was just fine for me but I got tired off having to constantly clean the track and check the nine benchwork section joints (including a lift bridge) every time I wanted to run. It was frustrating at times, and it sucked the enjoyment out of the process. I know I made my layout more complicated than necessary to allow it to move, expand, and reconfigure, but in the process I introduced problems that wouldn't have occurred if I had built standard benchwork. In essence, by trying to allow it to live forever, I might have killed it from the start.

As for prototypical layout operations, mainly switching, for reasons discussed below it was never very fulfilling.

3.) I wanted the use layout to help me earn my NMRA Master Model Railroader award. 
This definitely did happen. The track plan and wiring were designed, built, and photographed from the very beginning work on my Electrical and Civil certificates. Along the way I built and included things to satisfy certain requirements that I otherwise didn't want (ex: a turntable and a section of super-elevated curves). But, it was definitely worth it to get those certificates.

And, the skills learned in scratchbuilding structures for my layout translated into earning my Cars and Structures certificates too. And I finally earned my award, MMR #776. None of my previous layouts have ever had enough scenery and detailing to qualify for the Scenery certificate, and this one won't either.  

4.) I wanted it to keep me busy
I have discovered I have more fun researching and building stuff for my layout than actually running it. That is true for a lot of modelers. Having spent several hundred hours working on it so far, it certainly has done that. I enjoyed all of the research involved in planning it, starting with reading books and scouring online websites for information on industries. Then, I went out to take measurements and pictures of existing buildings or search for older pictures of now-gone structures. I draw up scale drawings and sketched maps of how various elements in each Layout Design Element fit together. And this was before I cut a single piece of styrene or laid a piece of track. 


5.) I wanted to build a focused HO scale roster.
I have way more HO scale engines and cars than could ever fit on the layout but I enjoy putting together kits and detailing/weathering models. Whether it was engines, boxcars, TOFC flat cars, covered hoppers or cabooses, if it fit my era I wanted it. But, it is depressing to know that I can't see most of them because they are in storage. I remedied that for my engines with a display case, which helped somewhat. But running a 12-car train on my layout is a stretch, and nice long trains with multiple engines are just too much work to dig everything out, set it up, run it (and hope it didn't derail), and then put it all away. Also, since my roster contained just about everything I wanted, I stopped buying stuff.


So what went wrong?

I planned on building four sections representing the Capital District area of NY where the D&H ran. It was an ambitious project as I had never attempted scale modeling of actual prototypes before, but I jumped right in. 

My first section, the North Albany Yard, was almost complete. I just needed to add a few backline details like telephone poles and trees, but that never happened. Mostly because the money I could spend for detail parts which would just sit there would be better spent on raw materials to construct the next parts of the layout. Finish detailing is usually the last step in the lifespan of a layout, and I never got there. 

The problem was that the first section of the layout wasn't fun to operate as it just acted as a staging yard (on the operational tracks) and a demonstration of a yard being deconstructed (on the non-operational scenic tracks). I liked building it because it was so different from what I had done in the past, but once it was finished I didn't know what to do with it. Using the yard lead to make up and break down trains wasn't enjoyable because it was on a curve and hidden behind a hill, besides the yard could hold at most a dozen or so cars. And, you don't really need a staging yard if you rarely run trains!


My second section, Menands, was about 70% done. I needed to add a few more trees and details like telephone poles, as well as vehicles and figures. But I was pretty close to calling it complete. However, I had attempted to compress too much into the 7' length of this scene and that led to some visual and operational problems. My structures were too close together and prototypically operating them didn't work out as I expected. 

The track leading to Agway has a bend in it that prevented freight cars from actually reaching the modeled loading door. The spur to Colony Liquor just barely clears a 50' boxcar but it is hard to see when spotting one at the door. The third, Southworth Machinery, stopped receiving rail service in 1981 and I later learned that the boxcar spotted at the loading ramp (which I had assumed meant it still received rail service) was only used for storage. 

In conclusion, this section is a scenic feature that would be nice in a museum but not very functional to operate as a train layout. It was especially heartbreaking because I spent the most time building the structures on it and it was the very first part of the layout I designed at my old apartment. All that work for zero operational gain.


The third section was for Norlite and Keis Beverages. I never started it because to get there I had to model a road crossing on the corner section between this area and Menands. I was excited about adding operating crossing gates and sound, but even as I was researching it I realized my layout was doomed. 

Besides, Keis never actually received rail service during the time I model (or anytime at all, so I have been told) and I didn't have enough space to model the extensive Norlite quarry facility effectively. So, again both would have been fun to build but they wouldn't have made the layout any more fun to operate. Sigh.


The fourth section, which I already removed and stored in my garage after a redesign in September 2023, was going to represent the Cohoes' Mohawk Paper plant. Due to a sharp incline to reach the siding, I already had to rebuild it once to lessen the grade. The section was essential for any semblance of operation as it had the only passing siding on my entire layout. But, it too didn't add much operationally. 

The Mohawk Paper plant was allocated a tiny corner on the front of the layout, and most of the plant (like nearly every other one of my buildings) fell into the aisle. The scenery on this section would have been awesome though. A highway crossed the railroad tracks at grade, with a wall of trees behind it, and lots of residential houses along the backdrop. At least that was the plan. I realized it would not have fit into the scene only 2' deep and 7' long. So this section had to go. I never figured out what I would have replaced it with.

In sum... my four layout sections all provided me with interesting structure and scenery building opportunities but were not good as implemented for switching or prototypical operation. Running trains in circles was fun when it worked, but keeping the layout for that reason alone turned out to be a waste of space. Once I removed the Mohawk Paper section and eliminated the option for just letting trains run around and around, the layout ceased to serve any meaningful purpose.


So What's Next?

An old 2011 post by Trevor Marshall on his blog perfectly captured the state of where I was. To stop work on my layout would be to admit it was a failure, which it wasn't. But I haven't worked on it during the past two years except to trash parts of it. I can't blame it on lack of time. It is due to lack of interest. I don't want to press on with building a layout that isn't fun to operate, and the only way to save it would be to redesign all four sections again. One option I considered was to build two new sections (to complete the circle again) and perhaps model something besides the D&H on them (a farm scene? a station?). But that is just diluting what I have, and likely wouldn't satisfy me long-term.


My problem was I tried to stuff too much prototype main line into too small a space. I didn't know at the time that it would be a problem, but it was. 

So, on the tenth anniversary of my blog, I am declaring my layout finished. This isn't a decision I am making lightly, and it isn't impulsive. I have mulled it over for a long time. But it is the right decision. 

I am thinking about turning my North Albany section into a Fremo module, because I am really pleased with how it turned out. I may try and save the structures from my Menands section too.

I have been planning my next layout since 2020, and hinted at it for the past several years. It is a three-rail O scale railroad and features scale size (1:48) trains running through realistic but generic New England scenery. This allows me to build whatever I want and run whatever I want, and the larger size lets me focus more on detailing structures and scenes which I enjoy. A blog for for my the New England Northern Railway went live last fall.


This blog will continue as a catch-all for my various train interests. And, if I find more interesting D&H stuff I will definitely put it here. Only my O scale adventures will go on my new blog, so this one will live on. And who knows, I may someday return to model the D&H Colonie Main.

Thursday, August 15, 2024

D&H #4112 becomes A&A #114!

What is old sometimes becomes new again. Such is the case with D&H RS3 #4112, which was rebuilt by the D&H in the mid-1970s along with some sister engines into a new class of RS3m (or RS3u). She started off as a regular Alco RS3, as shown below in March 1971.


Here she is in September 24, 1974, in Watervliet just months before being sent out for rebuilding. I have no idea if the word "bye" on the end was a D&H employee's foreshadowing of the event or not, but it is ironic if nothing else.


I wrote about the rebuilding several years ago on my blog here, and at the time mentioned that I was interested in this engine because it had been repainted by the D&H in a classy red/white/blue scheme and numbered #1976 for the Nation's bicentennial celebrations. I even opined here that there was a good chance that it took part in one of the many gathering of bicentennial locomotives that was sponsored by Kalmbach Publishing Companies' Trains magazine. Here she is nearly two years later on September 25, 1976 in Bellwood, Illinois. The Rock Island engine behind her suggests a gathering of bicentennial engines.


After the D&H renumbered her #506 to fit in with the roster scheme of the other RS3m engines it kept on going. This is what she looked like in May 01, 1977 in Bethlehem, PA.


Unlike many of the D&H's Alco engines, she survived through the period when the NYS&W was appointed operator of the D&H. This shot shows her in August 1989, working with another leaser engine. 


Finally, she was sold to the Tioga Central Railroad, then the Wellsboro & Corning Railroad, and then the Western New York and Pennsylvania Railroad in 2014. The WNY&P repainted her solid black with yellow chevrons in October 2014. Sadly, I didn't have the foresight to take pictures of it when it was on the Tioga Central in its faded but showing bicentennial colors. 

I lost track of the engine after 2014 and didn't think much of it until last year when it was acquired by the shortline Arcade & Attica Railroad, of which I have written about much on my blog. I have yet to go out and see her in person, but I hope to correct that soon. Here is what she looked like in August 2023 after just being received by the A&A. They numbered her #114, which was the next slot in line (they already have engines numbered #110, 111, 112, and 113). 


Note that Bowser has announced HO scale models of these engines in several D&H paint schemes, as well as one in the WNY&P. Can we hope that it will someday offer it in the A&A #14?

Friday, August 25, 2023

D&H #752 in Watervliet (1969)

Here is a shot of D&H U33C #752 leading a train south through Watervliet on August 25, 1969. If you are wondering about the unual paint scheme, there is a story behind it. 


The D&H normally purchased diesels only from Alco and General Electric, but in 1967 EMD tested three SD45 demonstrator locomotives on the D&H. Apparently, the D&H needed engines and EMD offered them a great deal... perhaps to attempt to lure the D&H into buying more EMDs. It worked, and the three engines were acquired.

However, the D&H didn't like them. They were nicknamed "Hummingbirds" though I am not sure why. Part of their issue was because the maintenance crews needed separate inventories for three lone EMD engines in a roster of Alcos and GEs. So, in 1969 after only two years they were swapped with the Erie Lackawanna for three GE U33C engines. The Erie Lackawanna's maroon and gray scheme was retained, with D&H blue replacing the maroon. As D&H repaints go (and there were a lot when it aquiried a bunch of Geeps at the formation of Conrail), this was pretty tasteful. By 1972, the U33C engines were repainted into the more traditional D&H "Lightning Stripe" scheme. 


Ironically, the three initial SD45s were later returned to the D&H on Conrail's "Conveyance Day" in 1976 and all were then patch painted for the D&H, again with the EL's maroon repainted in blue. They lasted on the D&H for two more years before being sold to Mexico in 1978.

Saturday, July 15, 2023

D&H "Gray Ghost" #2311

The unique paint scheme that has since been dubbed the "Gray Ghost" is the result of the D&H Colonie paint shop being tasked with repainting GE U23B #2311 after an overhaul in April 1981. As the story goes, the railroad didn't have enough blue paint to do a proper "Lightning Stripe" scheme and instead improvised with an mostly-gray look. Considering there is a paint factory (Passonno Paints) located literally 5 minutes away from the shops, it is a sad indictment on the financial condition of the railroad that they couldn't splurge for enough blue paint to do the engine right. 

Some call it an "experimental" paint scheme. Others look at is as an extreme case of cost-cutting. A few dub it ugly. But I consider it neat.

Here is a shot of the fairly new looking engine in Conklin, NY, on June 13, 1981:

I have seen sources claim it was an intentional experiment and I suppose it was in its own right, but I don't think the D&H set out to create it (unlike the blue/yellow scheme for #5015). They just ran out of pennies in their piggy bank. By the end of the year, they aparently had acquired more blue paint because this was the only gray engine to appear on their roster.

Fast forward two years and this shot in Allentown, PA from September 10, 1983 demonstrates how badly the gray paint showed dirt and grime:

All of the D&H U23B engines were off the roster by the end of 1983, having been traded to Guilford owned Maine Central. Within a couple of year everything had completely faded and the "ghost" was nearly transparent. Here she is in Wiscasset, Maine in September 1987. The Maine Central painted their emblem on the cab side and renumbered the engine #290. Also note all the leaves stuck in the side radiator.

Because it is an odd ball I just love it. I even considered setting my layout in 1983 instead of 1984 so that I could include it. But, there is still a work-around: I also like the look of the M.C. patch-paint jobs, so I might buy the Atlas HO model and do the same thing 'Cause I ain't afraid of no ghosts!"

Thursday, August 18, 2022

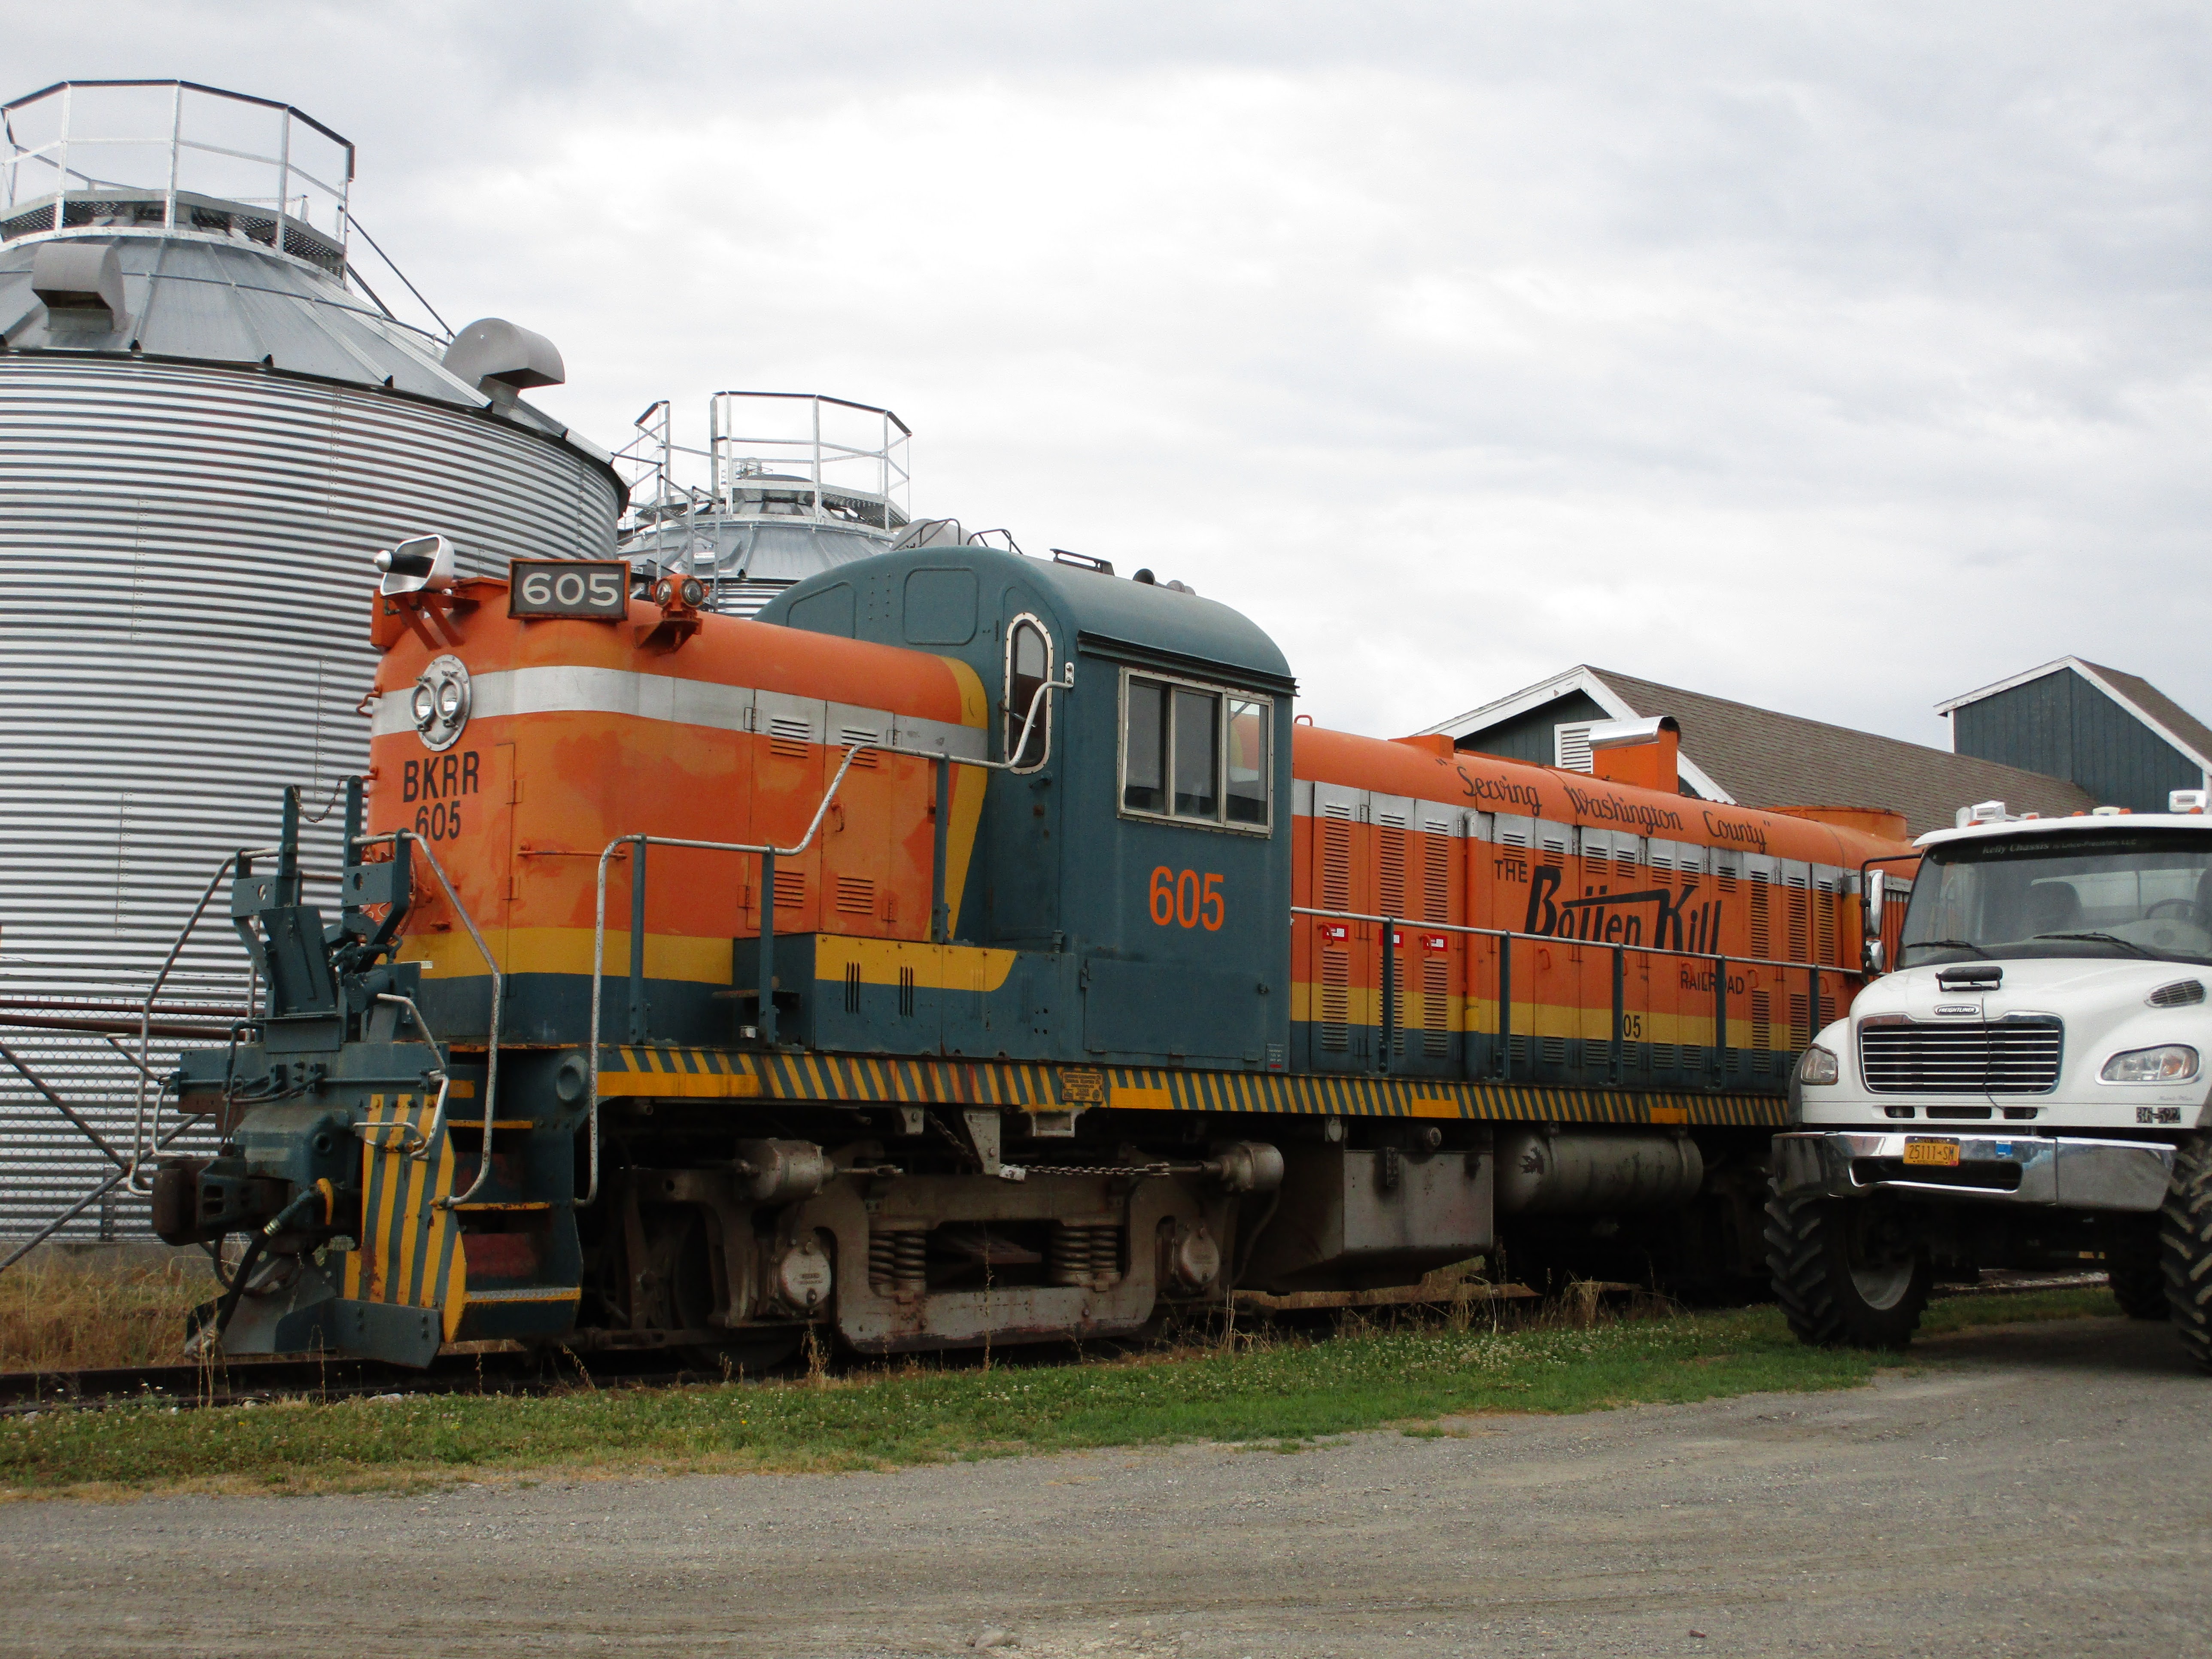
Modeling BKRR RS3 #605 in O scale

After spending a day in 2012 chasing the Batten Kill Railroad I knew there was something special about it. It is the only local shortline and its colorful Alco roster and picturesque setting reminded me of my favorite local shortline near where I grew up. 

During the start of the pandemic in June 2020 I visited the BKRR again. While there, I ran into engine #605 which has been out-of-service for a while with a damaged turbo generator. I have never seen it in operation, which is a shame, but I was still able to take some pictures.  

Note that part of the front pilot is missing. I don't know if this was sacrificed to keep their other Alco RS3 #4116 going or not, but it looked sad. However, the rest of the paint scheme has held up remarkably well for almost 40 years. 

It was at this time that I realized that I wanted a model of this engine.

Everything about it was neat, from the classification lamps to the numberboards, and the four-color scheme with silver stripes and trim was really sharp. So, I filed it away in my future "to do" pile.

Fast forward about eighteen months, and I had joined a local O scale club. I didn't have a layout, but wanted to start collecting "scale" (1:48) trains which run on three-rail track. And having worked with a local custom painter before on an RS11 project, I knew this could be my chance to have a model of #605.

It was built by Alco in Schenectady in November 1950 and assigned a works number of #78369. It was purchased by the Lehigh and Hudson River Railroad as their #10, and they later sold it in 1972 to the St. James and Lamoille County Railroad as their #203. In 1976, it was sold to the Vermont Railway and renumbered #605, and finally in 1984 it was acquired by the BKRR who kept the engine number. Below is a shot from December 1984 showing both of the BKRR engines.

I then looked at various O gauge Alco RS3 engines. Several models are made by Lionel and MTH but they either aren't scale (true 1:48 proportion) or had molded on grab irons and other details that weren't very good. I didn't want to get super involved with the project by shaving off and replacing things. So, I went with a Williams by Bachmann engine, which used old K-line tooling. The tooling had separately applied wire grab irons and other free-standing details and it looked great. Only a few items would need changing. I picked up a new engine decorated for the Seaboard System (they didn't sell undecorated models) from Trainworld at a great price.

While this was happening, I was also researching decals. I didn't want to deal with custom decals, and if I couldn't find a set commercially available I would give up on the project. I reached out to Highball Graphics and discovered that their LO-236 set is perfect for BKRR #605. It was promptly ordered.

Changes to the locomotive model that I considered "mandatory" included adding classification lights and number boards at the corners, relocating the three-trumpet horn* to its proper location, and blanking off some of the middle cab windows. The classification lamps came from Precision Scale Company (#4248), as did the clear jewels that went inside them (#48329). They also provided the three-chime Alco air horn (#56191). I didn't bother filling in the cab windows with styrene and putty but instead just asked the painter to spray right over them. That resulted in them looking like they had been blanked out with steel plate.

*A note about the horn: I found a lot of pictures online showing various locations and types of horns on #605 over the years, including a single-trumpet horn mounted on the side of the short hood, the multi-chime horn mounted in front of the cab on the long hood (and later on the top of the cab) and Hancock 4700 air horns mounted on both ends of the hoods. Look at the pictures above of #605 from 2020 and you will see the gray horns at the very ends. They sound like steam engine whistles, so perhaps the BKRR added them to enhance the experience for the passengeres? They weren't mounted on the engine in May of 1984 (the time stamp for my model), so I didn't need to add them.

My painter works out of Milepost Hobbies, a great train store in upstate New York. This was not his first BKRR engine, and he knew exactly what he was doing. Still, I thought it helpful to write down everything I wanted and include pictures and directions so that there wouldn't be any misunderstandings. He scratchbuilt the corner number boards for me and he also replaced the single-beam headlight castings on the ends of the hoods with horizontal dual-beam castings. I didn't even know he was going to do that, but they look awesome.

The painting is exquisite and the colors really pop. I admit that this could be considered a gaudy paint scheme, but I love it. Those yellow diagonal stripes along the walkways really take it to the next level. And, because I am modeling the engine as it was freshly painted in 1984, I don't even need to weather it! (Though if you look at the pictures taken in 2020 above, it really hasn't weathered too much over the years).

While I was researching engine #605 I came across references to the "Batten Kill Limited" and "Batten Kill Rambler" passenger excursion trains. The image below is from a postcard dated 1984. I modeled my engine to match the appearance in the picture, and it also inspired me to try and model the entire train. But that is still in the works!

Thursday, April 21, 2022

Leased ex-Conrail U33B #2922 (Sept. 1984)

In 1984 the D&H leased six Conrail G.E. U33B engines which were patched-painted and lettered "D&H" on the nose. It was minimalist to the extreme, but compared to other patch-paint jobs that were to come from Guilford they didn't look too bad. It helped that the D&H's Altschul blue dip paint and Conrail blue paint were pretty similar. It's ironic the D&H leased U-boats engines because they had a bunch of them (U23B #2301 - #2316) on their roster until June of 1983 when they were traded to the Maine Central. (And those are examples of bad patch paint jobs).

I have considered painting a model for my layout, which is set in May of 1984. Sadly, I have yet to find photographic evidence that the engines were delivered by that time. They certainly were on D&H property by the fall. I asked on the D&H Facebook group but they weren't able to confirm it either. 

This picture shows one of them, #2922, in Binghamton's Conklin Yard on September 05, 1984. Just a little more than three months after my layout's time frame.

The second picture shows the same engine in November 1984. Note the dried leaves stuck in the radiator along the rear, which is common for G.E. engines.

If anyone has any photographs of the engines on the D&H in May of 1984, I would love to see them!

Monday, December 6, 2021

D&H Shark #1216 is moved!

Here is a movie of a recent (December 02, 2021) move of Delaware & Hudson RF-16 shark #1216. 


As D&H fans know, their two sharks (#1205, 1216) were built for the New York Central Railroad, then traded in to GE and later sent to the Monogahela Railway. Sold for scrap, the D&H purchased them in 1974 by exchanging $12,000 worth of metal scrap boxcars for the pair. Under the care of President Sterzing and maintenance of Chief Road Foreman of Engines Marv Davis, they worked various jobs including excursion trains, the Slatepicker, and road assignments. 

In 1978, with the D&H under new management, they were sold to the Castolite Corporation (a leasing company) and ended up on the Michigan Northern Railway. After #1205 was damaged in a snow accident, the pair were sent to the Escanaba and Lake Superior Railroad. They have been there for over 40 years, and owner John Larkin has kept them hidden (and protected) from the weather, vandals, and a scraper's torch. He announced in 2020 that upon his death they would be sent to museums for future preservation.

We all have dreams for what we would do if we won the lottery. One of mine has always been to purchase and restore these two engines. I don't know why... they were retired and hidden away years before I was even born and I have never seen them run. My favorite steam locomotive is Arcade & Attica Railroad #14, a Baldwin ten wheeler that I rode behind once or twice as a child before it too was locked up in 1988 in an engine house for protection and perhaps future restoration. And who did the A&A buy it from in 1963? Ironically, it was the Escanaba and Lake Superior Railroad. 

So, if I won the lottery (and my wife let me) my money would go to restoring several engines that passed through the E&LS railroad's roster. Small world, eh?

Tuesday, November 10, 2020

Favorite Engines - Conrail SD80MACs

There are some engines that you just see and go "wow." I remember visiting the Steamtown museum last year with my friend and seeing Big Boy #4012 and thinking that. It was just huge. I respect that. There are other engines though that jump out at me because they have striking contours, or flashy paint jobs. The first example that I can recall personally coming in contact with were the Conrail SD80MAC engines. While most modern EMD and GE locomotives are big... especially compared with older first generation, four-axle engines... these not only seemed huge but very boxy and brutish. Here is an interesting website about them.

December 25, 1998


They were special for a couple of reasons. They were Conrail's first alternating-current (AC) traction engines, the first 5,000 horse power units, sported 20 cylinders instead of the typical 16, and featured EMD's radial truck design. And, Conrail was the only railroad to order them (though CSX and NS eventually inherited them) with a roster of 30 total. All nice, but when I saw them for the first time I didn't know or care about any of that. What I did see was a striking paint scheme of blue with a "white face." Conrail had designed a special livery just for them (which I asked about on Railroad.net) to signify their uniqueness and it worked.

June 22, 1996


They weren't frequent visitors on the Conrail mainline that cut through Rochester, but I definitely saw them a couple of times. I always wanted a model of one, and in 2002 Kato released an HO scale engine that I quickly pounced on. I had trouble installing a DCC decoder in it, so I drove across town to the NCE factory and they let me walk in and after we toured the place they personally installed a decoder for me. Now that is service.

Postcard of six (!) SD80MACs in Chatham, NY


I tried to run the engine on the college model railroad club's layout I belonged to but it always derailed in one place because they chose to run the mainline through the curved leg of a switch instead of the straight leg. Never, ever do that! Eventually, when I migrated to N scale I sold it. But now Athearn has announced that they are releasing them again in HO scale. And they are super detailed with DCC and sound! Yes, I know they are 12 years too late for my layout, are for the wrong railroad, and never operated on the territory I am modeling. And yup, I am going to get one. I mean... just WOW!


Wednesday, October 21, 2020

Announcement: Athearn ex-Reading patched D&H GP39-2

Athearn has really been helping the D&H modelers recently. In the past couple of years they have released blue-dipped GP39-2 engines and lightning stripe GP38-2 engines, and now they are putting out a few more in the lightning stripe scheme and the ex-Reading patched scheme.

Here is the official Athearn announcement. The lightning stripe engines are too modern for my layout. I already own a couple of blue box Athearn GP38-2 engines in different blue dip schemes, but the green and yellow #7412 is just perfect and would help break up the mostly blue roster I have. Atlas offers it too, but this is supposed to be a better model. 

Sunday, October 4, 2020

Newly discovered info on D&H RS-3 #4099

Last summer I wrote up a post about all of the Alco RS3 locomotives that were still on the D&H's roster in May of 1984. At the time, I wasn't sure about the status of engine #4099. I had a picture from 1981 showing it with severely faded "Delaware and Hudson" small font lettering and small numbers on the sides, but I didn't know if it ever received large numbers or not. Further, records showed that it left the D&H's roster in 1984 and was sent to the Cuyahoga Valley Railroad in Ohio but I couldn't be sure when that happened. If it was before May of 1984, I shouldn't have a model of it on my layout. So, I waited for further information...

...and I finally found the slide above! While blurry and over-exposed, it does show #4099 (the lead engine on the right) with large albeit faded side numbers in Colonie on July 29, 1984. So, I can at least confirm that it was on D&H property in May of 1984. What's more, I can now say that the three engines all had different paint and numbering schemes:

#4075 - blue dip with large yellow numbers; 

#4099 - lightning stripe and large numbers; and

#4103 - lightning stripe with small "Delaware & Hudson" lettering, and probably not large numbers.

As for #4118, I don't know if it was still on the roster or not. The search for information continues. I have seen a slide dated 1983 showing the engine in Pennsylvania. However, that isn't conclusive.

Now, I just need Bowser to finally release their long-anticipated RS3 engines!

Wednesday, August 12, 2020

Scratchbuilding a GWR cattle wagon - Part 5 (Weathering & Cows)

The cattle wagons lasted for decades on the GWR. Originally, they used powdered lime (limestone, not the fruit) to sterilize the lower third of the wagon interior and in short order it would leach outside of the wagon, giving it a white band all around the car. This practice was discontinued in the 1920s, and I didn't want to do that anyway. Instead, I followed the picture and gave the car a used appearance but didn't want to make it look like it was falling apart. The underside of the car, with its mess of pipes, diagonal braces, and brake gear, was painted flat black and hidden in the shadows. Drybrushing various shades of brown (dirt) and orange (rust) made them pop. Acrylic paint doesn't go on perfectly smooth, and any rough texture looks like accumulated dirt and crusty rust.

I then used mineral spirits and oil paints, mostly beige and brown but with a little black, to make washes which were then applied to the interior and exterior of the car. Even though the car was regularly disinfected, it still got dirty after transporting livestock on the inside. The outside was a different change of pace for me, as I am sure they used lead paint on the wooden body and thus it wouldn't rust like metal boxcars and stock cars do today. It was nice to approach weathering this car differently from all the 50-foot steel boxcars that I have on my roster that seem to have rust everywhere. I also gave the cows a bath in brown oil paint wash to tone down their plastic look.

Looking at many of the pictures, I noticed that the iron and steel work did rust a bit more and that caused it to visually stand out against the gray sides. In some cases, it was extreme but I didn't want that. So, I used a microbrush to lightly stipple some reddish/black paint on only the steel angles and bracing. Whenever I thought I added too much I gently wiped it away. I wasn't going for a subtle look, but at the same time the rusting ironwork wasn't to be the focus of the car. I used acrylic paint as it is thicker than regular model paint and you can use that to add texture to the "rust." When I thought I had done too much I went to bed, but upon waking up in the morning I thought it was perfect.

The straw or hay load (my wife says there is a difference, but I don't know it) was made by cutting up a cheap chip brush that I got at the hardware store. It was straw colored which looked good. I used a combination of scissors and a knife to remove them. WARNING... they flew everywhere on my work bench, including near some models with fresh paint that I had drying. It is probably best do cut them outside or near a garbage can. I easily collected enough for several cars, or maybe some future scenery projects. They were tossed into the car and encouraged to poke out the sides, just like in some pictures I had seen. Alcohol followed by matte medium secured them.

Finally, all I had left to do was add the cows. I looked online for realistic cows, and I found two sets by Bachmann in their "Scene Scapes" line that looked good (#33102, #33103). One set was brown with white spots, and the other was white with black spots. Beats me if cows of different colors normally traveled together. I assumed that they would face the same direction in the car, being as they were all loaded from the same side. So, I dipped all four of their feet in thick Arlene's Craft Glue and then stuck them down. Then, I sprinkled more of the hay around their feet and secured it with alcohol and matte medium. I left it to dry overnight, and by the next morning the roof was ready to be attached.

The roof met the car's upper edges pretty well, but there were slight gaps. I used thick beads of Loctite Superglue gel (once I discovered it, I absolutely love it for everything) and then carefully set the roof into place The glue took up and filled any gaps, and I didn't need to put any pressure on it to keep it in place. Once that cured, the car was essentially finished. My display cabinet has one shelf specifically to hold my scratchbuilt cars, and there was just enough room to slip this short car in. It came out really nice and I think the cows are cute. That being said, I was ready to moooove onto my next project.

Friday, July 31, 2020

Weathering D&H "I Love NY" boxcars and blue glass hoppers

One of the great things about modeling the D&H in the 1980s was that there were a ton of colorful freight cars roaming the system. Two of my favorite examples are the blue Oneonta glass recycling service hopper cars and the blue and white "I love NY" boxcars. I have models of each, thanks in part to my lovely wife. They have been sitting in my display case for a while waiting for the right time to work on them, and with most of my scratchbuilt car projects finished or waiting for parts in the mail I thought that this would be a good time to get them layout ready.

The boxcars were from Intermountain and for the most part they look pretty good. The shade of blue used is dark, which matches the prototype during their early careers on the D&H. It only began to fade in the late 1980s when they were pretty much off the roster. Unfortunately, Athearn and Bev-Bel used this lighter color when they produced their models and they just look bad. The Intermountain cars don't have roofwalks, which is correct, but they do have ladders on the right sides and non-brake end that go up to the roof. I cut these down to match the prototype, and then touched up the white paint where the pins were. The ladders are fragile and cracked (but didn't break), which surprised me.

Car #50027 should have a black "Operation Lifesaver" emblem, and car #50008 should have a "NYSDOT" emblem, but I couldn't find decals. I may have some made up for future cars, but for now I am okay with them as is. If someone points out their omission I would be very impressed. The stock couplers are Kadee #5, (better than cheap McHenry or similar clones) but I use #158 couplers. The coupler boxes, unfortunately, are glued shut and to the frame. So, I pried them off and had to drill/tap the area for 2-56 screws. Not tough, but these cars don't appear easy to take apart and everything is very fragile. The cars received light weathering as the paint was only two years old in 1984. This was not the place to create a "rust bucket."

To see an extreme example of weathering one of these boxcars by Lee Turner, check out his blog.

The two Oneonta recycling hoppers are another set of cars that I really like. I have a 4-bay model from Walthers and a limited 2-bay one from Atlas. Unfortunately, the car numbers on both are the same... #7065! That is wrong for the Walthers model, but so is everything else: body style, artwork style, lettering color. So, I left it as is. The load was made from a styrene base with mounds formed from caulk from a tube and the edges sealed with more caulk. Then the loads were then painted with Testors gloss gold enamel paint or green acrylic craft paint. The caulk worked well, but I don't know if it was any easier then used carved pieces of foam which is always featured in magazine articles.

Next, I took some Czech "tube beads" that I found on online and crushed them to make the load. I couldn't find HO scale bottles for sale and even if I had, they would have been so small as to effectively render them useless. And expensive, if I wanted to fill even the visible portion of a hopper load. I considered those tiny round "Indian" glass beads (also sometimes called "seed beads", perhaps because that is more P.C.) that are used for bracelets, but then I found tube beads on Ebay for a couple of bucks a bag, delivered from China. Not knowing how much I needed, I bought three bags each of a greenish color and a brownish color. Remember, Oneonta sorted the loads by glass color so I did too.

The beads were still too large to represent bottles or jars in HO scale, so I put some in a Ziplock back and started wacking with a hammer to crush them. Then, I filtered the glass shards through one of my dirt sieves (cleaned, of course) to remove the bigger pieces that required more wacking. Over and over, the process went, but it wasn't difficult. I would definitely suggest not doing it directly on your workbench... a piece of sheet metal, or even wood, would be better. And, eye protection is a must. But, I was happy with the results and it didn't take too long. One bag of each color was more than enough for one car, so I have a lot of extra.

Then, they were heaped onto the loads and maneuvered in place. The centers of the cars are mounded, much like coal would be when it passes through an automatic loader. I doubt the glass was loaded into these hoppers like that, but I didn't want the top perfectly flat. After the glass was how I wanted it, I dribbled rubbing alcohol all over it and then soaked it with my matte medium. The green one came out perfect, but the brown one (the first car I worked on) didn't. There was too much whitish glass powder in the mix and that dried in white spots, so I then ground some more brown glass to go over the top. Much better.

I am really happy with how they turned out. I had seen articles suggesting glitter but that looked too fake. You can buy ground glass shards (used for other crafting projects) but since hobby stores were closed I wasn't sure how large the pieces would be. Here, for about $3 a car I had a really neat glass load. And yes, if you dig your finger into the load you are likely to get cut, so I didn't try it. The green car came out especially nice, and I really wish I could think of another application to use this glass for. Since these cars were routed from Oneonta to Corning, I doubt they spent much time at all traveling on the Colonie Main. So, they might just reside in my display case for now. But, they may make appearances now and then for something special.

For comparison: HO scale figure on left,
then Indian bead, then tube beads
... and that would have been the end of the story, except I showed the models to my wife who first commented that I shouldn't have weathered the boxcars ("but they were so shiny and pretty"), and this is coming from a woman who thinks all train cars should be weathered! Then, she saw the glass hoppers and wanted one filled with blue glass. I explained that blue glass wasn't around to recycle in the 1970s, and still isnt' even now, but she thought it would be pretty. I had a Like Like blue hopper on order- a really dated and terrible model in my opinion- that I was going to use up my extra green glass in. But, if she wants a blue glass car she will get a blue glass car! The glass is ordered... stay tuned for that.