CP Executive train in Albany

CP Executive train in Albany

Sunday, January 31, 2021

A faux "Springfield" train show

Well, its Sunday of the Springfield train show weekend and normally my body would be stiff from walking around for 7 hours on hard concrete floors looking for amazing train finds. Sadly, the Springfield Train Show but it isn't meant to be this year. That means my hobby money I had saved up to spend there is now burning a hole in my wallet. Over the past six months of working on the scenery of my layout I have avoided buying vehicles, figures, and other details online or in hobby stores. They are "little things" whose cost can quickly add up even though they really bring a layout to life. 

I was hoping to search the Springfield show this year and see if I could find some good deals for them, but oh well. Instead, I decided to have a "virtual" Springfield show at a hobby store that is only about 45 minutes from my house. The owner is a great guy, they have a good selection of new and used equipment, books, and supplies, and I hadn't been there in a while. And I want to support local hobby stores during the Pandemic.

So I went a little crazy, at least by my standards. I didn't even realize until I was driving home that I bought things I normally wouldn't get there. Like old magazines, which I love. I love collecting old hobby periodicals related to model railroading that show what the ideal train layouts of that time period looked like. I have nearly all of Kalmbach's layout planning guides, but I found another for only a couple of bucks and snagged it. Many of the layouts are crammed full of track and switches but that was popular during the 1960s and 1970s. The thinking was that more industries to build and switch meant more fun. Many of the track plans had been recycled from other Kalmbach publications, too, but that is okay. I also bought a Lionel track planning book which looked interesting and cheap.

I had come mostly to pick up a D&H Walthers gondola and crane that the owner had been holding onto for me for months. I think the crane is a metal kit from Custom Finishing #247-7000 and it was put together really well. It even was lettered for the D&H. I will likely modify it a little bit in the future, but for now it will feature in my North Albany yard scene. The gondola is a recent Walthers release that is decorated in the D&H's 1980s scheme. It is perfect for my needs and it matches a prototype picture I have of a similar gondola used for similar MOW work.

I also found a Bachmann high-nose GP50 painted in the Erie Lackawanna scheme. This engine was the motive power in my first train set that I ran to death... literally. The motor burned up and melted, and the broken engine has sat in my display cabinet waiting for a new lease on life. This engine, which only cost me $10, might serve that role. At first I thought about using it as donor parts for my locomotive, but I think instead I will keep mine as-is and run this new one as a proxy.

Finally, I purchased some HO scale trucks and figures to help populate my layout. The Atlas two-tone red and white truck was high on my want list for awhile, as it is a model of a 1970s truck and perfect for my layout. I purchased a similar truck in plain white just because it was there. The black truck also fits my time frame and I am not sure what I am going to do with it yet. Some of the figures are destined to work the Albany Terminal Warehouse docks.


While building a layout can be expensive, it is the final 10%... the final details... that make it look special. I missed going to Springfield with my friends but I still had a fun time shopping in the store in sections I normally would skip, looking for these little things. And hopefully next year Springfield will be back.

Thursday, January 28, 2021

Structure - Albany Tomato Company (part 8)

It has been a long time since I have worked on the Albany Tomato Company project. I ordered the window castings in May 2017 but did very little since then. I hit a couple of bumps along the way. First, the building wouldn't fit on my layout and so it seemed a waste of time to work on it when I finally had the opportunity to construct a working layout. Second, I had hoped to finish it for the local NMRA convention held in the fall of 2016 but that had come and gone. Finally, there were several construction issues I wasn't sure of and my skills weren't developed enough to tackle them. 

The biggest problem I faced was that the building is brick and the windows and doors are inset in the openings. And as seen in the picture from 1984 below, there were also a lot of them in various different shapes. As such, I had to cut and file the openings perfectly to fit the castings. And, because I cut the openings based on prototype dimensions instead of actual commercial castings I had to scratchbuild or modify nearly every window and door casting to fit the openings. That is a lesson I learned the hard way: if possible, modify your model's window dimensions to utilize commercial castings

Because they are castings attached from the back, it also affected how the building was going to be painted. I could either paint the building red, the windows gray separately, and then glue them into the building, OR I could glue them in, paint everything red, and then touch up the windows with gray. The first option leads to a cleaner appearance, but the second is easier assembly-wise as it is much more convenient to access the inside of the building when the roof is off. With these problems above on my mind, I had put the project aside and left it. 

But recently I started thinking about it again and I wanted to focus on finishing it. As a reminder, here are some photographs of what I am building. The first image is from 1984, and the second image is from 1986. Its current appearance as seen here looks a bit different and isn't terribly helpful.

I have learned a lot in the past 4 years as it relates to scratchbuilding and have built 8 freight cars and four structures since then. I have acquired new skills, tools, and a healthy supply of styrene pieces. I was ready to move on. And in taking a leap of faith I decided to glue the windows in now while I could easily access the openings from top and bottom, and deal with the painting later. It also meant that I could fix any issues before painting, which will hopefully help hide them.

But where did I leave off? I had a box full of window and door castings, some of which had been modified. Thankfully, I found tracings of the walls in 2017 that I had to determine which castings from Tichy or Grandt Line would work. I had also made notes about which ones would require modifications. These were extremely helpful now that I had to piece it all together again.

Some window castings had been cut down in height and glued back together. To add strength to the joints and increase surface area for gluing into the window openings, I attached small pieces of styrene strip to the sides.

They needed to be glued in straight but I found holding them from the inside and applying glue from the outside tedious. So, I let gravity do the work. That meant turning the building upside down and letting it overhang my workbench and getting on the floor and looking up to adjust them. That was annoying, so in a moment of brilliance I asked to borrow my wife's makeup mirror. I could now see well enough to adjust them while sitting at my desk, and then flood the joints with MEK from above to secure them.

The spaces between the windows were loosely fit with styrene to provide larger mounting surfaces for the window glass that I will install later.

Some windows were blanked off in the 1984 pictures, and those were modeled with styrene covering the openings from the back.

An odd second-story loading door was made by cutting down a Tichy casting and then framing up the sides and opening with styrene strips.

I am not sure how it was used, or why it was there. The prototype had windows built into it (just visible in the 1984 picture) but because I compressed the height of the building the windows had to go. The window next to it is an unmodified casting that I framed with styrene on the top.

I used a Tichy door casting for the ground floor entrance. I sort of penciled in where the steps will go.

A random casting from an old Life Like "Supply House" #1398 kit (for a laugh, look it up online and see the colors it came molded in) was cut down to fill in as a ground floor, glass block window.

Two large glass block windows were made by combining a pair of Grandt line castings for each. The lower windows were also made by combining castings. You can see the uneven window strut patterns in the lower ones which give away their cobbled construction. Oh well.

Most of the upper-story windows were modified Tichy castings, but one was made using another pair of window castings from a Walthers power plant kit.

This picture makes them look more crooked than they are in person. 

I had some steel door castings left over from the Walthers' "Modern Loading Dock Doors set" which worked well for the two doors on the roof. I did have to frame one though to hide the gap. The bottom looks skewed but it will be hidden when the roof flooring and steps are installed.

I needed to build three loading doors for the model and the pictures I had were grainy at best. For the smaller one on the front, I combined two castings that looked like grooved steel into one large door and then framed the opening with styrene. I imagine it to be one of those noisy rolling doors.

The second, larger door was actually visible in photos and it looked like a five-panel door. This I scratchbuilt from styrene strips and sheet. It isn't tall enough for a box-truck to fit in but a smaller flatbed truck would. I don't know if this was how tomatoes were shipped out of the warehouse.

The last doorway that was planned was on the trackside wall and was used for the unloading of the reefers of produce. The 1984 picture only shows that the door was gray, and the 1986 picture shows an awning. That's it for guidance. When I started building the model I considered leaving it open and constructing a shadowbox scene inside of loading docks, workers, conveyor belts, etc. Since then, I have decided to just move on and close it up. I had a Pikestuff rolling door casting in my scrapbox and used that. I first framed up the opening with styrene strip, and added a larger piece along the bottom where loading bridges would have been installed and banged around.

The stairs were a fun exercise in scratchbuilding. I used extra pieces of brick sheet and made two mock-ups of the stairs to test rise, run and tread width. I also had a Walthers stairway railing casting that I might use and I wanted the stairs to work well with that. Eventually I went with stair profile #2. I used it as a template to make another identical piece of smooth styrene which would become the front of the stairs.

I then used my NWSL Chopper to cut pieces of styrene to glue between the two sides, and it came together quickly.

I could have left the open gaps and it would have represented a steel plate stairway. But, I assumed it was a cast concrete stairway so I added more styrene inside to fill the gaps (and add rigidity). 

For even more strength, I then filled the entire thing with epoxy and let it cure overnight. A little cleanup with the belt sander underneath, and some sanding sticks everywhere else, and I had a pretty good little set of stairs. Because it is concrete, I don't need sharp corners and any little bit of roughness will add texture.

And with that, all of the window and door castings were in place. Thank goodness I took good notes... and kept them... so that I could remember what went where. I spent about 10 hours on the windows and doors. 

I then added all the styrene roof panels, framed them out along the edges to give a clean appearance, and trimmed everything flush. Then I started adding all of the details that make the building interesting. Unlike older building from the early 20th Century, by the 1980s and 1990s most building were pretty plain except for some electrical conduit, lights, and safety cameras. My pictures didn't show what was on the roof, so I had to make some logical guesses. I first built some of the air conditioner units that came in the Walthers roof top detailing set (#933-3733).

The units were connected with conduit and sprues and other such bits and pieces that were found in my scrapbox. The yellow "vents" are actually crates from a Walthers "freight load" set (#949-4151). I wanted something small and rectangular and they were perfect. They even have little nubs that stick out the bottom (or the top when oriented as intended) which makes them look even better.

I laid out up some electrical boxes and such with more pieces from my parts boxes. I also whipped up a simple awning from strip styrene. I thought about going crazy and adding lost more pipes but they didn't seem to fit this style of building and they sure didn't show up in the pictures (though to be fair, the pictures were blurry nothing seemed to show up). So, I went with a less-is-more attitude.

I held off gluing on the front steps for now, as I can easily paint them and attach them later. But I did add a little bit of sprue near one of the truck loading doors that sort of looks like a gas meter. 

And finally, with all of that done, the building was ready for painting. By my estimation there were be at least six colors sprayed on, and I will need to wait at least several days in between for it to cure before masking for the next one, so likely my next update will be in a month or so. I am currently working with several people on custom decals. So, it is coming together. Between the research, the field trips, draft of the plans, and actually building the model I have between 40 and 50 hours into it already. I will be glad to see it finished. 

Monday, January 25, 2021

Contemplating the MMR Certificate for "Master Builder - Structures"

I have four certificates necessary for my Master Model Railroader award already and 3 more well underway. However, while cleaning up my workbench I stumbled on my Albany Tomato Company building which was about 70% complete. Since I had no room for it on my layout, I had shelved the project. For various reasons I decided to dig it out and work on it again and in the process started thinking about working on the "Structures" MMR certificate.

It is funny how quickly I become passionate about something. Less than a month ago, while dining with a friend and discussing the MMR program, I told him I was not going to go for Structures because I didn't want to spend time building lot of things that would just sit around and collect dust. And yet here I am, already starting to work on it. Don't ask me why.

One friend and excellent structure modeler is Mike Hachey, a fellow NMRA Division member. Constructing structures is his favorite part of the hobby, and it is no joke to say he is building a layout just to display them. And they are beautiful works of art. All of the pictures in this post are from a visit to his layout a couple of years ago. He has so many that in places they are just piled up, waiting to be integrated into the layout!

The requirements are on the NMRA's website but essentially you need to build 12 structures, with at least 6 scratchbuilt, of various styles. At least six of them must earn 87.5 merit points and at least one must be of some sort of bridge. There are other details, but that is the basic requirements of the award. Almost all of the structures on my layout are or will be scratchbuilt but none would qualify for the certificate. That is because most are truncated at the edge of the layout which makes them "partial structures", and I am also using a lot of commercial castings and omitting some details in the back that can't be seen. So, any buildings I use for my MMR award will be stand-alone structures that will otherwise live in a display case. But I am okay with that.

There are lots of things I want to build, and I really want to push myself and learn new skills. For example, I want to build one model out of wood instead of styrene, and I want to make another by casting plaster either for wall pieces or as one unit. I want to build models following articles from Michael Tylick and Lee Vande Visse, my two favorite authors as a kid. I want to use the plans from Harold Russell, the prolific draftsman who has done tons of drawings for Model Railroader. I want to do something related to the Arcade and Attica Railroad. It would be neat to do a barn or something farm related as my wife's family owns several farms. A church would be nice too, as my Christian faith is very important to me. And while most will be in HO scale, doing something in a different scale would be a pleasant diversion. That is quite a crazy set of druthers.

Thankfully, I have lots of old train magazines, many of which were purchased by my parents for me. I sat down one day and went through every issue and wrote down a list of scratchbuilding articles with plans that interested me and fit into the categories above, and ended up with 66 ideas total from 1988 through 2017. So, I have plenty of fodder to work from. 

But I need to work on my Albany Tomato Company first before starting something new. So, for now I will just start making plans. But, the "local" NMRA Regional Convention is in early October and I would like to have some structures to enter (as well as my scratchbuilt freight cars built last year) so there will be no sitting around.

Friday, January 22, 2021

A Curved Backdrop for Cut Corner

"Cut Corner" has been waiting for its backdrop for a while now. Because of the angled geometry of the back corner (with its piece "cut off", hence the name), a rounded backdrop wasn't the easiest thing to pull off. So, I had made a three-piece angled backdrop support. However, I still wanted to round over the edges on the inside to make the sky's bend less jarring. And that called for styrene. Unfortunately, I had run out of 0.040" thick stuff. So, more was ordered from the local plastic distributor. I brought it home rolled up so it would fit in my little Toyota. I had to purchase two sheets as they didn't sell them individually. 

Next, I roughly calculated the length of the backdrop. The radius around the back of the curve is 30", which means that the circumference of the circle is 188.5". Thus, the one-quarter Arc I needed was around 48" long. A handy online calculator is here. I could have cut the styrene across the full width of the sheet as it was 48" wide, but that left no room for error in my math. So, instead I cut a strip 16" tall the entire length of the sheet (8 feet). My backdrops are 20" tall, but only 16" shows above the plywood table top.

I then gave it a good rinsing in the shower as styrene comes from the manufacturer dusty. In the process, I managed to knock down the sprung shower curtain bar. I had the choice to grab the falling bar or my styrene and protect one from the floor... and you know which one I safely secured. I mean, you can get a shower curtain bar anywhere...

After that, I tested the styrene on the backdrop Gatorfoam substructure and it looked like it needed to be trimmed to 52" long, which is what I did next.

Then, the wife's help, I mounted the vinyl backdrop print from LARC Products to the styrene. It wasn't as easy this time for some reason, and we had to unstick and reapply it several times. But in the end, we got it done. The styrene was then loosely mounted to the Gatorfoam with foam double-sided tape at the ends and in the very middle. I still need to make some clips to go along the top of the backdrop joints to hold them together, but from normal viewing heights they look fine. I also reconfigured the trees along the back to try and make them look fuller. 

Tuesday, January 19, 2021

Repainting the fascia black

My layout doesn't have formal fascia boards installed yet. It might never have them. However, I did paint the outer edge of the 1x4 framing while I was building the layout to draw the viewer's eyes onto the layout more. At first I used dark hunter green gloss paint, which is a popular color with other modelers. But, as I began visiting other layouts I discovered I liked black even more. However, piece by piece as I work on the layout I have been repainting the benchwork from green to black. I like the change, but I will really know more once the backdrops and scenery are in place. Thankfully, paint is really cheap and easy to change. Under-layout curtains would help too, but I don't plan to add them because they just seem to collect and then hide clutter (and spiders...)


Saturday, January 16, 2021

Structure - Agway (Quonset hut)

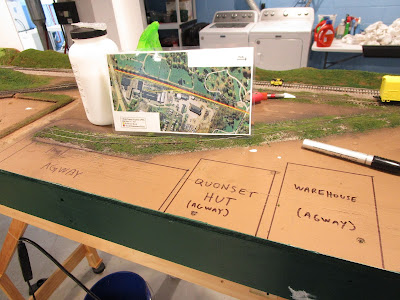
With a full three-day holiday weekend available to me, I decided to really get serious about working on the North Menands section of my layout. I redid some scenery, added ballast, and started planning in full size how my structures would go. This included the Agway complex, which contained at least three buildings. For an overview how they all fit into the area I am calling "North Menands", see here. This is what the complex currently looks like. You will need to imagine a railroad spur leaving the mainline and cutting through where the thick trees are to run parallel to the larger building on the right.

This Agway still was receiving rail service in 1984. I didn't have many good pictures of how it existed at that time, and this is the only one showing it:

While drawing up my plans for these buildings, I realized that most of their square footage would be cut off by the aisle. I had to selectively compress everything, but the Quonset hut (the middle building) was especially difficult because they are generally built to a common set of proportions and if I made it too thin then its height would need to be reduced accordingly, making it look extremely silly.

So, I started with this building. Plus, my wife was using our computer and I couldn't easily access the pictures I took of the other buildings. This led to an issue later on that only reinforces this important rule: always have reference pictures available when you are building something! 

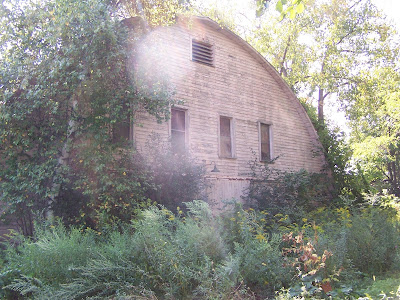
I determined that a width of 4.75" inches and a depth of about 5" would produce a building that was large enough to give the impression of what I wanted without dominating the scene or looking too small. Its height would be determined later. The prototype picture below shows it to be a pretty neat looking building but sadly I couldn't build it to size. 

I then looked in the recent Walthers' catalog to see if there were any commercial kits that would work. Rix had one (628-410) but it was too small for what I needed. I found a Busch "Airplane Hangar" (189-1408) that looked promising but it was too big and the curvature of the roof arch didn't match that of a quonset hut. One kit was too little, one kit was too big... I needed one that was just right. So I decided to scratchbuild it. 

I assumed that the end profiles were essentially half-circles along the roof line. Perhaps the area where the arch intersects with the ground it actually straightened but I wasn't sure. And I didn't have access to the internet. So I forged ahead. Styrene is cheap (did I mention I bought another two 4'x8' sheets of 0.040" recently?) and I was in the mood for cutting and gluing.

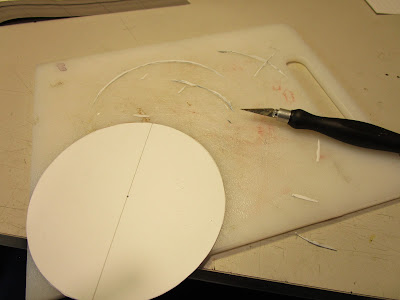
Based on my width dimension of 4.75", I pulled out my trusty compass and drew a circle on some styrene. This was cut in half and then I had the two ends marked out. I cut close to them with a knife, and then used my belt sander to go right to the pencil mark. Some sanding sticks smoothed over any areas that needed a touch up. One end was used as a template to mark a middle interior brace.

The two ends were then glued to a piece of styrene that I had cut to the dimension of the base, and the interior joints were braced with pieces of 0.25" square styrene.

The middle brace was installed the same way, and then two more pieces of square styrene connected them at the top to prevent collapsing when the wrapper was installed.

At this point I installed vertical styrene corrugated siding pattern sheets to the ends, which matched most Quonset huts I had seen in my life. Unfortunately, the prototype is not like "most" and it actually had horizontal wooden siding installed on the ends. The picture below is of the side facing the tracks. My compressed size of the building makes modeling it with all of the windows impossible, but I decided to add some detail. If you look carefully just below the two innermost windows you can see a green gooseneck lamp that is hanging above a sliding door (hidden by the brush). I may add that light, because it will give my scene extra points for the MMR scenery certificate.

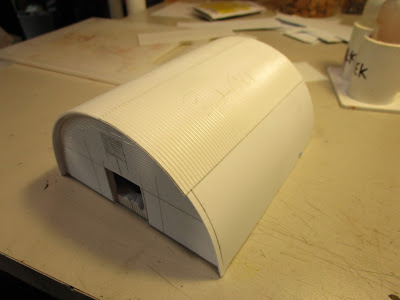
The first roof layer was made from a long piece of 0.040" styrene, cut to width allowing for a little overhang on the ends and taped to one side. It was then bent over the curve and pulled tightly, and then the other non-taped joint was flooded with MEK and allowed to set. I had to hold it in position for a good ten minutes while it dried. I then ran MEK along the curved arch and let it set. The next morning, I removed each piece of tape one at a time, added MEK to the joint, and retaped it. Once cured, it was nice and strong. Any gaps along the roof will be hidden later.

Before going on, I set it on the layout to check its relative size and see if it was what I was looking for. It was fine, though I really wish I had room to make it larger.

I then decided to strengthen the roof by laminating on another plain piece of styrene. I cut it a little wider than the first one to give me some extra overhang on the ends. To mount this one, I decided to go with the Pliobond contact cement I had used over the summer. I remembered that it had worked well (though it smelled terrible). I applied two coats to each surface, let them dry, and then in one smooth movement bent it over the existing structure. 

However, this idea was a bust. Even though I carefully followed the instructions it never formed a nice solid bond. My Pliobond was only 6 months old, which should have been "fresh enough" to work. Maybe I should have scuffed up both pieces of styrene first so that the contact cement would have had something to grip. Regardless, I resorted to MEK and superglue.

As noted above, I then rushed ahead and glued on some styrene Embossed Pattern Sheets brand #97402 corrugated styrene sheet vertically on the ends. I later discovered this was all wrong for the ends, which had horizontal wooden siding. It didn't stop me from sketching out where the sliding door and upper air vent would be located. I plan to add these details on the track-facing side, but left off all of the windows. 

I then glued on some Evergreen O scale freight car scribed siding #2067, which was perfect in size for the large HO scale wooden siding. There were some gaps along the edges of the joints where the contact cement had not fully secured the pieces together, but they were hidden behind a trim piece of 0.060" square styrene that I bent around the entire curve and then secured in place with MEK. 

On the trackside end, I cut a square hole in the subwall before gluing on the horizontal siding. The door on the end will be removable, and behind it will be a hole which will allow me access to run the wires from the gooseneck light through the building to the benchwork if the bulb ever burns out. At least in theory that is why I did it this way.

After looking at more prototype pictures (finally!) I noticed that the roof was made up of lots of panels running the length of the roof, but with seams every so often. I simulated this by cutting more of the corrugated styrene into strips about 2" wide, and then gluing them along the roof. 

It took a while to get all the joints in place, as I had to hold the edges down with a metal straightedge to avoid fingerprints marring the soft plastic and there really was no easy way to clamp things. 

I installed some details on the trackside end including a sliding door track made from some styrene I-channel and L-angle, as well as a vent along the top made from a Pikestuff casting (#541-1009). Then, I washed everything in soap and water in preparation for painting. 

Assuming that masking the roof would be easier than masking the ends, I painted the roof first. The prototype roof looks like it the corrugated metal was left in its natural silver color, and it weathered or corroded to a whitish finish. In addition, the dips in the corrugations trapped water, dirt, and rust and left interesting weathering patterns. I started by spraying the roof with Rustoleum "Silver Metallic" #7271, which I thought would be a good silver color. However, upon spraying I could see silver flake particles floating in the paint and they pooled in areas. Once I weathered it they went away, but a non-sparkly silver would have been a better choice. After that I drybrushed the entire roof with "Dolphin Gray" acrylic paint, which allowed some of the silver to show through. It was just the effect I was after, and now it looked like chalky, weathered metal.

The roof was then given a shot of Dullcote and weathered with brown and black oil paint and mineral spirits. 

For the wood siding ends, I first went to the hobby store and bought a bottle of tan paint but when I tried it out I realized it was too "orangish". So, instead I used some Valspar tan spray paint whose color was called "Rugged" (#84230) that I had lying around. After masking the roof, I applied several light coats and it was ready for final weathering and detailing.

Weathering was done with oil paint washes, mostly focusing on brown to represent the years of dirt that would blow against the sides and wear down the paint. In the 2010 pictures above, the paint was heavily peeling and the rubber-cement trick would be a good way to replicate it. However, I don't think the building was as in such bad shape 26 years before so I just left the paint dirty with only a few peeling/worn spots.

I still need to install and wire the gooseneck lamp, and then glue the sliding door on and plant the building. I am looking into the light now. And I think I have a nifty trick for powering it up. Stay tuned.