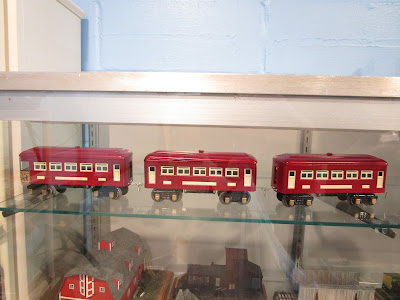
Whenever I go to the train shows I see old Lionel, American Flyer, and Dorfan passenger train sets for sale. Usually they are the large "Standard Gauge" size, which is roughly that of modern G scale. They have a toy-like charm that attracts me. I thought it would be fun to buy a set of passenger cars and paint them up how I liked. However, standard gauge was too large and I didn't want to invest in another train size that I would only be able to operate occasionally under the Christmas tree. So I looked to the smaller on O gauge.
Lionel made several sizes of tinplate trains that ran on O gauge track, and I was most interested in the larger 710/712 series cars. But they are expensive, so I settled on the smaller 600-series for my first attempt. (For a brief history on the various types of Lionel 607/608 passenger car sets, see this helpful website.)
One thread on the O Gauge Magazine forum was inspirational on showing how it was possible to take apart and put together the cars, and even though it focused on standard gauge coaches I liked how he did it.
Then I ran into a picture of the Lionel Collector's Club of America "The Lakeshore Limited" set, and I really liked the color combination of the dark cherry metallic and cream. However, the roofs transition to black in the middle and I didn't like that at all. I also didn't like the truss rod castings underneath the car (painted cream in the picture) but since I was using a different style of passenger car I didn't have to deal with them.
I planned to pick some up some 600-series coaches at the next train show I went to, but that was in March 2020 and Covid hit... and the project took a back seat. For two years. Finally, in 2022 after talking it over with a friend he offered to sell me a box of beat up 607/608 cars for a good price. I didn't need them all, but I figured I could get enough parts for 2-3 good cars. I bought them without really looking to see what I had.
When I got home, I noticed that I had one 607 coach and four 608 observation cars! That does not make a train. And none of the cars matched. Some had brass journal covers and some had nickel. I had three different observation platforms painted gold, silver, and custom made job that looked like tin cut from a can and hand-soldered on. The truck sideframes had different style stampings. The roof mounting screws weren't all the same. Three had black underframe tanks with silver ends (which I wanted) and one had formed truss rods (which I didn't want but its is easily removable). It was a hodge podge. But, I got them at a great price so I didn't complain. I just got to work.
A series of videos on Youtube by a guy named "Darth Sante Fe" (here is one) walked me through the entire process of disassembly. I picked the best observation car that matched the coach and took off the roofs by unscrewing them. Then, the window panels were removed by unbending the fragile metal tabs.
Parts were sorted into piles, including some which I knew I was never going to use.
I used a small glass container filled with lacquer thinner to strip the paint. This, and an old toothbrush, worked well. I later bought a metal brush to make it easier to get into the corners.
The fuel tank assemblies underneath were cleaned (I discovered that some were blackened steel, and others were painted steel... another set of inconsistencies!) and then sprayed gloss black. The nickel-plated ends were buffed shiny and sprayed with clear gloss to keep them from tarnishing.
The truck sideframes were carefully spread apart just enough for the wheel assemblies to fall out. I was surprised to learn that the wheels rotated independently on the axles. I cleaned and polished them, and removed any rust. I masked the middle rail truck rollers and then the trucks were painted gloss black.
I had also masked the tops of the trucks because it transfers current to the body for the interior lights.
Some of the truck journal box castings were brass and some were nickel. Replacements for both are available, but I wanted to reuse what I had. So, for consistency I painted all of the journal covers I with Testors gold paint. I also painted the observation platform railing with the same gold paint to match.
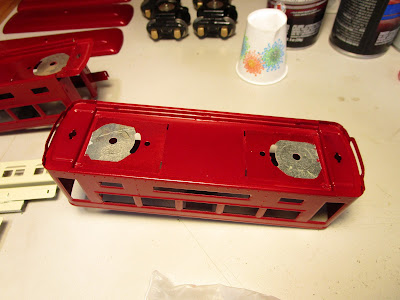
The bodies were next cleaned of all paint using lacquer thinner, and that was a tedious process. I wish I had access to a media blaster to get it all out. Thankfully, the inside corners aren't easily seen so I didn't strive for perfection there.
To give my train a second coach I purchased a spare 607 coach body on Ebay, but its trucks and roof didn't match what I already had! However, I managed to scavenge trucks and roof from one of the surplus observation cars. When I was done, I still had enough parts for at least one complete 608 observation car. Maybe for the future...
Also, the extra coach 607 that I purchased later had a bent steel underframe piece and no fuel tanks.
To match the other coaches I removed the underframe assembly and then drilled holes to mount some surplus fuel tanks which I took from the parts supply.
I was finally ready to start painting the bodies! I used automotive primer and spray paint because I wanted really durable paint, and automotive colors come in a lot of metallic options. Here, I selected Duplicolor "Medium Garnet Red Metallic" (BGM 0380) and the matching primer. This stuff costs 2-3 times as much as regular spray paint but the nozzles are wonderful and the paint goes on nice and smooth. It should... it is used on real automobiles! One thing I noticed is that it required frequent shaking or the metallic particles inside would spray out inconsistently. I built up the color in many light coats.
I finally got smart and screwed hooks into my ceiling beam which were very handy for hanging projects that needed to dry after painting, such as these coach bodies.
The undersides of the coaches were masked as well to allow for electrical conductivity with the trucks.
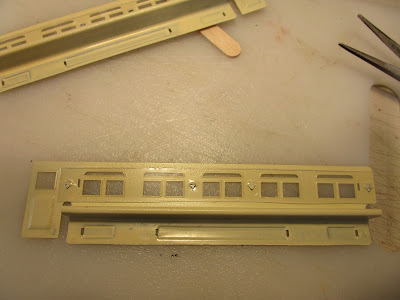
The window inserts were straightened and then painted with Ace brand "Najevo White Gloss" (17185) which looked a lot like creamy white. I couldn't find a comparable auto paint color but many of the stores had empty shelves where car paints should be.
The original Lionel window inserts were discolored, dirty, and damaged, so I replaced them all with strips of clear styrene that I cut to size.
These were lined up on the inside of the coach wall inserts and pushed down until the metal spikes pierced the clear plastic. Then, the spikes were bent down to hold the clear plastic in place.
The coaches were reassembled by reinserting the tabs into the slots and bending them over. The lower ones were especially difficult to get to because the metal window inserts and clear plastic window glass blocked access. Perhaps at the factory the clear plastic was added after assembly of the sides?
Then, the tanks were installed on the bottoms of the coaches.
I struggled with couplers. I didn't like the clunky, hard to use original latch couplers, but also didn't want to install Lionel knuckle couplers because they would be too large and lose the sense that this is still a toy train. So, I looked for some simple hook-loop couplers and found some American Flyer reproductions on EBay (AFO-3000-1) which would work. I drilled out the shanks for the mounting bolts, then cut off the excess and filed everything smooth.
I used 2-56 screws and nuts with 4-40 washers (one car required 6-32 washers because the old holes were so large) to attach the couplers.
While the roofs were off, I also installed some wires onto one truck of each car which had a pick-up roller and ran it up into the body of the car. I purchased no-flicker lighting circuit boards and LED strips to light up these cars, and I may eventually add them. I don't know yet. But at least the wiring is in place if I decided to do so.
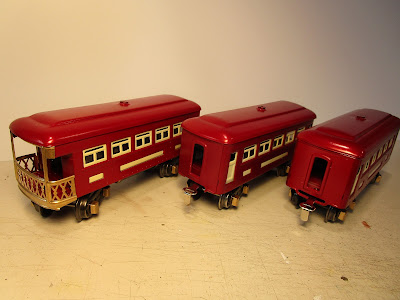
Finally, I could screw the roofs back on. A common problem with these cars is that the roof doesn't want to go on nice and tight, and I had to work around the edges until they fit properly. But once they were screwed on, the project was finally finished. I had considered adding lettering and numbers to the cars, but at this point I am going to skip it. So, with that, my cars were complete.
It was a fun project, but I am not sure I would do it again. It was a lot if work, and I had to learn as I went because I didn't have any experience with tinplate cars. I much prefer plastic models assembled with screws instead of tinplate cars fixed with bent tabs and soldering. Also, for as much time as I spent stripping and priming the bodies, the paint just wants to chip off. That is a bit disheartening. If I am careful with them they will hold up, but original Lionel coaches feature nice baked-on enamel and I hoped this automotive paint would have been similar. Perhaps next time I will look into having the cars powder-coated. I also discovered, much to my chagrin, that the finished train looks a lot like the rare uncataloged Macy's special set.
I also still an engine to pull the train, and I am looking at a Lionel 252 diesel electric or maybe a 249E steamer. Who knows? I guess it depends on what I find for sale at the next train meet. And I still have a bag of parts left over!
This project was very special for me as I worked on it during the many times I had to run between the hospital and our house while my wife was in in the hospital in labor with Harrison. I would come home, feed and water the dog, spray a coat of paint, play with the dog, and go back. This continued after he was born while he was in the hospital. Then, Harrison came home and the project halted for months. But now it is finished, and someday I will give it to him.


Obviously, this was a labor of love, which is our hobby of modeling
ReplyDeleterailroads.
Excellent work and presentation!
ReplyDeleteThanks!
DeleteNice job, I feel your frustration with the paint chips, had the same problem. I built an oven to bake the paint. Live and learn. Baked paint is hard but still can damage the finish during reassembly, be carful
ReplyDelete