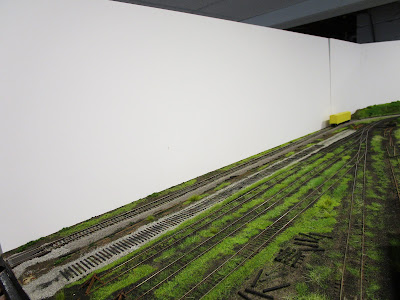
In my 30+ years of building train layouts, only one or two have ever had backdrops. These were usually just blue painted pieces of wood running down the middle of tiny N scale portable layouts, and honestly they were more to divide the layout into multiple scenes than to convey the impression of a sky. They were caricatures, in a way, of the sky. For this layout, I wanted to do better. Even though my basement walls are painted blue, there is no hiding the fact that they are cinder blocks. Further, any pictures I take show the laundry area, storage shelves, steps, and other accoutrements that normally accompany a basement.
I considered tempered hardboard or plywood but after talking with Dave from Gatorfoam.net at the Springfield train show I decided that gatorfoam, or gatorboard, might work. Per his website:
Gatorfoam is a unique, strong laminated panel with a core of extruded polystyrene and a face made from impregnated wood fiber veneer commonly known as Luxell.... it can be cut with a variety of woodworking tools, Xacto or matt knife. It accepts all types of paints, stains, and adhesives."
It sounded like just what I wanted. I dabbled it in a little when I bought a smaller piece for my T-trak module in January and though I haven't been to any shows to display my module, it seems plenty strong and lightweight.
Because the layout is set about 50" above the ground, I only wanted the backdrop to rise another 16" or so. Any taller and it might lean, and there really wasn't a need to go up to the ceiling. My layout's benchwork is built from 1x4" lumber, so I figured if the backdrop pieces were 20" tall I could have them extend down to the lower edges of the benchwork and I could clamp them with spring clamps. The bottom 4" of the backdrop would be hidden by the benchwork, and 16" would stick up. Ordering from Dave was easy, except that except shipping pieces 20" x 5-7' long would be expensive. Thankfully, he only lives about 3.5 hours away, so a car ride in the fall would be pleasant. He even offered to meet me half-way, but I picked a workday to drive up during a vacation.
While the trip through Vermont was picturesque, and there were several notable things I passed by (such as the Ben and Jerry's ice cream plant), I really cared about meeting up with Dave. He took me into his workshop and we quickly had my order sorted out. He also showed me his layout, of which I instantly drew comparisons to the Franklin and South Manchester. Dave seemed a humble man but he is very accomplished. He demonstrated how many of his buildings and urban areas were on lift-out sections of Gatorfoam, and I never would have noticed the seams at all as they were already part of the landscape (road edges, bridge edges, etc.) It is a very nifty trick. For gluing Gatorfoam together, he recommended the adhesive Phenoseal.
After getting my gatorfoam home I used a pair of colorful (and cheap!) clamps from Harbor Freight to hold it in position. A package of 20 clamps cost $5. Dave was concerned the springing pressure of the clamps might deform the gatorfoam and if I were to use stronger clamps I would insert an extra piece of foam or perhaps a thin piece of wood (like a paint stirrer) in between. The clamps held the board pretty firmly but there is a chance it might get bumped or perhaps sag over time. So, I used some 1" metal L-brackets, screwed from inside the layout, to support the bottom. They stick out just enough to catch the board, and yet are easily removed if necessary. They, combined with the clamps, make for an easy to mount, easy to remove, completely reversible backdrop mounting system. And I thought I was in the clear...
Unfortunately, not all of my benchwork has the rear 1x4 so easily exposed. In fact, most have one of the L-girders holding up the layout sections directly below the 1x4. So, I needed another method to mount the rest. In the process, I re-did the first backdrop too. So, I put on my thinking cap and came up with the idea for aluminum U-channels. The inside width of the "U" portion is 1", which is just right for my 1x4's thickness (3/4" thick) and the gatorfoam (3/16" thick). There is just enough slack (about 1/16" to slide the board in easily from the top, and the U-bracket is tall enough to keep the foam vertical.
I had my metal store cut me 20 that are 2" long, and I cleaned up the edges on my belt sander. Then, I drilled them with holes on one side for mounting screws.


No comments:
Post a Comment