It looks so cool that I am looking for a project in my basement to try it out on. And, I am posting it now on my blog because I am sure down the road when I find such a project I won't remember who to attribute proper credit to. Oh well, I suggest you check out the post yourself and see. It is fantastic. The entire blog looks interesting, and he is modeling an interesting operation- the Quebec and Gatineau Railroad, which is part of the Genesee and Wyoming Railroad's family of short lines. Being from Western NY, I am very familiar with the original G&W. Not the picture at right taken in May 2007... there are various engines (a switcher, an old Geep) and paint schemes (blue patch out, black patch out) in addition to the traditional orange and black. This is in Mt. Morris on their daily salt train run.
This blog will be a record of my personal journey in researching, building, operating, and finally sharing my HO scale layout based on the Delaware and Hudson Railway's "Colonie Main Line."
CP Executive train in Albany
Wednesday, August 22, 2018
Hairspray and Rust
I recently discovered a Blog by Bernard Hellen that has some interesting articles, including this post about weathering steel structures using salt, rubber cement, or hair spray. Now, I had heard of the first two before but certainly not the third. Hair Spray? Oh, I'm a big hair 1980's music nut so I fully believe in the wonderful transformative powers of hair spray. But for modeling rust? Common...
It looks so cool that I am looking for a project in my basement to try it out on. And, I am posting it now on my blog because I am sure down the road when I find such a project I won't remember who to attribute proper credit to. Oh well, I suggest you check out the post yourself and see. It is fantastic. The entire blog looks interesting, and he is modeling an interesting operation- the Quebec and Gatineau Railroad, which is part of the Genesee and Wyoming Railroad's family of short lines. Being from Western NY, I am very familiar with the original G&W. Not the picture at right taken in May 2007... there are various engines (a switcher, an old Geep) and paint schemes (blue patch out, black patch out) in addition to the traditional orange and black. This is in Mt. Morris on their daily salt train run.
Thursday, August 16, 2018
Frog Juicer to the Rescue!
My yard lead consists of three switches that were installed together. Had I used M.E. switches with isolated frogs or switches with insulated frogs, I wouldn't have had problems. But, I didn't because I was fed up with M.E.'s quality contraol. Diagnosing the problem took a while but the cure was easy. First, I marked each place I had a feeder with a red or black bead, and blocked off all other track that was isolated from the switches.
I needed to cut gaps in only four places. For two of them, I merely unsoldered the rail joiners connecting the adjoining rails and slid them along onto only one rail. Then, thin styrene was glued between them to maintain the gap. For the other two, I didn't want to use a Dremel for fear of messing things up. So, I removed the rail joiners completely and carefully slid out the rail from the molded frog and pulled it parallel to the rail it joined. The rail was nipped just a little shorter and it was slipped back into the molded frog.
Then, three additional green wires were soldered to the rails in the crotch of the frog and dropped (thankfully just barely clearly a benchwork cross brace) and hooked up to the Tam Valley Depot frog juicer. The one I purchased has the capacity to power six frogs or reversing loops, which is more than I needed. But, having excess capacity is better than having insufficient capacity. After only about 20 minutes more of work, everything was running smoothly (I tested it all this time) and I was back in business!
I also got sick and tired of switching out the DCC and DC throttle systems input leads to power the layout. Sometimes I want to run DC trains, sometimes I want to run DCC. So, I built a little gray "magic box" that at the flip of a switch can change the input power source. The output can also be switched from the layout itself to a programming track (useful for testing engines), which I have yet to hook up. It was mainly a bit of cutting, stripping, bending, and connecting various wires together. The box is screwed to the board behind it so it won't shift around.
Now the wiring is officially done!
I needed to cut gaps in only four places. For two of them, I merely unsoldered the rail joiners connecting the adjoining rails and slid them along onto only one rail. Then, thin styrene was glued between them to maintain the gap. For the other two, I didn't want to use a Dremel for fear of messing things up. So, I removed the rail joiners completely and carefully slid out the rail from the molded frog and pulled it parallel to the rail it joined. The rail was nipped just a little shorter and it was slipped back into the molded frog.
Then, three additional green wires were soldered to the rails in the crotch of the frog and dropped (thankfully just barely clearly a benchwork cross brace) and hooked up to the Tam Valley Depot frog juicer. The one I purchased has the capacity to power six frogs or reversing loops, which is more than I needed. But, having excess capacity is better than having insufficient capacity. After only about 20 minutes more of work, everything was running smoothly (I tested it all this time) and I was back in business!Now the wiring is officially done!
Friday, August 3, 2018
Short circuits in the Staging Yard!
Just when you think you are out, something drags you back in!
I was pretty confident that I had finished up the wiring for my layout. I had run some test trains around the mainline and into all of the sidings, and even checked the turntable and the stalls, but I never actually tested the staging yard. What was there to worry about? I mean, I wasn't powering the switch frogs and between the three switches I had three sets of feeder wires. What could go wrong? Apparently, a lot.
I had originally designed the layout for M.E. switches, which have insulated metal frogs. The rails that come from the frog are gaped from the frog and internal jumpers power them, so no rail gaps after their switches are necessary. I noticed the same thing with the Shinohara curved switch. For the replacement Peco electrofrog switch I installed on the mainline, I gaped the rails away from the frog and powered the frog through the Tortoise switch machine's contacts. Again, simple enough.
But, for the staging yard I intended to purchase Peco insulfrog switches and mistakenly bought electrofrog ones. They are better in the sense that they allow the frogs to be powered, but that benefit comes with a cost: you need a toggle switch to control the polarity of the track switch. I wanted to go the cheap route and use Caboose Industries ground throws, and hope the trains didn't stall on the frogs. I was also hoping to avoid using a Tam Valley Frog Juicer because they only work with DCC trains, and I might want to run DC trains in my staging yard. Unfortunately, something has to give.
If I had just ordered M.E. switches I would have been fine. But, I now question their reliability and am avoiding them (though their flextrack is still excellent).
I am now in the position where I must: (1) purchase three new Peco insulfrog switches; (2) purchase a Frog Juicer and cut gaps in the rails and install feeders, or (3) remove the switches, drill holes, and install my remaining Tortoise machines. Since this section is a "temporary" one I don't want to go with option 3. The other two were about the same cost so I ordered a Frog Juicer online.
Unfortunately, it means that DC powered engines will not be able to go into the staging yard. Since I plan to focus on DCC anyway, I don't think that will be a big deal. If it is, I can always remove the Frog Juicer and instead use slide switches or toggle switches to control the frog polarity.
I was pretty confident that I had finished up the wiring for my layout. I had run some test trains around the mainline and into all of the sidings, and even checked the turntable and the stalls, but I never actually tested the staging yard. What was there to worry about? I mean, I wasn't powering the switch frogs and between the three switches I had three sets of feeder wires. What could go wrong? Apparently, a lot.
I had originally designed the layout for M.E. switches, which have insulated metal frogs. The rails that come from the frog are gaped from the frog and internal jumpers power them, so no rail gaps after their switches are necessary. I noticed the same thing with the Shinohara curved switch. For the replacement Peco electrofrog switch I installed on the mainline, I gaped the rails away from the frog and powered the frog through the Tortoise switch machine's contacts. Again, simple enough.
But, for the staging yard I intended to purchase Peco insulfrog switches and mistakenly bought electrofrog ones. They are better in the sense that they allow the frogs to be powered, but that benefit comes with a cost: you need a toggle switch to control the polarity of the track switch. I wanted to go the cheap route and use Caboose Industries ground throws, and hope the trains didn't stall on the frogs. I was also hoping to avoid using a Tam Valley Frog Juicer because they only work with DCC trains, and I might want to run DC trains in my staging yard. Unfortunately, something has to give.
If I had just ordered M.E. switches I would have been fine. But, I now question their reliability and am avoiding them (though their flextrack is still excellent).
I am now in the position where I must: (1) purchase three new Peco insulfrog switches; (2) purchase a Frog Juicer and cut gaps in the rails and install feeders, or (3) remove the switches, drill holes, and install my remaining Tortoise machines. Since this section is a "temporary" one I don't want to go with option 3. The other two were about the same cost so I ordered a Frog Juicer online.
Unfortunately, it means that DC powered engines will not be able to go into the staging yard. Since I plan to focus on DCC anyway, I don't think that will be a big deal. If it is, I can always remove the Frog Juicer and instead use slide switches or toggle switches to control the frog polarity.
Friday, July 20, 2018
FRED for my MMR
![]() |
While reviewing the circuit diagram I found an error in the MR article. The diagram showing the LED has the polarity (+ and -) notations correct but the length of the anode and cathode reversed. Trust the polarity as indicated and not the length of the LED prongs as drawn. I used a small project board to make everything cleaner and mounted it all in a boxcar that I had lying around. I cut a notch in the bottom of the boxcar shell for the LED to stick out from, as I didn't want to have it permanently mounted to the boxcar's body should I need to get inside. It isn't a perfect scale model of a EOD, but it does demonstrate my electrical abilities.I love cabooses but I may actually purchase a D&H decorated boxcar shell to use for times when I want to ... shudder... model a period train when cabooses weren't used anymore.
Tuesday, July 17, 2018
DCC at last!
This NCE system isn't the first DCC system I have owned, or even the second. It is the fourth! I started out back in 2002 with an Atlas Master DCC system that was as basic as you could get. It even looked like a regular train set power pack. For my small switching layout and two DCC-equipped engines it was perfect. But, I wanted something with more functions so I upgraded to a Digitrax "Chief" starter set, which I don't think is made anymore. However, once I took a look at the Digitrax controller with its millions of buttons I put it back in the box and eventually sold it without really using it. Lots of people swear by Digitrax (and some at them), so it clearly was just me. But, I didn't like it.
My local train club (RITMRC) at the time converted from DC to DCC and naturally chose NCE because the club was based in Rochester and so was NCE. They were really great to us. I remember having an engine (an Atlas AEM-7) that required a special, compact decoder and taking it to NCE and the owner Jim took me on a tour and we picked out the right decoder from bins and bins of them and he installed it himself. NCE had lots of buttons too but they were laid out better, were larger, and the display screen was clear and large. But, then I moved and I didn't need a system so I didn't think much of it until I built a small N scale layout. I wanted to use DCC so I picked up a cheap Bachmann EZ-Command system. Talk about simple! But, it worked.
Well, now I need one because I want to run sound equipped engines and get the most of their features. So, I turned to NCE again and finally bought their starter set. Installation took about 10 minutes, though I haven't read their full manual yet. It looks pretty well laid out though, which is encouraging to a non-tech guy like me. I still plan to have a DC track powered option too, but for most days this NCE system will be perfect.
Wednesday, July 11, 2018
Wiring the Tortoise switch machines
Each switch machine needs a toggle switch to control the points, and I have seen them done in various ways. Having them protrude from the fascia is just asking for trouble, and making special bump-out protectors looks clunky. I wanted something low profile. I found a vendor selling DPDT, on/on (no center off) rocker switches on EBay for about $1.25 each. They are round, so installation is as simple as drilling a 5/8" mounting hole. And, I can orient them so that the little white dot on the switch indicates the primary flow of traffic through the switch, giving an easy visual cue as to whether the switch is set correctly. Finding a source for them took some doing, and I ordered a bunch in case I can't get them in the future.
The toggle switches were pre-wired at my workbench while I was sitting down and listening to music. Otherwise, it would get very tedious (it still was). For my ten switches I needed to make 70 total solder joints. And, I had to be neat because the wiring has to slip through a 5/8" hole from the front instead of back-loading as with typical toggle switches. Some of the solder joints for the criss-crossed wires looked a little too close for comfort, so I tried something new and used liquid electrical tape. It stinks, it is thin, it drips everywhere, but it peels off cleanly once cured. I did two coats as recommended in the instructions. I also twisted the wires for neatness. Each switch has two feet of wire... surely excessive... but a much better alternative to splicing longer wires on later.
To keep everything consistent and avoid screwups, I drew up exactly how I wanted the Tortoise machines wired and then printed it out and laminated it. (Side note: once you own a laminating machine, you will use it for so many things!). Though I could wire the machines directly to the bus wires, installing an intermediary terminal strip is a good idea should you need to remove a Tortoise for maintenance (or, as it turns out, if you need to replace a switch itself... grrr). Another option is edge connectors, but they are expensive.However, they also essentially double the amount of wires necessary for each switch machine. If I didn't power the frogs, I think I would only need two wires going to the Tortoise. However, because I am powering them I needed an additional 6 wires. And, since the barrier strip was already in place I ran the power bus wires through it too for a total of 14 wires. Suddenly, my layout's neat underside has become a mess or wires. I plan to purchase a wire stapler to keep them organized, as the regular staple gun I have sometimes compresses the wires too much.
That being said, it wasn't a difficult job to wire up. I designed the layout sections to easily be disconnected and flipped on their side for wiring. While that is probably still true, I haven't done it because I am happy with how everything is aligned and don't want to ruin it. Unfortunately, the layout height is just perfect underneath so that I cannot sit on a chair (I hit my head) or lie on my back (too far away). I must hunch over. So, I do a couple of wires at a time and take a break to do something more interesting. To those who solder wires under the layout in situ, my respect to you!
To fully check everything on the layout was wired correctly, I took my newly acquired Boston & Maine RDC out for a spin. For the most part it operated fine, and I am happy to be finished with this wiring!
Wednesday, July 4, 2018
Happy Fourth of July!
What's special about this picture? I doubt you can guess. It is dated 7/04/2010. Yup, on our nation's birthday eight years ago I shot this picture. My wife was out of town visiting her family, and I was by myself. It was a scorcher, much like today, in the mid-ninties. However, I was firmly convinced I wanted to model the D&H so out I went with a camera, a map, a pad of paper, and a measuring stick to document every building in the area. I thought I was insane, but I am glad I did. Things are always changing.The area to the left of the train in my picture originally had a factory on it in the 1980s but now it is just a grassy spot. The cream colored building behind the train was a millwork place in the 1980s, and if you look at my last post you can see it in the pictures. It is the bright red and yellow building in the distance on the left. Recently, a gas company has bought it and renovated it quite nicely. It looks a lot different from this 2010 shot. C.P. also extended the double track from Kenwood Yard to just south of here in 2013ish.
Eight years! My how the time does fly.
Monday, July 2, 2018
Track laying in North Albany Yard (Staging yard)
![]() |
| March 28, 1984 (note Huck Finn's Warehouse on the left) |
Unfortunately, the yard is oriented west of the mainline which means on my layout that always has west in the back (and north to the right), the yard should be behind the main. That just isn't possible with my current arrangement. The yard will be extremely short (the entire section is only 4.5 feet long) and the yard ladder has to fit on it. So, it had to be selectively compressed. I started by laying down a layer of foam that I purchased at Hobby Lobby. I hate foam for this purpose as it is squishy and I fear the ballast/glue layer cracking while cleaning track, but this stuff is so thin that it should be okay. It is even thinner then N scale cork, so it really will allow the track to look buried in the weeds.And with that, track laying on my layout is complete. I still need to wire this last section up, and connect the ground throws for the three switches (no Tortoise machines here... and perhaps no powered frogs) but it is with sadness that I conclude laying track. However, I can't wait to start some scenery and ballasting!
Friday, June 29, 2018
Styrene organizer - Version 1.0
So, I went to Lowes and looked around, and then looked around some more. Here and there, pricing various wooden dowels and trim pieces and boards and pipes. The challenge was making it strong enough to withstand dropping a tool on it (which could happen) while not overbuilding it and causing the budget or space requirements to go up. This is what I came up with. It ain't pretty, but it works.
The wooden slats across the top help keep the styrene from bouncing around (and out!) and are glued at every joint. Everything was given a spray of dark blue paint to make the styrene visually pop out. I thought I purchased flat blue but it turned out to be gloss, which is probably better because it is more durable in the long run.Keeping track of what I have and where it is will be problematic. My temporary solution was to write down on an index card what is in every slot. I don't want to assign slots to certain sizes because if I need to move stuff around it will be a hassle. But, I also don't want to reach for my calipers every time I pull a piece. It is a work in progress.
I want to build a "Cradle" of sorts that is just little wider and deeper than the racks I built. That way, I can slide these in it and it will prevent them from shifting and sliding around. But do they work? Yes! I partially dumped one already and most of the stuff stayed in place. Yay!
Monday, June 25, 2018
Essex Steam Train
Essex proved to be enjoyable even though the weather was lousy. It rained off and on all day, it was cold, and the boat was crowded. However, a bad day behind a steam locomotive is still better than pretty much anything else and I managed to get some pictures from the day. We rode the train as part of a group from our NMRA Hudson Berkshire Division, and we had half of a coach reserved to ourselves. The other half was reserved for a church group. Because the train is run as part of the state park system, everything was in excellent shape including the buildings, the outdoor displays, and of course the train equipment.
Tuesday, June 5, 2018
Guilford Passenger Trains
Updated: 6/28/2018
Eventually I want to model the Guilford Office Car Special ("OCS") train as it looked in 1984. There are several reasons why this is an interesting train. At 3-4 cars long it would fit nicely on my layout. It is a simple paint scheme (mostly just orange stripes) and wouldn't be hard to do. Motive power included high-nose Geeps in shiny paint, which would stand out from my rusty D&H engines. Also, I actually saw the modern incarnation of the train in 2007. I am still trying to collect information about suitable HO models for the passenger cars. I tried the Kalmbach Model Railroader forums and got nothing. So, I will try the blog community!
When it comes to modeling 1984, very few passenger trains ran on the Colonie Main. As near as I can tell, aside from an extremely rare Amtrak rerouting (which I am not sure ever occured) the only passenger cars to travel these tracks would have been inspection cars. But, the OCS train was also used for railfan specials all over the Guilford system, and it may have covered the Colonie Main line.
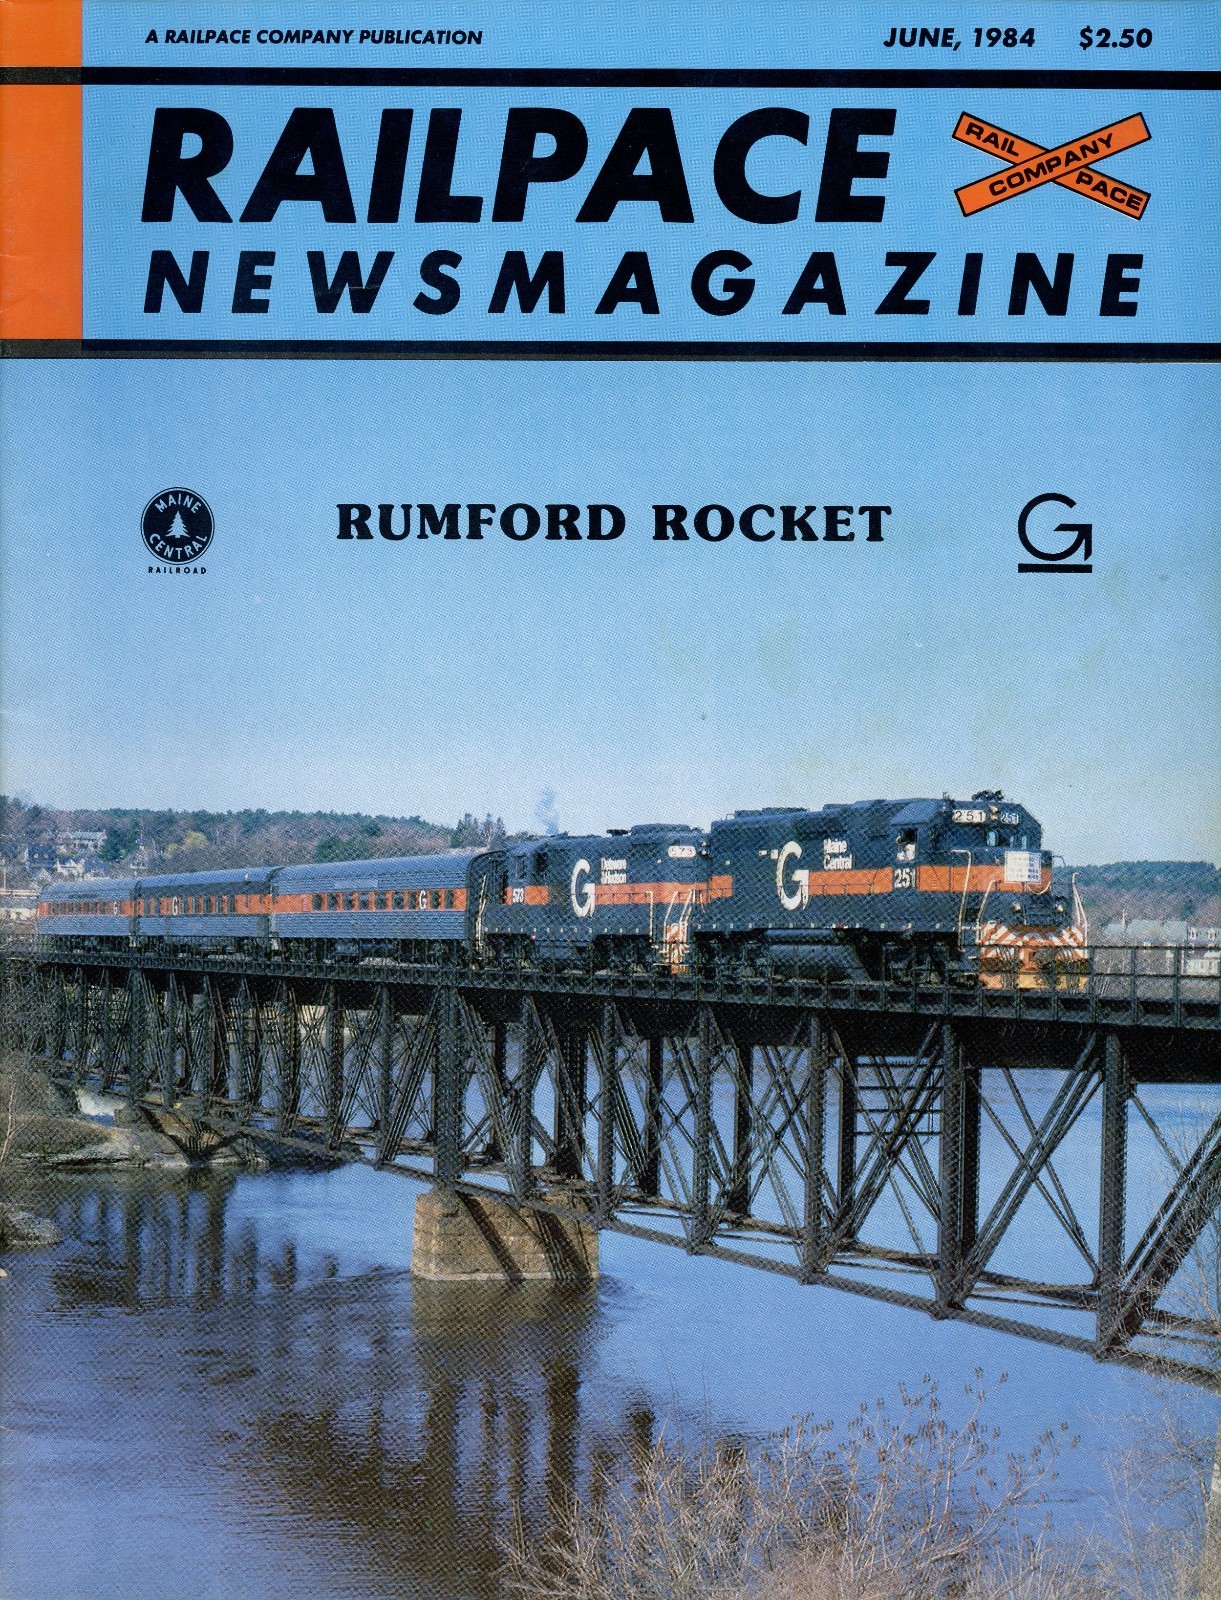
It was even on the cover of the June 1984 Railpace magazine as the chartered "Rumford Rocket." Over the past few years I have collected images of the OCS train that are scattered online or on slides, and I have a good grasp of what equipment was used in 1984. The best reference is a thread on railroad.net discussing the curren Pan Am's OCS train (of which some of the equipment dates back to the 1980s), though at 77 pages long it took a while to get through. Another thread about surviving MEC passenger equipment had some interesting information. However, there are still gaps when it comes to the train equipment and even a mystery passenger car, so I will need to keep digging. As I find more pictures or information about this train, I will update this page so that I can keep all of my research into one place.
My current HO scale passenger car collection consists of various Amtrak Amfleet I and II coaches in Phase II and III paint schemes. I also have some old IHC heavyweight D&H passenger cars bought cheap for $8 each even though I knew that they weren't realistic. Walthers had announced in 2015 a short "D&H Fallen Flags" train but it was cancelled for lack of interest. I have never set out to actually acquire realistic models of D&H or Guilford passenger equipment, and don't really know where to start. Thankfully, I don't think most other people are fully knowledgable about the train either so I can get away with substitute cars until I find the right models.
Motive Power
As for engines, pictures I have seen from 1983-1985 usually show Guilford (D&H/MEC) GP7 #573, Guilford (MC) GP38 #251, or Guilford (MC) GP9 #470 pulling the train. Maybe they were equipped to provide power and heat for the coaches and/or they were the cleanest engines on the roster at the time. They always ran the train with two engines which would be entirely unnecessary from a horsepower standpoint for only a couple of coaches, and pictures show both engines either on one end or the other, not top and tail. I guess they always has passing sidings at their destinations.
Engine #573 has a colorful past. Literally. In the early 1980s it was painted in MEC's historic green scheme with gold stripes. In July 1982 it was repainted in the maroon and yellow stripe scheme. By 1983 it was in Guilford gray and lettered Maine Central, but in early 1984 it was lettered D&H. By 1985, it was back to Maine Central lettering.
In 1996, a company called Mary Jayne's Railroad Specialties Inc. produced a post card of #573.
Passenger Cars
Springfield Terminal #100 (Observation Car)
It was purchased by the D&H from the Norfolk & Western (N&W #102) in 1976. I haven't been able to find out the early history of the car, so I don't know if it was built for the N&W or another railroad. It originally had stainless steel fluting below the windows and it still had it in 1984, though it was subsequently removed.
Springfield Terminal #101 (Diner/Lounge), "North Point"
It was built by the Pullman-Standard company for the Pere Marquette Railroad in
1946, but before it was delivered in 1950 the C&O which controlled the PM sold it to the D&RGW (D&RGW #1290). The D&RGW sold it to the D&H (D&H #43) in 1967. It also originally had stainless steel fluting below the windows and it still had it in 1984, though it also was subsequently removed.
Maine Central #390
It was built by the Pullman-Standard company for the Pennsylvania (Pennsy #4044). It was absorbed by the Penn Central (PC #4044) and later transferred to Amtrak (Amtrak #5444). I am not sure when the Maine Central (or possibly Guilford) acquired it. A great side shot from 1978 can be found online here.
There are conflicting references as to who built this car. One source says that it was built by Budd in 1939, but a different source says that it was built by Pullman-Standard in 1948 for NYC (NYC #3011). Regardless of who built it, it was renumbered (NYC #3211), then became PC (PC #3211), and finally was transferred to Amtrak (Amtrak #3951). I am not sure when the Maine Central (or possibly Guilford) acquired it. Side shot post Guilford at CPC RR Museum
There are some excellent shots on rrpicturearchives of a fan special to North Conway, NH, in 1983 and Maine in 1984 that show the passenger cars even better. You will need to scroll down the links to see them.
Note: I will keep adding pictures to this thread as they are added to my collection.
![]() |
| 1984 |
![]() | |
| October 1985 |
It was even on the cover of the June 1984 Railpace magazine as the chartered "Rumford Rocket." Over the past few years I have collected images of the OCS train that are scattered online or on slides, and I have a good grasp of what equipment was used in 1984. The best reference is a thread on railroad.net discussing the curren Pan Am's OCS train (of which some of the equipment dates back to the 1980s), though at 77 pages long it took a while to get through. Another thread about surviving MEC passenger equipment had some interesting information. However, there are still gaps when it comes to the train equipment and even a mystery passenger car, so I will need to keep digging. As I find more pictures or information about this train, I will update this page so that I can keep all of my research into one place.![]() |
| October 1985 |
Motive Power
![]() |
| October 1985 |
![]() | |
| September 1985 |
In 1996, a company called Mary Jayne's Railroad Specialties Inc. produced a post card of #573.
Here is the caption from the postcard: Maine Central GP7 Unit Number 573, still equipped with a
steam boiler for Passenger Service and painted in the Guilford Transportation
Industries colors, stands at the Rigby Engine Terminal in South Portland, Maine
in early 1985. Eleven years later, in 1996, this Unit would be acquired by
Conway Scenic Railroad and repainted in its original maroon and gold livery for
service on the New Hampshire Tourist Road.
Springfield Terminal #100 (Observation Car)
![]() |
| October 08, 2007 |
![]() |
| October 08, 2007 |
Maine Central #390
Maine Central #391 (Food service)
![]() |
| 1985 |
![]() |
| October 1985 |
Note: I will keep adding pictures to this thread as they are added to my collection.
Wednesday, May 30, 2018
Visiting the Railroad Museum of New England
Their are about a half-dozen outdoor pieces of equipment (engines, cabooses, boxcars, a crane, etc.) including a blue B&M boxcar that I really liked. I think the paint scheme is really sharp and am glad it fits in my modeling era. They own a lot of equipment, as during the train trip we passed at least two dozen more freight cars, coaches, and engines more cars in various stages of restoration/neglect. Admittedly, it was pretty depressing but it is a small museum in a bad location. With all that equipment, they should be in a larger area where it can be seen and appreciated more. Since only 6-8 pieces fit on the display track at the station, the conductor said that they occasionally swap out what is out there.
The website showed a train of vintage coaches pulled by an F-unit, and I was excited because I have never ridden behind one before. They also have RS-3 engines and some other vintage equipment shown on the web too. I was disappointed when our train pulled into the station. The ride was pulled by a modern diesel engine and consisted of a Budd RDC (which had air conditioning, no doubt the reason for its inclusion) and two antique coaches with open windows. We chose the later as we like the breeze. The cars definitely showed their nearly 100+ year age, but they were comfortable and when the train was moving it was nice and cool.
All in all, it wasn't my favorite train ride or museum but they have a lot of great stuff. They certainly have too much interesting rolling stock and engines for the one short display track at the station. It would seem to be a mecca for New England rail buffs, but you can only glance at it while rolling by it. Too bad they aren't in a larger location so that they could feature more of it.
Monday, May 28, 2018
First Mainline Train!
So, with the Tortoise machines manually moved to the mainline direction, I turned the power pack. And my train ran! I guess I expected it to, but I didn't realize how cruddy the engine was. The frogs aren't fully powered yet so the speed had to be kept up, but the event still counted. My mainline is operational, and I imagine within a week or two I will have all the switch machines powered and the sidings can be activated. But, this was the first time I have been able to run an HO train on a continuous-loop layout in over a decade.
Huzzah!
Thursday, May 24, 2018
Replacement Peco switch
Then, I used my soldering iron to remove excess solder and the old rail joiners from where I had cut the switch out, and replaced the new switch in. Some trimming of the ties was necessary where they fouled adjacent track. I was surprised how much shorter the Peco #6 switch is compared to the M.E. #6, and some fitter pieces were necessary. Because of how I had to adjust it, a new 1/2" hole was required under the throw rod. Because the frog isn't insulated from the running rails, I had superglued thin pieces of styrene into the rail gaps at the ends. Once the glue cured, I removed any excess styrene in the flange area. They will all but disappear when the track is painted and ballasted.
Within an hour's worth of work the new switch was in place, and my layout was back in business!
Friday, May 18, 2018
Damaged Micro Engineering switch
I had hoped to have trains running by the end of May. The impact of this remains to be seen. Even more alarming, though, is that I might have this failure occur on my other M.E. switches. I don't plan to ballast my track until it has been extensively tested, at which time I might have to replace more of the switches. I wish now I had just gone with Peco. Everyone only has good things to say about them.
Subscribe to:
Posts (Atom)


