CP Executive train in Albany

CP Executive train in Albany

Sunday, December 20, 2020

Structure - Colony Liquor (part 3)

For this building I had to find a suitable (ugly) shade of green to match the prototype. Unfortunately, there are only so many options available when using small modeler's spray paint so I had to switch to Rustoleum. I hate their spray cans, which feature tips designed to put out a maximum amount of paint. I settled on Rustoleum 2X Ultimate coverage "Satin Leaf Green" paint. 
My wife and I thought that it was a pretty good match for the color of the building, and I doubt anyone else even knows what the building looked like in 1984. I sprayed on several light coats while holding the building from the inside with my left hand completely hidden inside a large garbage bag for protection. The structure is huge, and it was awkward but it went okay. I aimed for completely coverage without spraying too much paint that would hide details or leave runs. I then set it aside to cure for a week.
Next, as I was preparing to mask the sides for the gray roof I discovered a gap in one of the sides along the top. I filled it with a micro-thin strip of styrene but it required painting that side green again, which started the drying clock all over again. Finally, I was able to move on to the roof. I masked all of the edges in preparation to painting with blue painter's tape. The extra-wide rolls are perfect for this.
I usually remove the tape as soon as I have sprayed the paint, which sometimes results in problems if I have missed an area because then I have to mask the whole building again. Here, though, the gray went on smoothly and perfectly. I used Krylon gray primer, which is really easy to work with because Krylon has wonderful tips.
I noticed that where I braced the underside of the roof the styrene had deflected a little bit and left ridges. It is quite visible with the partially-glossy primer, but I hope once weathered it won't be visible. I think I am cursed... no matter how I brace (or not) brace a structure, the styrene will warp a little.
Next, the building was sealed with Dullcote and then given a black oil paint wash. I did the roof first, focusing most on the flat areas. Every couple of minutes I would blow over the surface to break up large areas of paint. A more diluted wash might have been better.

This worked out well, but I noticed that the side facing away from me (the aisle side, sadly) had some of the black wash run down and it caused visible drips. 

So, I held the building at an angle so that green paint could only land on that side and quickly resprayed that side. Then, I was happy with the result.

The brickwork on the sides really captured the black oil paint wash and looked pretty grubby, but in parts it was a bit overdone so I then used more paint thinner to tone it down a bit. In the areas by the loading door I left it a bit darker.

I also installed a Walthers' air conditioner unit detail. Then, I went around and drybrushed brown "rust" and dirt highlights to the roof and sides of the building. I still need to redo the landscape around it, and ballast the track into the siding where I adjusted its height, but overall I am pleased with it. 

A view from the side of the building facing the backdrop which will never be seen.

Tuesday, December 15, 2020

The Quest for perfect Fruitcake

Since we aren't going out to eat very much I decided to take some of the funds that would normally be spent on dining out and instead decided to make Fruitcake, something that has been on my culinary bucket list for years. I love the stuff, and have eaten just about every type I have found (warning: the stuff from the dollar stores is vile!)

Since I haven't been working on my layout much this past week (spray paint drying and all) I decided to talk about my fruitcake. My mother has a family recipe that is pretty good but I wanted something that wasn't so dark. I also wanted lots of things I really love like colorful fruit and brandy. Casting a net online for suitable recipes, I found a recipe by King Arthur flour that seemed perfect.

The misses and I then went shopping, and I was determined to pay my own way. Thus, every ingredient (except for the spices) was purchased specifically for this project. And a good thing too, as there was practically nothing left over when the dust cleared. And I think it all cost about $50, not including the booze. I even purchased King Arthur brand flour... as a return good will gesture for their recipe. Finding the red candied cherries was very difficult and no grocery stores had them in stock. As a last resort I went to Walmart to find them. Is there a cherry shortage out there?

I started by cutting up all of the fruit and soaking it overnight with some brandy. The gallon Ziplock bag contains the results. All told, I calculated it all up and there are 4,000 calories exactly in the bag! Not exactly diet food, despite all the fruit, eh?

The next day, I beat all of the flour, eggs, sugar, and spices in a KitchenAid mixer. It was a wedding present from my parents, and likely the most important power tool in the house.

Then, all of the nuts and fruit were stirred into the batter.


At this point, I wouldn't have minded eating it with a big spoon (the beater attachment and spatula did not go into the dishwasher dirty!) but there were better things to come. In re-reading the recipe, I discovered that I needed two metal baking pans 9" x 5" and I didn't have them. I had Pyrex glass ones but they were slightly smaller. Who knew? Not wanting to risk the recipe failing at this stage, I went out and bought new pans. 

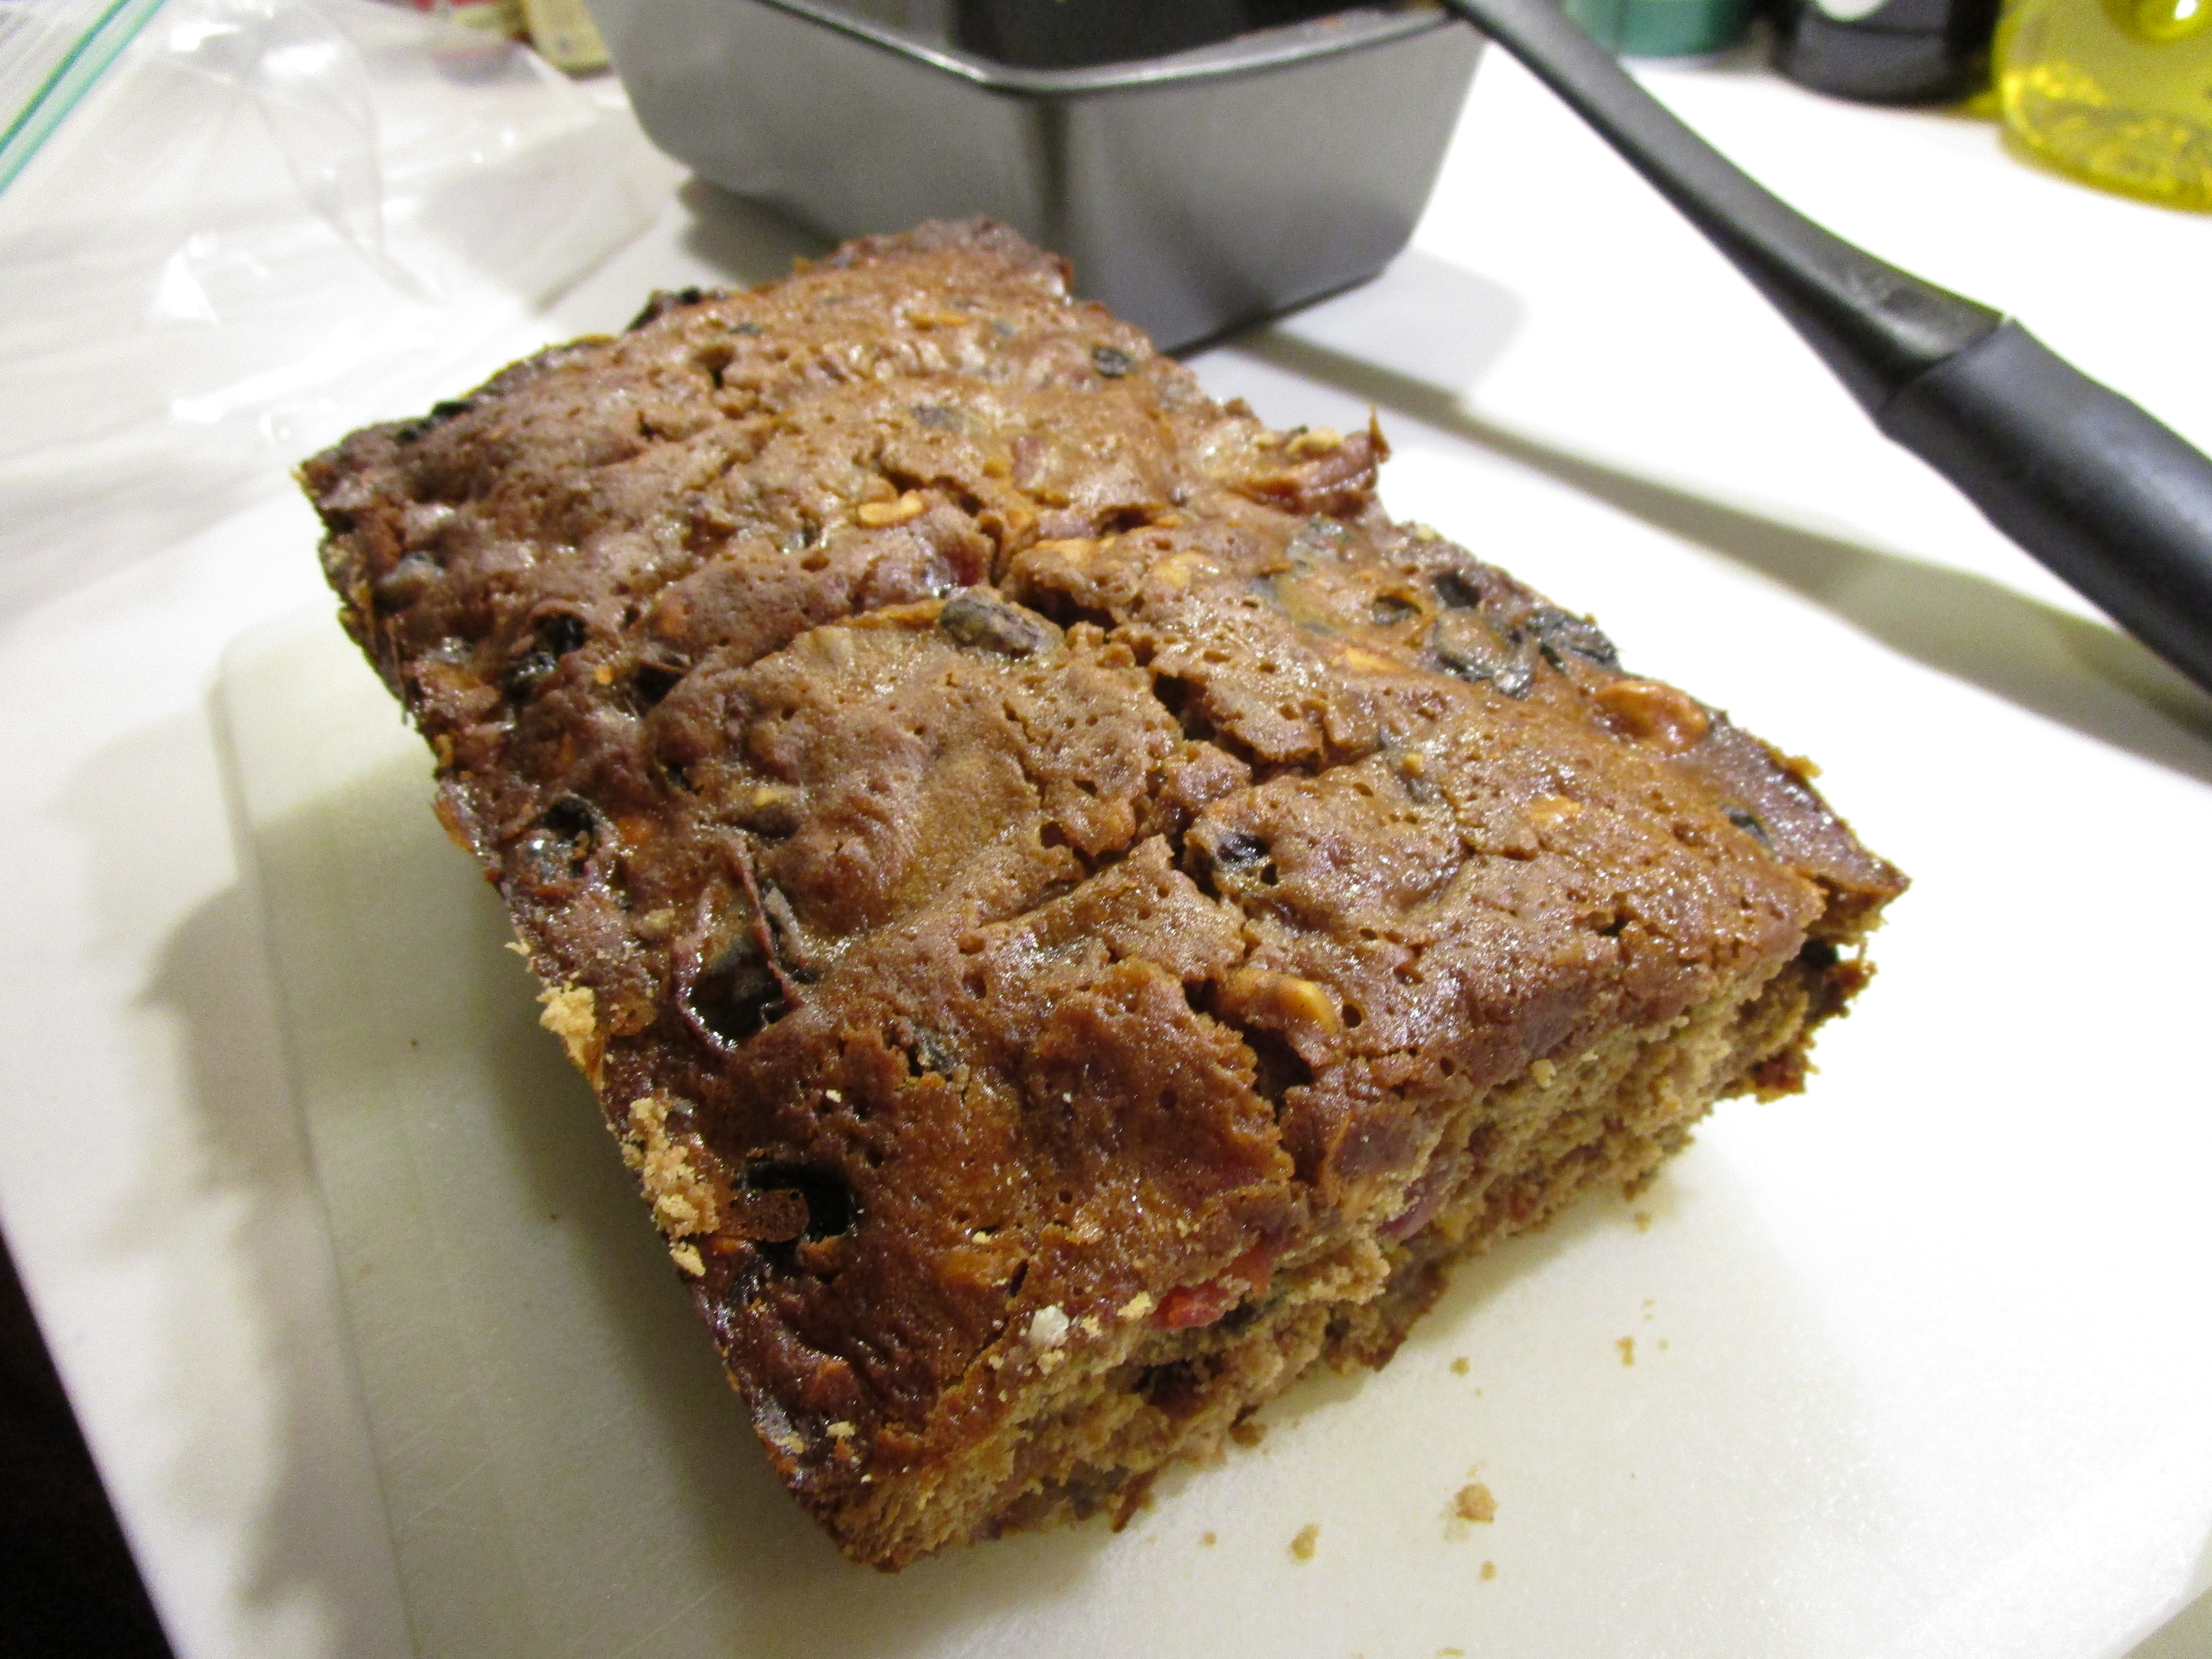
After a low, slow baking process they were cooled and then brushed with more brandy. Then, as the Italians would say, it was "Ora di mangiare" (time to eat).

All told, there were over 5,200 calories in each cake. And that didn't include the brandy that I have been brushing them with. That's 250+ calories per 1/2-inch slice. And it is so worth it! Since I don't travel and can't see many people I don't have the ability to share it. So, one will be frozen in the freezer and one will be eaten until I pass out. Even Clover might get a bite. It should be a good Christmas after all.

Saturday, December 5, 2020

A background ridge for North Menands

The area in north Menands across the tracks from my three industries contains a shallow ridge with trees running along the length of it. Just behind it, and visible through the trees, is a cemetery. I had a space of about 4-5 inches wide along the  back area of the layout reserved for this, and about a quart of left over ground goop. So, after watching football one Sunday I decided to forget my troubles and work on the layout.

Previously, I had used green florist foam as the underlying support for the hills on Cut Corner. I still had scraps lying around and I used them for this backline. In fact, the pieces I used literally were dug out from the garbage can in the garage where I had thrown them because I had incorrectly deemed them surplus and useless. But, they were just the right width and height for this project.

There were lots of gaps in the foam but that wasn't going to be a problem. I would just fill it with the ground goop. Taking a cue from my last adventure with the stuff, I removed the background Gatorfoam and covered all of the foreground areas with garbage bags to protect them from errant goop.

The ground goop went together quickly as I knew what I was doing. I just dove in with my hands and spread it out, and continually added water when necessary to get it nice and smooth. 

The material went on well and it left crags and gaps between the foam pieces that I thought looked quite natural and realistic.

I did deviate from the prototype at the edge of the layout section and built a little separation gap between the ridge on this section and the adjoining Cut Corner. It isn't too visible and perhaps a strategically placed tree will help it even more. However, portability of the layout sections is much more important to me than building a solid back ridge that would need to be cut with a saw to separate the sections down the road.

While it was still wet, I sprinkled on various shades of ground foam and ground turf. I also used real, sifted dirt and other scenery materials as well. Everything was given the same treatment as I had used on the other two sections so that they would visually work well together.

Once it all dried, I then went over it again with a misting of alcohol followed up with my matte medium. And then I ran out of both... and due to the pandemic had to order more rubbing alcohol online. It took a week to arrive, and a month to make my own matte medium, so what you are seeing now I actually did weeks ago. 

I didn't add any static grass yet, or trees, because I have to plan out the other areas and don't want my static grass to be done over various sessions and look "too patchy" or random. But, I can now put the backdrop back on and focus on more structures.

Tuesday, December 1, 2020

Problems with a gummed up curved turnout

Nearly all of the track switches on my layout have been replaced at least once. I started with Micro Engineering #6 turnouts and swapped them for Peco #6 turnouts, which proved to be more durable. However, I have one curved Shinohara/Walthers #6.5 left-hand turnout at the entrance to the staging yard. And unfortunately, over the past few months the control rod that shifted the points became stuck. It ran through a brass tube from the Caboose Industries ground throw to the switch throw bar, but during the process of adding scenery and static grass to Cut Corner some glue and water had found its way into the tube. Many applications of oil on both ends of the tube didn't help. I could force the switch back and forth and it would work, but a week later would gum up again. It was a disaster.

Knowing that a fix might involve destroying the switch, I first set out to buy a replacement. And wouldn't you know... they are discontinued by Walthers. And no online store has them. Believe me, I spent a hectic couple of hours looking. But then I went to my local hobby store and they had several just sitting in a pile, brand new in their box, at a great price. Doh! I bought one immediately.

Next, I decided to see if I could trim the tube shorter on both ends (thus removing the glued-up bits) and run a new wire through it. A Dremel tool made quick work of it, but studying the old control rod revealed that rust and gunk had permeated at least 4 inches into the tube, which meant that no amount of oil I had been applying would ever have reached the problem area. And, I didn't dare reuse the rod. So, it was destined to remain in situ.

Unfortunately, the hill it passed through was pretty solidly built. It had a hard, ground goop shell that wasn't easily punctured soo running another tube wouldn't be easy. I first tried bending a tube around the hill but the angle that it approached the switch's throw rod was at an angle and that changed the length of the control rod's requirement distance to move the points. An HO scale ground throw wouldn't shift them enough, and an O scale one was way too much. 

A second option I considered was drilling a hole through the hill with an extra-long drill bit, and a third plan was cutting a channel from the top which would later need to be patched. Neither sounded fun. So, in the end I remounted one of my Tortoise machines under the turnout.

I still have the brand new switch, which I will keep in case this one breaks. I had trimmed so much of the throw rod away on both sides that there wasn't an easy place to drill a hole for the control rod to connect to. That is a lesson for next time: always leave the throw rod long enough on both sides for emergencies.

Due to the location of cut corner, these repairs were easily reached by lifting away the lightweight backdrop. 

I will eventually come back and patch the ballast and scenery, perhaps when I add the trees, but for now the switch is working again and I can turn my attention to something else. 

Thursday, November 26, 2020

Structure - Colony Liquor (part 2)

Picking up where I left off, I worked on the boxcar loading area next. When gluing the cement block sections to the rear wall, I didn't bother to add them to the area that would eventually become the loading dock alcove. Note that some of the block wall joints aren't perfect and that is because it is tough to join them at their edges, while at the same time adding the back-reinforcing braces, while not having any of the glue seep through the joints and smudge the block faces on the outside. This was the best I can do. It is scruffy looking, like the prototype, and can't be seen. But, I won't use small block wall pieces to make large walls again. Lesson learned.

The loading dock area was built by measuring out various angles and testing things with an actual HO scale boxcar on my layout. Because of the thickness of the block wall sections, getting the angled joints perfectly aligned was difficult. The prototype had messy corners, and mine does too. The traditional method of hiding a corner gap in a block wall by scribing mortar lines in the filler wouldn't work here. I just filled them up with strip styrene. 

For the loading dock door, I used another one of the Walthers' doors. They are great. I framed many of the exterior wall edges and roof edges with strip styrene. It was otherwise impossible to hide the thickness of the block sections, and it gave everything a clean look. 

Unfortunately, I estimated the height of the building incorrectly and when it came time to test it on my layout (a process I did over a dozen times to ensure everything fit the way I wanted it to) I discovered that the loading door overhang area was too short. Oops! I had to fix this in two ways: I lowered the roadbed into this area and relaid the track, and I built up a foundation around the perimeter of the building with HO scale cork that was later blended into the rest of the scenery with ground goop.


The roofs were supported by styrene braces mounted just under the roof's edges. I used straightedges and levels to get everything properly supported, as I didn't want a sagging or slanting roof (which might have been prototypical). The roofing material added a lot of rigidity to the whole assembly.

Like everything else, each roof piece was cut one at a time to fit the actual measurements of the building.

Then, the edge seams of the roof were framed out with more styrene. This gives the impression that the block walls are the actual thickness of blocks and not just thin sheets laminated on. It also provides a cap to the roof. And, most importantly, it provides a nice clean appearance.

The inner portion with the lower roof, and the one oddball wall section, were lined out with block sheets and then framed like the rest. 

All told, there was a lot of styrene involved in this building. But, I am really happy with how it came out. Unfortunately, looking at the picture below on my blog is the only way people will see this side as it faces the backdrop. 


The interior of the building has a lot of extra bracing that I added as extra insurance to prevent the very large roof from sagging. When you buy your styrene in 4x8' sheets, you can afford the luxury of going overboard with it!

The details on the roof were a bit of creative interpretation. If you look at the two pictures in the introductory post to this area you can see that the details on the roof changed in the ten years between when the shots were taken (2010, 2020). Also, part of the building is now covered in solar panels. What existed in 1984 is anybody's guess, but I decided to use pieces from two of Walther's Cornerstone Roof Detailing Kit (#3733) to add some vents and an air conditioner unit. I really wanted something small and square, but didn't want to scratchbuild them. The Walthers kit comes with a tremendous amount of things, and I should be set for the future.

I used some short round vents for the larger part of the building and some short square ones (that I cut down even more) for the side building. I also built up one of the smaller air conditioning units to put in the narrow trench on the roof. I might add some more things there too.

Now, all I need to do is finish the model by painting it.

Saturday, November 21, 2020

Structure - Colony Liquor (part 1)

The first building I tackled for the North Menands section was Colony Liquor. Its most interesting feature to me was the boxcar loading dock area, which consisted of part of the rear corner of the building being cut away at an angle and a loading dock installed in the gaping hole. Then, blocks were installed around the door at an angle to frame it. However, above the door the building's walls and roof kept their original shape! The track extended beyond the door only just enough for a boxcar to be perfectly spotted against the bumping post with its doors aligned. If you went too far, you went off the track! I assume the D&H had to extend the siding by 5' to accommodate the transition from 40' to 50' boxcars.

These two pictures from early 1984 show the warehouse. I note that it too, like the Iroquois Millwork building, was painted in a drab green. That color must have been all the rage back then. Note in the pictures how close the boxcar is to hitting the doorway! Beyond the boxcar is another portion of the warehouse that I had to compress in length. In in the distance over the tracks is the expressway that could have been part of Cut Corner.

The shot below, taken in September of 2010, shows how overgrown and grassy the area is now. It is looking North, while the pictures above were taken facing south. 

The doorway in the corner alcove section has since been bricked closed with a regular steel door and a rickety wooden stairway installed in its place. 

The rear concrete block wall was in pretty bad shape. Also, note the wall along the right side of the lower-height roof area has smaller bricks instead of blocks. That is an interesting detail to model.
The northern most wall will be visible from the aisle, and I chose to focus on the truck loading door. I didn't have enough room to model the far portion with all of the windows.

So with the prototype research done, I turned my attention to how I was going to model it. Because of the size of the building, the various types of styrene sheets and molded walls, and tools required it consumed my workbench! The structure was built over the course of a week, with lots of breaks to ponder the next steps so that I didn't "paint myself into a corner" so to speak. 

Because of all of the angles, roof heights, and siding materials I thought drawing up a full size sketch would be too difficult so I roughed out some measurements based on pictures I had and just started building it one wall at a time. That would later prove to be a problem.

Since a majority of the structure is concrete block walls I again used Rix Products #541-1004 wall sections. Though I really liked working with them the last time, they were not a good choice for this building. The reverse side is molded in such a way that you need to install 0.040" thick styrene blocks in the middle of the sections to build up their thickness to match the thickness of the edges. However, when cutting up lots of the small wall sections and joining them together over the course of the building's substructure it gets difficult to make everything come out right. And, if you have to cut the sections midway you aren't left with a clean line because the inner reinforcing 0.040" is visible. 

In retrospect, I should have used concrete block sheets that were much larger and would have required fewer joints. The saving grace is that the most interesting angles of the building, which also required the most difficult joints, face away from the viewer and are nearly impossible to see.

Speaking of which, the prototype pictures showed that the rear side of the building had many old doorways and windows that were filled in with non-matching blocks. It really looks neat to see in person, but on my layout they are not visible at all so I just modeled that side with solid block walls and no "ghost openings." The side of the building did have a truck loading dock, and I installed another of Walthers' modern doors in that opening.

As the building's walls slowly wrapped around the exterior of the structure I had to be mindful of the middle area which featured a lower roof line. While I braced the upper and lower edges with 1/4" thick square styrene, I first had to add the inside walls so that they weren't blocked out by the square bracing. I bought a large bin of colorful plastic clamps for $5 from Harbor Freight and they were very useful here. Keeping everything square and preventing it from turning into a rhombus (I haven't used that word since high school geometry class!) was a challenge. Sometimes, I build my models on oversize graph paper sheets which let me spot at a glance when things are off. Here, I used rulers and squares to double check all measurements.

Large areas that needed stronger bracing were fitted with 45-45-90 degree corner pieces of styrene.

Stay tuned to how this thing gets finished...