
And, another picture from the same train that I purchased 6 weeks later:


 I worked on the roof next. I took some thin styrene strips and superglued them on to the brass after scuffing it up pretty good. Some pictures appeared to show the roofs of these cars covered with canvas, and others looked like plain steel. Some had these crosswise steel braces, and others had drip rails that ran the length of the car. Following the picture of the car I was basing my model on, I added the cross braces. When the glue had dried, I painted the roof with Krylon gray primer to give the surface tooth and texture. It was ready for weathering, but I will hold off on gluing the roof to the body of the car until I have finished detailing the inside of the car.
 The paint schemes and lettering styles for Great Western Railways freight wagons over the decades is probably diverse enough to fill a book. In fact, I know that there are books out there devoted to just this subject. Not wanting to purchase one just for this project, I turned to the internet for resource materials. First I looked for actual pictures, but there aren't many and they weren't all that helpful- they didn't always show the w5 style car I was building, they were blurry or grainy, usually in black and white, and rarely showed the roof. My next idea was to look for commercial models of the car that I could copy, such as those from Bachmann or Hornby. I found a couple, but none in the exact style car I was building. I take for granted the wealth of USA-prototype railroad information I can quickly put my finger on, mostly because I know where to look.
 Knowing my car was going to be gray, the two unknown questions were what color should the underframe be and what color should be the roof be. I first painted the model all over with Tamiya 'Imperial Japanese Navy" gray. Then, the underframe was carefully handpainted with flat black. I had one picture that showed this was correct for at least one period in time. I thought that the all-gray car was too bland and wanted something a little more interesting. The end solebeams were left gray, though in some pictures they appeared black too and in others were the same color as the rest of the end. Silly GWR ...
 I should point out that nearly every picture I have stored on my computer of these cattle wagons is also lettered in a different manner. No doubt the Great Western Railway's standard lettering schemes changed over time, and since I wasn't quite sure of the date of the picture I was using as a reference I had difficulty researching what type of decals to order. So, I went all in and picked a big set that covered a lot of options. Naturally, the mail held it up a bit. These decals had to go over the bumpy texture of the crossbeams on the sides and ends, and ample use of Microsol was required. The car number I chose was already on the sheet, and it was close to the one in the picture I was using. Oddly, the car was also labeled "8-tons" (I think) but that option wasn't on the decal sheet. There were many other options but not eight. So, I made it a ten-ton wagon. If I really wanted to get cute, I could weather over the number and then no one would know.
 The last detail to be added was the brake wheel, and by now I had stockpiled over a dozen of them in my parts box. It was a simple matter to search for one with curved spokes to match the prototype. The one I used came from a Tichy brake detail set, and it was duly painted up and glued onto the end of the car. This is the only area of the car that seemed to show evidence of rust (at least based on the dated museum photographs I could find online) which makes sense as the wheel might need to be rotated by the museum employees if they shift the car around, and it would probably need to be greased or oiled too.
 Decals were again custom ordered through my friend Ricky at Modern Rail Decals. Looking back at my notes, I have been purchasing through him for 17+ years and he always comes through. Champion decals once offered a set but they closed up a long time ago. Thankfully, there aren't many graphics for this car. Borden may have changed various fonts over the years, or maybe the plans were incorrect in RMC, but I had the decals made to match the car in the museum and not the drawings. That means "Milk Tank Car" is the same font as "Borden's." It took a while for the decals to arrive, but problems with the mail slowed things down and I needed them tweaked slightly.
 After applying them, I added a very light coat of weathering to the body. This was done with mineral spirits dipped into the tiniest amount of oil paint and then touched where I wanted the effect. Mostly it was burnt sienna along the brake wheel chain, but I added some dark brown on the wheel itself as well as the welded patch marks on the end. The four "nubs" on the upper corners also received a little color, as did the door hardware. Anything more than a trace would be too much. I'd like to think that the museum is taking pride in this car, much as I am with my own miniature one, and I wanted it to appear well kept.
 Then, I decided to add one final detail that I had known about for months but kept putting off. The pictures show a black painted data box on the lower end of the right hand side of the car. The article from R.M.C. didn't include them, and much of my car construction was based off of that article instead of prototype pictures. That is a lesson I will remember going forward: trust pictures, not other people's work! I had some extra decals of prototype car stencil boxes (ironically, from a custom made D&H blue Oneonta hopper set I ordered years ago from Modern Rails) and I used that. I didn't spray the frame gloss, but instead just applied the decals to the weathered body. Finally, everything was sealed with Dullcote and the car was done!
 One of the great things about modeling the D&H in the 1980s was that there were a ton of colorful freight cars roaming the system. Two of my favorite examples are the blue Oneonta glass recycling service hopper cars and the blue and white "I love NY" boxcars. I have models of each, thanks in part to my lovely wife. They have been sitting in my display case for a while waiting for the right time to work on them, and with most of my scratchbuilt car projects finished or waiting for parts in the mail I thought that this would be a good time to get them layout ready.
 The boxcars were from Intermountain and for the most part they look pretty good. The shade of blue used is dark, which matches the prototype during their early careers on the D&H. It only began to fade in the late 1980s when they were pretty much off the roster. Unfortunately, Athearn and Bev-Bel used this lighter color when they produced their models and they just look bad. The Intermountain cars don't have roofwalks, which is correct, but they do have ladders on the right sides and non-brake end that go up to the roof. I cut these down to match the prototype, and then touched up the white paint where the pins were. The ladders are fragile and cracked (but didn't break), which surprised me.
 Car #50027 should have a black "Operation Lifesaver" emblem, and car #50008 should have a "NYSDOT" emblem, but I couldn't find decals. I may have some made up for future cars, but for now I am okay with them as is. If someone points out their omission I would be very impressed. The stock couplers are Kadee #5, (better than cheap McHenry or similar clones) but I use #158 couplers. The coupler boxes, unfortunately, are glued shut and to the frame. So, I pried them off and had to drill/tap the area for 2-56 screws. Not tough, but these cars don't appear easy to take apart and everything is very fragile. The cars received light weathering as the paint was only two years old in 1984. This was not the place to create a "rust bucket."
 The two Oneonta recycling hoppers are another set of cars that I really like. I have a 4-bay model from Walthers and a limited 2-bay one from Atlas. Unfortunately, the car numbers on both are the same... #7065! That is wrong for the Walthers model, but so is everything else: body style, artwork style, lettering color. So, I left it as is. The load was made from a styrene base with mounds formed from caulk from a tube and the edges sealed with more caulk. Then the loads were then painted with Testors gloss gold enamel paint or green acrylic craft paint. The caulk worked well, but I don't know if it was any easier then used carved pieces of foam which is always featured in magazine articles.
 Next, I took some Czech "tube beads" that I found on online and crushed them to make the load. I couldn't find HO scale bottles for sale and even if I had, they would have been so small as to effectively render them useless. And expensive, if I wanted to fill even the visible portion of a hopper load. I considered those tiny round "Indian" glass beads (also sometimes called "seed beads", perhaps because that is more P.C.) that are used for bracelets, but then I found tube beads on Ebay for a couple of bucks a bag, delivered from China. Not knowing how much I needed, I bought three bags each of a greenish color and a brownish color. Remember, Oneonta sorted the loads by glass color so I did too.
 The beads were still too large to represent bottles or jars in HO scale, so I put some in a Ziplock back and started wacking with a hammer to crush them. Then, I filtered the glass shards through one of my dirt sieves (cleaned, of course) to remove the bigger pieces that required more wacking. Over and over, the process went, but it wasn't difficult. I would definitely suggest not doing it directly on your workbench... a piece of sheet metal, or even wood, would be better. And, eye protection is a must. But, I was happy with the results and it didn't take too long. One bag of each color was more than enough for one car, so I have a lot of extra.
 Then, they were heaped onto the loads and maneuvered in place. The centers of the cars are mounded, much like coal would be when it passes through an automatic loader. I doubt the glass was loaded into these hoppers like that, but I didn't want the top perfectly flat. After the glass was how I wanted it, I dribbled rubbing alcohol all over it and then soaked it with my matte medium. The green one came out perfect, but the brown one (the first car I worked on) didn't. There was too much whitish glass powder in the mix and that dried in white spots, so I then ground some more brown glass to go over the top. Much better.
 I am really happy with how they turned out. I had seen articles suggesting glitter but that looked too fake. You can buy ground glass shards (used for other crafting projects) but since hobby stores were closed I wasn't sure how large the pieces would be. Here, for about $3 a car I had a really neat glass load. And yes, if you dig your finger into the load you are likely to get cut, so I didn't try it. The green car came out especially nice, and I really wish I could think of another application to use this glass for. Since these cars were routed from Oneonta to Corning, I doubt they spent much time at all traveling on the Colonie Main. So, they might just reside in my display case for now. But, they may make appearances now and then for something special.
 |
| For comparison: HO scale figure on left, then Indian bead, then tube beads |
 As I mentioned in my last post about this car, my wife wasn't really impressed with the running abilities of the chassis. There were two causes of this: first, the plastic wheels had been glued onto new styrene axles and one of the wheels was mounted slightly off center (the axle diameter was smaller than the hole in the center of the wheel) and that same wheel was mounted slightly less than perpendicular to the axle. The result was that it had a slight hitch. If she could notice it, the judges would notice it (and I guess I couldn't hide it). Having nearly pulled my hair out trying to build working axleboxes last time, I was loathe to rebuild them. But...
 I decided to replace the wheelset with metal wheels. Hornby sold metal wheels of the same diameter, with the same three holes in the sides of the wheel so I bought a pack (#R8097). It came with 10, enough for many attempts! I took a pair and ground down the points of the axles to slip into the axleboxes, and I barely had to spread them. That was good, as I didn't want to break the axleboxes. But, the axle length was now too short and there was too much slop. So, I took another pair and mounted them as is. They almost worked, but the oversize flanges now rubbed on the
  The car is still very lightweight, and there just isn't any room to add weight while still keeping its prototypical appearance. As it is, the car is supposed to weight 2.5 ounces and even with metal wheels it barely cracked 0.80 ounces without its roof. The cows will add a little, but still not enough. I tested the car as it currently exists is on my layout and it rolled around just fine but a train of them would likely bump and derail from any sudden jerks or imperfect track. So, another display case piece. I am starting to realize that superdetailed cars are not always operational cars, and sometimes compromises have to be made for the best operational performance.
 Finally, I worked on the brake gear. Some of the prototype cars had no brakes at all, and that is why British trains had "brake vans" at the back to act as anchors to stop the whole train because most of the cars couldn't stop themselves. Some cattle wagons had handbrakes on one axle activated by a trackside lever on one side, and others had dual axle brakes activated from levers on both sides. I modeled a wagon with brakes on one axle operated by vacuum, with vacuum lines running to either end of the car. The brake shoes were cut from a Kadee USA freight car truck brake pad detail set, and the rest was scratchbuilt from styrene, brass rod, and steel wire. I can't guarantee the car is perfect, but it looked like the drawings I found. I didn't include every GWR safety redundancy bit, but oh well. I like how it turned out. I also included the Bachmann sprung buffers on the ends.
 Then, I stared at the model long and hard and realized that the bent brass tube air line on the end didn't look great. By pure luck while reading one of my British modeling magazines there was an article on detailing a freight wagon and a reference was made to Wizard Models. After checking them out, I decided to order proper air line castings and while I was there picked up some buffer castings and coupler hooks. It took six weeks for them to arrive, hence my delay in this post. But, they are just what I was looking for and I drilled out the body and attached them with superglue. I still need to polish the buffers gently with some sandpaper, but the car is essentially ready to be painted.
 I don't know if it was very common in the States, but in England during the heyday of the railways young boys would walk or bicycle down to the nearest line or station and try and "nab" locomotives, which once spotted would be written down and/or crossed off their list. They hoped to see all of the engines of a specific region, or of a class of engine, or perhaps one of each type. To me, this trip represented the same sort of adventure. I didn't take any pictures of Conrail trains, so either we didn't see any or I decided to save my precious film to use elsewhere.
 Now, from what I can remember the only thing in Dubuque is a Bible College and we knew many people that attended. What exactly I would do when we got there wasn't known. It certainly wasn't a trip to Walley World! But, having grown up in western New York State and rarely having the chance to get out and see the country, it sounded fun. From Rochester to Dubuque was a distance of about 800 miles and perhaps 13 hours of straight driving. I don't think we did it in one day, but I don't really remember the "non-pertinent" details. I recall we drove through Chicago, my first and only time in the Windy City (and named because of its smell similar to onions, if you believe the legend).
 I also remember it being a bit hot, and dusty, and I tried to play a game where I checked off all of the license plates from different states I could find. I didn't get all 50, but I am sure I got close (I think I assumed Hawaii didn't count). I don't remember my siblings going, though I can't recall why, so I had the back of the minivan all to myself. I did bring along one issue of Railroad Model Craftsman magazine to read, the October 1997 one with a cover story by Dominic Bourgeois on weathering D&H diesels... it is pretty ironic now if you ask me! However, I didn't care about that as at the time as I was only interested in the Burlington Northern and Conrail.
 I remember getting to the midwest and seeing a wide diversity of engines that I had only seen in the magazines. Naturally, every BN engine I came across that I could I snapped a picture of but there were some other oddities that I remembered reading about in Trains, such as the Illinois Central's "Paducah rebuilds". The iconic orange and white engines with the roof-mounted paper filters that hung over the sides looked really strange to me then, so I guess I must have managed to plead with my parents to pull over long enough to get this picture. I also got a couple of the black and white engines too.
 In 1996, the BN had officially acquired and merged with the Santa Fe railroad but the repaints had not begun in earnest yet. So, when we stumbled onto this odd cabless B-unit I had to get a picture of it. Remember, at the time film cameras held 24 pictures and I might have been lucky and had two cameras total for the trip, so at most I would have been able to take 48 shots. The train had to be really rare or special for me to devote a negative slot to it, and this engine was one of them. Looking it up online just now, I see it was an EMD SD45-2B. Not a common engine at all.
 My father did take me railfanning one morning, and we went to two different places. I don't recall where they were, and we didn't stay too long in either- likely under an hour at each- but they were a treasure trove of special trains. This photograph features Denver and Rio Grand Western and Union Pacific engines, which never made it into Rochester. In 1996, the UP had acquired the D&RGW and some engines were repainted by not all of them. Being only a year later, this one survived long enough to get caught by me. We caught it pulling a train through a rail crossing, and I bet the shot of the UP engine was too blurry to scan.
 I should point out that many of the railroads above don't exist anymore in either their corporate identity, or their paint schemes. They are "Fallen Flags." The green and black, and awesome corporate ivory and dark green colors of the BN are gone. So are the blue and yellow of the Santa Fe, and the black and orange of the D&RGW. A year after taking these pictures, CN acquired the IC/ICG Railroad in 1998 so the orange and white engines vanished. And, of course, so did the Southen Pacific, which was the trailing unit behind the two others shown above. And it's a "tunnel motor" too! It looks like it lived a tough life.
 After visiting Dubuque, on the way home we drove north through Wisconsin and perhaps detoured into another state before entering Canada. I recall we hit a small rail yard with various Wisconsin & Southern locomotives stored. I don't think I had even heard of the W&S at the time, and so it was definitely a place that we had to stop and get a couple of pictures of. There were a few Geeps and some passenger cars, but something that was new to me was an E-unit. This is engine #101, which makes it an E9A. I don't recall ever seeing an E-unit prior to that time, and it just seemed so long.
 I also got this shot at the right. In the picture they just appear to be a bunch of old engines, in a couple of different paint schemes. But, if you look way down the line you will see a bluish engine that had some weird angles on the rear sides. Either it is a GG-1, which seems extremely unlikely, or else it is a BL2. I assumed it was a BL2 when I took the picture and I zoomed in as best I could, as I couldn't walk down the tracks for a better view. Of all the engines I saw on this trip, the BL2 it is probably the rarest (ironically, though, I just went railfanning two weeks ago to shoot a pair of them less than an hour from my house.) I see there is an Illinois Central E9B in the attractive brown and orange scheme.
 |
| Sanbury, PA (August 10, 1990) |
 Initially, I washed the car and frame and then primed both with some Krylon gray primer. Then, I sprayed the car with some really nice Tamiya red paint that I had specifically picked out at the hobby store. I am not terribly familiar with the Tamiya range but I know they make a lot of military paint. Obviously, they must also make a lot of automobile paint because the end result was that my boxcar body was a resplendent silver-flake red! It would look awesome on a guitar, but not on this. So, I used some Rustoleum "Colonial Red" spray paint to go over it. The stuff is really thick so I had to be really careful. "Light layers" and "Rustoleum" are mutually exclusive.
 I then worked on the frame. One dirty little secret about this car is that the underside on the replica is not actually painted but is just plain, exposed wood. Since I built my car out of white styrene I couldn't easily copy this. Painting it yellow and adding faux woodgrain pattern wouldn't look right. So, I painted mine red. After giving it a good coat of Testors Dullcote, I began drybrushing various shades of brown and black on the underframe. The Museum keeps the car in good shape but it is occasionally used in photo charters so it can pick up dirt and grime. And, during the warmer months it is on display next to a saltwater inlet so I am sure the metal gets rusty.
 |
| Showing partial damage. I ended up stripping the whole end. |
 As this point I was pretty dejected. I started to consider throwing the project in a box and leaving it for a while, but then I had crasy thought: "How would a Master Model Railroader fix this?" I soaked the car in lacquer thinner and stripped it all off, including two different colors of red and two different colors of gray. The problem probably was I used Krylon Primer, Tamiya flake red, Rustoleum Red, and then Tamiya gray on the roof. There likely an enamel vs. lacquer paint thing going on. Or maybe one coat went on too heavy over another. But, all the paint came off. After washing it all again, I primed it with Krylon gray (I love the spray nozzles on their cans).
 Then, I used Krylon "Pimento" satin red to paint the car. I was even more careful to apply extra light coats to the body to slowly build up the color. It went on beautifully. Finally, after a while I masked the roof and painted it gray with the Krylon primer that I used before. That worked too. Unfortunately, some of the wood grain that I scratched into the individual vertical boards was lost in the process, but in real life it is hard to see the wood grain from a couple of feet away. At the same time, I am just happy I got back to this stage when I thought I might have to trash it! After several days, I clearcoted the car and then prepared it for decals.
 The decals came from Deerfield River Laser who sell a laser-cut wooden kit for this car. I reached out to them and asked if they would be willing to sell me the decals separately and they agreed. Twice, in fact... sigh. The decals are made for them by Shawmut Car Shops and are close to what is on the replica car, though the font size and spacing is a little off. Not wanting to have custom decals made for this car, I took 'em as is and said "thank you." I was more careful with the Solvaset on the second attempt and they dried nice and straight. The car doesn't have much lettering on it at all, as all of the 2-foot railroads went bust before regulations required car data and such to be applied to the car sides.
 The car was lightly weathered. It sits on display by an inlet of the ocean in the town of Wiscasset for several months during the summer, so salt water and rain and wind allow it to slowly pick up a patina of age. That being said, I believe that the WW&F has repainted it at least once too keep up its appearance and I didn't want to go to far. So, I used brown and black oil paint washes on the body and roof to just add a little more history to it. The car is also used occasionally for special occasions where it is pulled by one of their steam locomotives, so I also added some real crushed coal to the roof. Then, everything was secured in place with a light spray of Dullcote.
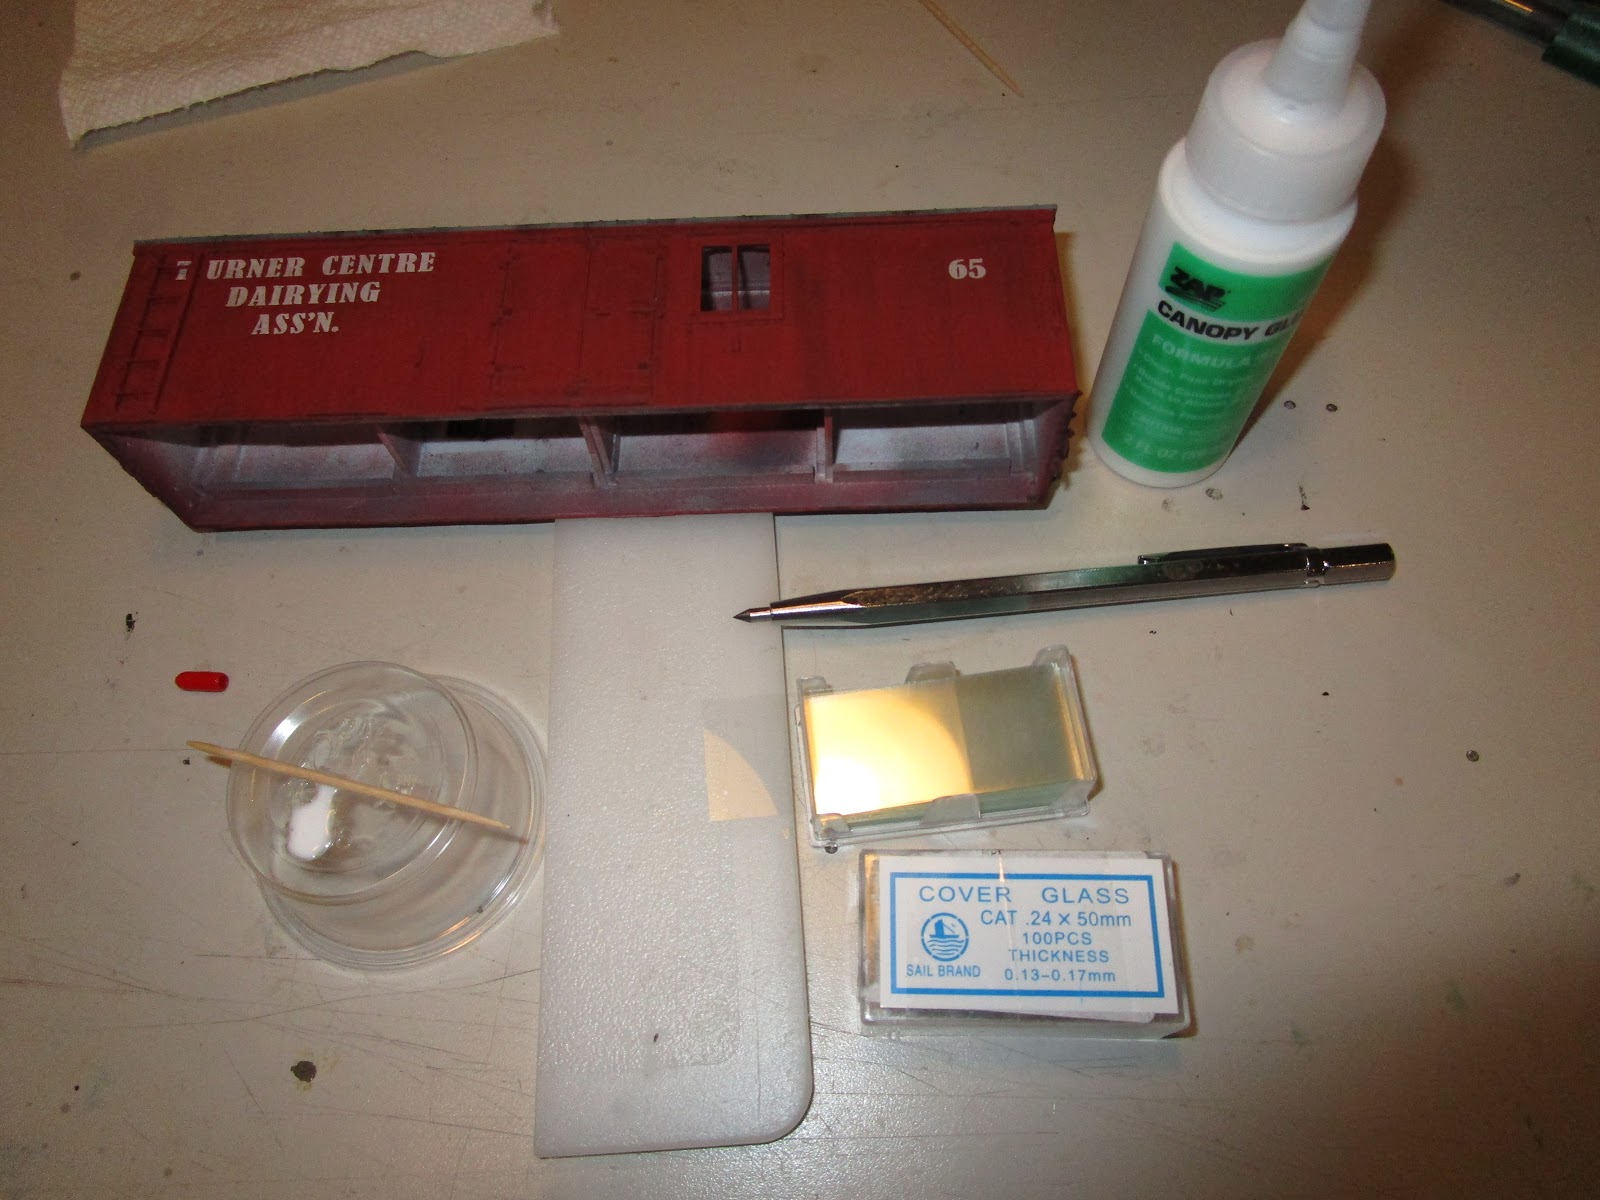 The last thing to do was install window glass in the two windows. I had purchased some thin microscope slide covers and they were secured from the inside with some canopy glue. The stuff works well for glass as it won't fog up like superglue, and it pretty much stays where you put it until it has set. I also painted the inside floor of the chassis including the lead shot boxes and such with a thick coat of cheap black craft paint. That way, should anybody peer inside they won't see that there isn't any milk loaded. And with that, all that was left to do was attach the frame to the body with some Arlene's Tacky Glue.
 And with that, this car is finished! I wish I could take better pictures but I shot 20+ and this was the best of the bunch! Despite some set-backs I am extremely happy with my model. It brought me back to a simpler time in prototype railroad construction, what with the lack of a roof walk, lots of foot stirrups, and graphics on the sides. Because it is On2 it surely will become a display case item, but every time I see it I will remember my last trip to Maine. And, during its construction I joined the WW&F Museum as a paying member, so I have a greater connection to it now. I can't wait until the next time the wife and I can find our way up "Down East."
 I was going to post a picture of my favorite bicentennial steam locomotive from 1976 but today marks another, more important anniversary. So that picture will have to wait until 2021 (stay tuned!). Instead, I was sitting in bed Wednesday night and I realized that this Fourth of July was special for a more important reason: it was 10 years ago from today that I actively started researching the Colonie Main for my layout. At that time, I had officially abandoned modeling a B.N. branchline in N scale and started to look at the building on the Colonie Main. I didn't jump back into HO scale though for a couple of months.
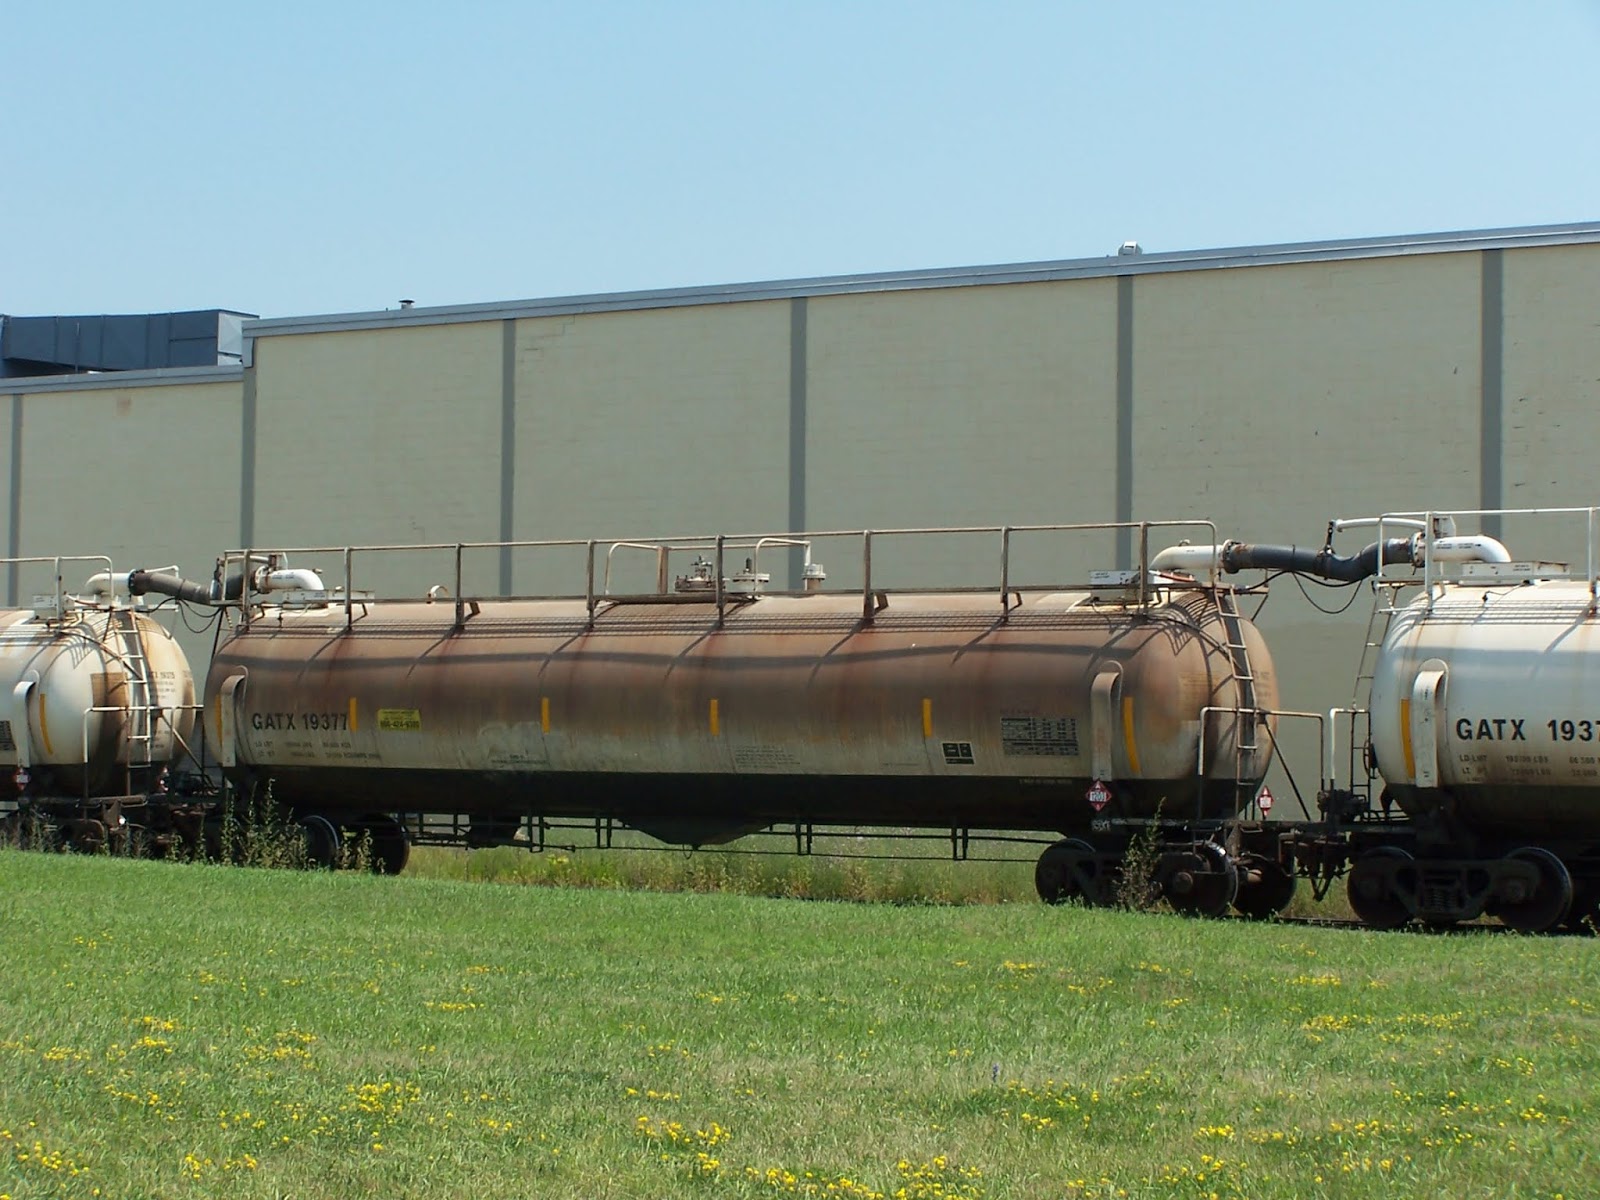 That July in 2010 found me in sweltering heat photographing, mapping, and measuring buildings that I might put on my layout. As it turns out, the section I focused on isn't currently going on my layout but perhaps it will sometime. Anyway, while I was out taking pictures a C.P. train "snuck up" on me. Running trains on a national holiday seems unpatriotic, but it was a Canadian Pacific painted train (likely with US crews though) so I will give them a pass. On the end were a bunch of connected tank cars, which I frequently see. They are always painted white and always have burnt rust weathering patterns along the top that always make me thing of ...
 Zweigles hot dogs! In my opinion, the very best hot dogs made. And not because they are from Rochester and I am from Rochester. Well, maybe partially. But they taste great. They come in red and white varities, and the white ones confuse people who aren't from western NY. They taste a lot like bratwurst, so if you like that you will like Zweigles. They have natural casings that "pop open" on the grill, and they stay juicy. One of my personal slogans is "If a hot dog is option A, I don't need an option B" and Zweigles is a big part of that. And I take them with ketchup only, thank you very much. Yum!
 |
| D&H Car-Mobile" from May 1973 |