As mentioned elsewhere (here and here), I really enjoy displaying my models and toys. It brings me great pleasure just to look at them while doing other things in the basement. Certainly, it is more fun than keeping them stored away in boxes. But finding suitable cabinets or display cases has been tough. Even with Craigslist, I have not seen many suitable ones for sale.
One I purchased was a gorgeous cherry-finished wood cabinet, but it was too dark on the inside and the models weren't easily visible. So, I gave it to my wife and it is in her craft room. Another cabinet came from a friend and I like it a lot, but it is too small and additional matching ones aren't available. After much searching, I finally found this one on craigslist for $200 and jumped on it. I had to pay a little extra for delivery, but it was worth it.
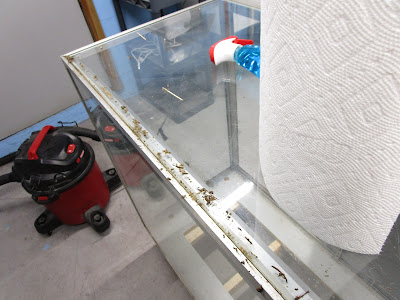
Unfortunately, when it arrived I saw it was a mess. It had been stored in a barn for years and it was covered in dirt, old stickers, and oily residue. The wooden framework underneath held the electronics for a lighting system but it didn't work. Worse, the bottom was covered with dozens of dead (and not dead... eek) spiders! I decided to clean it up and see what I could do with it.
Because the shelf was originally designed for use in a store with sliding doors accessible only from the rear, it would be difficult to get things into and out of it when placed against a wall. So, I chose to mount wheels on the bottom, and that required a solid foundation. The particleboard framework had to go. Since it was in my garage and I was too lazy to go into the house for a hammer, I grabbed the nearest tool I could find... a sledgehammer! I guess I had been watching too much Red Green Show. However, it worked well.
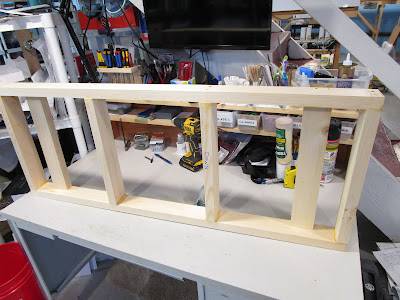
Then, I built a new frame from some 5/4 lumber. I later painted it black to help it hide in the shadows.
I spent several hours cleaning up the case, and used a ton of Windex and a roll of paper towels. Various tools were used to scrape gunk out of every seam, and all the glass was cleaned to remove stickers and dirt. It was immensely satisfying to see it all come together, but very disgusting too.
A friend helped me carry the case into the basement, where I set it on the frame. I had premeasured and drilled holes in the wood floor of the case, so I used them as spot markers to drill into the 5/4 wood frame. Some strong lag bolts tied it all together. Naturally, I had to order the bolts twice because the first set were too short.
The old plywood shelves were filthy and blocked views of the lower shelf, so they were replaced with new 1/4" glass shelves. It turns out that the glass company I went to with had a model railroader on staff, so they were pretty easy to work. Unfortunately, when I tried to install the new shelves they wouldn't fit. They were about 1/8" too long. How could that be?
I discovered a couple of more problems at this time. First, the three shelf bracket support tracks are not equal. The middle one flops around a little bit because it is only supported at the top and bottom, and isn't firmly attached for the length of the vertical corner like the other two. This meant that the rear edge of the glass sometimes pivoted around the middle shelf track which stuck out further from the rear sliding door area, and that caused the excess length of glass to bind. So, I returned the glass and had it shortened by 1/2", and then it fit in fine.
However, once that was done the glass shelves were dangerously close to falling off the three steel brackets. The brackets fit loosely in the tracks and are free to swung left and right a little, and if the ones on the end swung out from under the glass it could crash down. That would be bad! So, I ordered some suction cup support brackets from Ebay which fit over the shelf brackets and extend the amount of surface area holding the glass. It turns out that when I bought the display case some were actually included, but they were so old and brittle and warped that I threw them out.
So, I ordered two identical sets of brackets at the same time from the same seller, and naturally they came with completely different shaped rubber cups. They also didn't fit the metal shelf brackets in my display case, so I had to cut away or reshape the new ones with a Dremel tool, belt sander, and pliers. But I made them work. Below is one modified with one side cut away to clear the side of the display case.
The next problem with that the steel shelf brackets had a hook at the end which stuck up to hold the glass shelves in place. However, I couldn't get the glass to fit in them because they extended out different lengths from the shelf brackets. Again, the non-rigid vertical middle shelf track was causing havoc. Had I made the shelves narrower they would have worked, but I had ordered the glass without knowing of the problems described above. Instead of taking the glass back to have it recut narrower, I instead removed the brackets and used my bandsaw to cut off the sticky-uppy portion at the end. Then, the glass dropped in fine.
When I went to set the shelf brackets at their final height, I discovered yet another problem. Whomever built the unit cut the shelving tracks at three equal lengths but they didn't make sure the bracket mounting holes were aligned the same on each one! So, let's say I set all three brackets in place in the fourth holes from the top. If I laid a level across them, it wouldn't be level! So, I picked holes that generally matched up and relied on the compression of the suction cups to help compensate for the differences.
In total, it was a very involved process (as are all of my projects) to get my display case. But, I am absolutely thrilled with it. It holds a lot of stuff, and it is easy to see into. It sits alongside a wall where I can easily see it from my workbench, and it provides instant gratification at seeing my models.


No comments:
Post a Comment