CP Executive train in Albany

CP Executive train in Albany
Showing posts sorted by relevance for query passenger. Sort by date Show all posts

Tuesday, June 5, 2018

Guilford Passenger Trains

Updated: 6/28/2018

1984
Eventually I want to model the Guilford Office Car Special ("OCS") train as it looked in 1984. There are several reasons why this is an interesting train. At 3-4 cars long it would fit nicely on my layout. It is a simple paint scheme (mostly just orange stripes) and wouldn't be hard to do. Motive power included high-nose Geeps in shiny paint, which would stand out from my rusty D&H engines. Also, I actually saw the modern incarnation of the train in 2007. I am still trying to collect information about suitable HO models for the passenger cars. I tried the Kalmbach Model Railroader forums and got nothing. So, I will try the blog community! 

October 1985
When it comes to modeling 1984, very few passenger trains ran on the Colonie Main. As near as I can tell, aside from an extremely rare Amtrak rerouting (which I am not sure ever occured) the only passenger cars to travel these tracks would have been inspection cars. But, the OCS train was also used for railfan specials all over the Guilford system, and it may have covered the Colonie Main line.

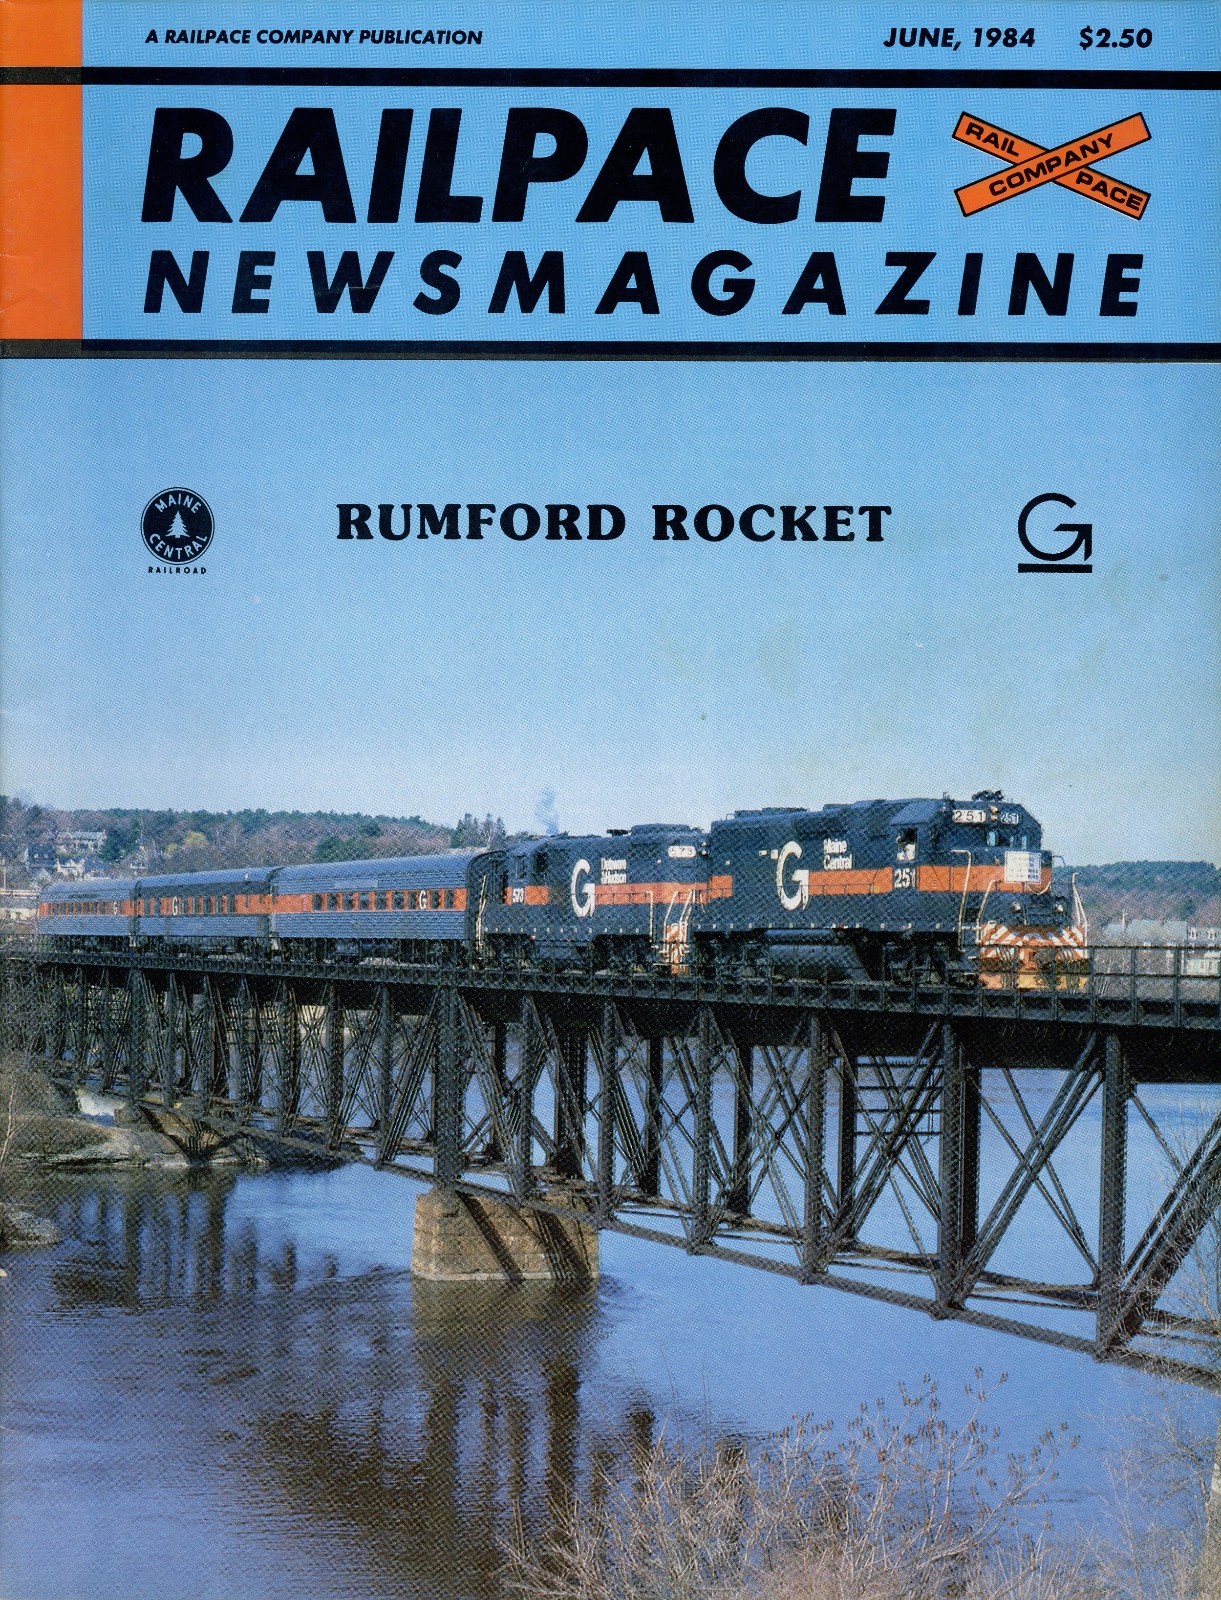
It was even on the cover of the June 1984 Railpace magazine as the chartered "Rumford Rocket." Over the past few years I have collected images of the OCS train that are scattered online or on slides, and I have a good grasp of what equipment was used in 1984. The best reference is a thread on railroad.net discussing the curren Pan Am's OCS train (of which some of the equipment dates back to the 1980s), though at 77 pages long it took a while to get through. Another thread about surviving MEC passenger equipment had some interesting information. However, there are still gaps when it comes to the train equipment and even a mystery passenger car, so I will need to keep digging. As I find more pictures or information about this train, I will update this page so that I can keep all of my research into one place.

October 1985
My current HO scale passenger car collection consists of various Amtrak Amfleet I and II coaches in Phase II and III paint schemes. I also have some old IHC heavyweight D&H passenger cars bought cheap for $8 each even though I knew that they weren't realistic. Walthers had announced in 2015 a short "D&H Fallen Flags" train but it was cancelled for lack of interest. I have never set out to actually acquire realistic models of D&H or Guilford passenger equipment, and don't really know where to start. Thankfully, I don't think most other people are fully knowledgable about the train either so I can get away with substitute cars until I find the right models.

Motive Power
October 1985
As for engines, pictures I have seen from 1983-1985 usually show Guilford (D&H/MEC) GP7 #573, Guilford (MC) GP38 #251, or Guilford (MC) GP9 #470 pulling the train. Maybe they were equipped to provide power and heat for the coaches and/or they were the cleanest engines on the roster at the time. They always ran the train with two engines which would be entirely unnecessary from a horsepower standpoint for only a couple of coaches, and pictures show both engines either on one end or the other, not top and tail. I guess they always has passing sidings at their destinations.

September 1985
Engine #573 has a colorful past. Literally. In the early 1980s it was painted in MEC's historic green scheme with gold stripes. In July 1982 it was repainted in the maroon and yellow stripe scheme. By 1983 it was in Guilford gray and lettered Maine Central, but in early 1984 it was lettered D&H. By 1985, it was back to Maine Central lettering.

In 1996, a company called Mary Jayne's Railroad Specialties Inc. produced a post card of #573.
Here is the caption from the postcard: Maine Central GP7 Unit Number 573, still equipped with a steam boiler for Passenger Service and painted in the Guilford Transportation Industries colors, stands at the Rigby Engine Terminal in South Portland, Maine in early 1985. Eleven years later, in 1996, this Unit would be acquired by Conway Scenic Railroad and repainted in its original maroon and gold livery for service on the New Hampshire Tourist Road. 

Passenger Cars
Springfield Terminal #100 (Observation Car)
October 08, 2007
It was purchased by the D&H from the Norfolk & Western (N&W #102) in 1976. I haven't been able to find out the early history of the car, so I don't know if it was built for the N&W or another railroad. It originally had stainless steel fluting below the windows and it still had it in 1984, though it was subsequently removed.

Springfield Terminal #101 (Diner/Lounge), "North Point" 
October 08, 2007
It was built by the Pullman-Standard company for the Pere Marquette Railroad in 1946, but before it was delivered in 1950 the C&O which controlled the PM sold it to the D&RGW (D&RGW #1290). The D&RGW sold it to the D&H (D&H #43) in 1967. It also originally had stainless steel fluting below the windows and it still had it in 1984, though it also was subsequently removed.

Maine Central #390 
It was built by the Pullman-Standard company for the Pennsylvania (Pennsy #4044). It was absorbed by the Penn Central (PC #4044) and later transferred to Amtrak (Amtrak #5444). I am not sure when the Maine Central (or possibly Guilford) acquired it. A great side shot from 1978 can be found online here.

Maine Central #391 (Food service)
1985
There are conflicting references as to who built this car. One source says that it was built by Budd in 1939, but a different source says that it was built by Pullman-Standard in 1948 for NYC (NYC #3011). Regardless of who built it, it was renumbered (NYC #3211), then became PC (PC #3211), and finally was transferred to Amtrak (Amtrak #3951). I am not sure when the Maine Central (or possibly Guilford) acquired it. Side shot post Guilford at CPC RR Museum 

October 1985
There are some excellent shots on rrpicturearchives of a fan special to North Conway, NH, in 1983 and Maine in 1984 that show the passenger cars even better. You will need to scroll down the links to see them.

Note: I will keep adding pictures to this thread as they are added to my collection.


Tuesday, September 10, 2019

Chief Dispatcher documents for M.M.R.

For the Master Model Railroader: Chief Dispatcher requirement you must develop an operating scheme and then draft up some paperwork. Since my own home layout would never suffice (it can barely hold two trains at the same time), I used the Adirondack Live Steamers track to accomplish my requirements. They regularly hold proto-operation days throughout the summer but they use dispatcher-issued Form D paperwork. It looks like the MMR requirements are more in favor of Time Table and Train Order (TT&TO), so I started from scratch.

Requirement #1: prepare a schematic drawing of a model railroad layout meeting the operating conditions described in (A), and indicating all pertinent simulated distances. 

Below is what I came up with. ALS has actual mileage marker posts every 88 real feet, so creating a properly scaled drawing was pretty simple. Because of the way the branch lines are arranged at ALS, they look a bit larger here than in real life. But, everything else is pretty close. Locations in the schematic in RED represent towns with passenger stations and passing sidings where trains can meet. All other passing sidings shown on the schematic may not be used for train meets. Because the layout is a giant loop, I am using Wilton to represent the westernmost town and Broadway to represent the easternmost town even though they are in fact the same place.


Requirement #2: Develop a timetable appropriate to this model railroad, simulating prototype time, covering a period of eight hours or more, during which at least three scheduled mainline trains move in each direction. 

This was a lot of fun. I started by doing two first class passenger trains (#16/17), one in each direction, which only stopped at the red passenger stations. I gave them 10 minutes at each station to board passengers. Then, I added a pair of second class passenger trains (#18/19). They operated on the same time frame as the first class trains, but presumably have older equipment.

Then I added two local freight trains (#52/53), one in each direction, that stopped at every location and did any necessary switching. I gave them 20 minutes at each location, whether they needed it or not. Nearly all of the towns on the railroad have passing siding track arrangements. There are two industries on each passing siding, one at each end. When switching these locations, crews are sometimes able to use the passing siding to sort cars for spotting. However, if cars are already located on-spot and are not ready to be moved then the passing siding effectively becomes two sidings: one facing point and one trailing point. In such instances, the crews may only spot the cars that they are able to access and the remaining ones must be taken along to a future location where they can be spotted for pick up by a train heading the opposite direction for future delivery.

Most trains are multiple cars long and are connected with safety cords or chains, which need to be removed or installed after each switching operation (much like connecting air hoses). All cars must have their wheels chocked on sidings and frequently on the mainline when left without the engine (much like applying air brakes). Derailments are an uncommon occurrence but must be dealt with as well, much like the real thing. As such, the time built into the schedule to switch various locations reflects the actual time that the crew will need to do their work. When operating trains of this size and weight safety is a real priority and slow and careful maneuvers are necessary. No need to fake adding time for "prototype actions" as we really need to do them here.

Pierson yard is sort of in the middle of the railroad, and I added a pair of Peddler freight trains (#142/143) that work in each direction clearing the yard of cars and making whatever drop-offs it can. Finally, I added a pair of branch line turns (#224/225) which operate two different branches (actually, portions of our older mainline that are now downgraded) in an out-and-back method.

A lot of white-out was required to get it all to work, but here is what I came up with. Time slots marked in orange represent scheduled meets.
Requirement #3: Develop an operating train chart (graph) which interprets the above schedule for timetable operation of the model railroad. Indicate at least one train meet on the schematic drawing required above. Show the position of the trains involved and describe the action, giving pertinent time and movement data to effect the meet. 

I had never done one of these before. I had read an article somewhere about how to do it but at the time it looked boring so I skimmed it and now I couldn't find that article. Doh! Thankfully, once I found a sample online I saw what it looked like and I put mine together pretty quick in Microsoft Paint. Having worked everything out in the timetable, I didn't have a single conflict at all and it all fell together pretty well. I even discovered my schedule was a little back-heavy towards the end of the day so I shifted one of the branch line trains up a few hours. Here is what I came up with:


This represents ten trains in an eight hour span. There are some gaps in the schedule. If I wanted to really get cute I could probably schedule more trains to create more meets (which are always fun). But, there are four scheduled meets already. And, it doesn't show the work that the yardmasters have to do to get the trains ready to go, or the time people have to get their trains out of storage and engines fired up, as well as going through the paperwork. After taking an hour or two to stage everything beforehand and the same to clean up, an eight hour shift in between can really add up! There is plenty of room for a couple of extras, but I am happy with it just as it is.

Apparently, based on a discussion on an online forum you can set up a spreadsheet in Excel to do the hard work for you. But, I am glad I did it myself.

Requirement #4: Develop or adapt a system of operation for the layout in (A), including all the necessary forms and explanations for their use for controlling car movements, train makeup, and operation in a prototypical manner.

I also drew up a station register for the three/four towns that trains will sign in to when passing through. Additionally, at ALS we use waybills similar to the ones originally marketed by Old Line Graphics and now by Micro-Mark. I made some sample cards and filled in industry names actually used as ALS. I even made up some Form 19 order templates which the dispatcher can use to modify trains' schedules or add new extra trains. Finally, I explained my operating scheme for ALS and how we make up trains in the yard based on the car cards, deliver them to the industries at the club, handle the waybills as required, and run trains to clean out yards of extra cars or cars that couldn't be delivered earlier.

It isn't a full explanation of TT&TO operation. You would need a book (or at least a healthy-sized chapter) to accomplish this. Instead, what I did was create a simplified operating scheme based on a timetable of scheduled trains with the flexibility to add additional ones through dispatcher issued Form 19 forms. I think I met all of the requirements that the NMRA is looking for regarding this certificate at least as it involves creating an operating scheme.

Requirement #5: Have participated in the operation of a model railroad, either home or club, for not less than fifty hours. A minimum of ten hours each must have been served in three of the five categories (Engineer, Yardmaster, Hostler, Towerman, Dispatcher), and one must be Dispatcher.

Unfortunately, I still need to accrue 50 hours of operating other people's model railroads. As of right now, I have about 20. Most of the model railroaders around me meet on Wednesday nights for operating sessions, but I am a conflict on Wednesday nights. So it will take a while to get. But, I am slowly getting closer to finishing this certificate.

Monday, September 26, 2022

Custom Lionel 607/608 passenger train

Whenever I go to the train shows I see old Lionel, American Flyer, and Dorfan passenger train sets for sale. Usually they are the large "Standard Gauge" size, which is roughly that of modern G scale. They have a toy-like charm that attracts me. I thought it would be fun to buy a set of passenger cars and paint them up how I liked. However, standard gauge was too large and I didn't want to invest in another train size that I would only be able to operate occasionally under the Christmas tree. So I looked to the smaller on O gauge.

Lionel made several sizes of tinplate trains that ran on O gauge track, and I was most interested in the larger 710/712 series cars. But they are expensive, so I settled on the smaller 600-series for my first attempt. (For a brief history on the various types of Lionel 607/608 passenger car sets, see this helpful website.)

One thread on the O Gauge Magazine forum was inspirational on showing how it was possible to take apart and put together the cars, and even though it focused on standard gauge coaches I liked how he did it. 

Then I ran into a picture of the Lionel Collector's Club of America "The Lakeshore Limited" set, and I really liked the color combination of the dark cherry metallic and cream. However, the roofs transition to black in the middle and I didn't like that at all. I also didn't like the truss rod  castings underneath the car (painted cream in the picture) but since I was using a different style of passenger car I didn't have to deal with them.

I planned to pick some up some 600-series coaches at the next train show I went to, but that was in March 2020 and Covid hit... and the project took a back seat. For two years. Finally, in 2022 after talking it over with a friend he offered to sell me a box of beat up 607/608 cars for a good price. I didn't need them all, but I figured I could get enough parts for 2-3 good cars. I bought them without really looking to see what I had.

When I got home, I noticed that I had one 607 coach and four 608 observation cars! That does not make a train. And none of the cars matched. Some had brass journal covers and some had nickel. I had three different observation platforms painted gold, silver, and custom made job that looked like tin cut from a can and hand-soldered on. The truck sideframes had different style stampings. The roof mounting screws weren't all the same. Three had black underframe tanks with silver ends (which I wanted) and one had formed truss rods (which I didn't want but its is easily removable). It was a hodge podge. But, I got them at a great price so I didn't complain. I just got to work.

A series of videos on Youtube by a guy named "Darth Sante Fe" (here is one) walked me through the entire process of disassembly. I picked the best observation car that matched the coach and took off the roofs by unscrewing them. Then, the window panels were removed by unbending the fragile metal tabs. 

Parts were sorted into piles, including some which I knew I was never going to use. 

I used a small glass container filled with lacquer thinner to strip the paint. This, and an old toothbrush, worked well. I later bought a metal brush to make it easier to get into the corners.

The fuel tank assemblies underneath were cleaned (I discovered that some were blackened steel, and others were painted steel... another set of inconsistencies!) and then sprayed gloss black. The nickel-plated ends were buffed shiny and sprayed with clear gloss to keep them from tarnishing.

The truck sideframes were carefully spread apart just enough for the wheel assemblies to fall out. I was surprised to learn that the wheels rotated independently on the axles. I cleaned and polished them, and removed any rust. I masked the middle rail truck rollers and then the trucks were painted gloss black.

I had also masked the tops of the trucks because it transfers current to the body for the interior lights.

Some of the truck journal box castings were brass and some were nickel. Replacements for both are available, but I wanted to reuse what I had. So, for consistency I painted all of the journal covers I with Testors gold paint. I also painted the observation platform railing with the same gold paint to match.

The bodies were next cleaned of all paint using lacquer thinner, and that was a tedious process. I wish I had access to a media blaster to get it all out. Thankfully, the inside corners aren't easily seen so I didn't strive for perfection there. 

To give my train a second coach I purchased a spare 607 coach body on Ebay, but its trucks and roof didn't match what I already had! However, I managed to scavenge trucks and roof from one of the surplus observation cars. When I was done, I still had enough parts for at least one complete 608 observation car. Maybe for the future...

Also, the extra coach 607 that I purchased later had a bent steel underframe piece and no fuel tanks.

To match the other coaches I removed the underframe assembly and then drilled holes to mount some surplus fuel tanks which I took from the parts supply.

I was finally ready to start painting the bodies! I used automotive primer and spray paint because I wanted really durable paint, and automotive colors come in a lot of metallic options. Here, I selected Duplicolor "Medium Garnet Red Metallic" (BGM 0380) and the matching primer. This stuff costs 2-3 times as much as regular spray paint but the nozzles are wonderful and the paint goes on nice and smooth. It should... it is used on real automobiles! One thing I noticed is that it required frequent shaking or the metallic particles inside would spray out inconsistently. I built up the color in many light coats.

I finally got smart and screwed hooks into my ceiling beam which were very handy for hanging projects that needed to dry after painting, such as these coach bodies.

The undersides of the coaches were masked as well to allow for electrical conductivity with the trucks. 

The window inserts were straightened and then painted with Ace brand "Najevo White Gloss" (17185) which looked a lot like creamy white. I couldn't find a comparable auto paint color but many of the stores had empty shelves where car paints should be.

The original Lionel window inserts were discolored, dirty, and damaged, so I replaced them all with strips of clear styrene that I cut to size.

These were lined up on the inside of the coach wall inserts and pushed down until the metal spikes pierced the clear plastic. Then, the spikes were bent down to hold the clear plastic in place. 

The coaches were reassembled by reinserting the tabs into the slots and bending them over. The lower ones were especially difficult to get to because the metal window inserts and clear plastic window glass blocked access. Perhaps at the factory the clear plastic was added after assembly of the sides?

Then, the tanks were installed on the bottoms of the coaches.

I struggled with couplers. I didn't like the clunky, hard to use original latch couplers, but also didn't want to install Lionel knuckle couplers because they would be too large and lose the sense that this is still a toy train. So, I looked for some simple hook-loop couplers and found some American Flyer reproductions on EBay (AFO-3000-1) which would work. I drilled out the shanks for the mounting bolts, then cut off the excess and filed everything smooth. 

I used 2-56 screws and nuts with 4-40 washers (one car required 6-32 washers because the old holes were so large) to attach the couplers. 

While the roofs were off, I also installed some wires onto one truck of each car which had a pick-up roller and ran it up into the body of the car. I purchased no-flicker lighting circuit boards and LED strips to light up these cars, and I may eventually add them. I don't know yet. But at least the wiring is in place if I decided to do so.

Finally, I could screw the roofs back on. A common problem with these cars is that the roof doesn't want to go on nice and tight, and I had to work around the edges until they fit properly. But once they were screwed on, the project was finally finished. I had considered adding lettering and numbers to the cars, but at this point I am going to skip it. So, with that, my cars were complete.

It was a fun project, but I am not sure I would do it again. It was a lot if work, and I had to learn as I went because I didn't have any experience with tinplate cars. I much prefer plastic models assembled with screws instead of tinplate cars fixed with bent tabs and soldering. Also, for as much time as I spent stripping and priming the bodies, the paint just wants to chip off. That is a bit disheartening. If I am careful with them they will hold up, but original Lionel coaches feature nice baked-on enamel and I hoped this automotive paint would have been similar. Perhaps next time I will look into having the cars powder-coated. I also discovered, much to my chagrin, that the finished train looks a lot like the rare uncataloged Macy's special set.

I also still an engine to pull the train, and I am looking at a Lionel 252 diesel electric or maybe a 249E steamer. Who knows? I guess it depends on what I find for sale at the next train meet. And I still have a bag of parts left over!

This project was very special for me as I worked on it during the many times I had to run between the hospital and our house while my wife was in in the hospital in labor with Harrison. I would come home, feed and water the dog, spray a coat of paint, play with the dog, and go back. This continued after he was born while he was in the hospital. Then, Harrison came home and the project halted for months. But now it is finished, and someday I will give it to him.

Sunday, September 12, 2021

Dead engines in Colonie Yard (2005)

During the same visit into the Colonie Shops in April 2005, I also took some pictures (from a distance) of a few old, abandoned relics being stored in the yard outside. I didn't know it then, but there is/was a tortured history behind nearly all of these pieces. For a full account of them, here is a thread at Railroad.net with all of the sad details of this collection. Warning: it is 39 pages long and a tough slog to get through. 

The equipment was:

Alco RS3 - former Albany Port Railroad #2, former D&H #4126 - owned by City of Albany (scrapped in 2019):

The switcher on the left is Alco S2 - former Albany Port Railroad, former D&H #3011 - owned by City of Albany (scrapped in 2015):

Coach whose identity I don't remember:

Alco S1 - former Long Island Railroad #417 - owner unnamed (scrapped in 2019):

NYC baggage car; NYC passenger car "Rapid Stream"; D&H "World's Fair" passenger car; D&H passenger car (all scrapped in 2019): 

There were two other engines, along with a random boxcar and caboose. I took dozens of pictures of these trains, but a computer crash over a decade ago resulted in most of them being lost. The engines were:

Alco RS3 - former B&M, former D&H #4082 (first #4082) - owned by M&H Chapter of NRHS (scrapped in 2013)

Alco FA-2 - Western Maryland #302 - owned by WM Railroad Historical Society (this engine was saved in 2008)

Here is a shot I took of them on September 02, 2010 (actually, my wife took the shot while I drove across the yard on a bridge):

Interestingly enough, Canadian Pacific reinstalled a few yard tracks in the summer of 2012 and that may have set in motion the scrapping process even though it took years to actually take place. Or not. Who really knows. Anyway, it is gone. I never saw the red Alco Port of Albany Railroad engines actually work in the port, but someday I may paint a model of the RS3. 

Thursday, August 20, 2015

Why 1984? (12 reasons)

Over the past few years, I have agonized about what area and time period to model the D&H in. It seems that the most popular time period would be the 1960s - 1970s, and I think a large reason for that is those were the last few "golden years" of the D&H. The engines wore the new Lightning Stripe scheme, the railroad had fan-favorite Alco PAs and Baldwin sharks, the road was mostly Alco, and company pride was high. In 1973 in celebrations of the D&H's 150th Anniversary even "D&H steam" returned in the form of modified Reading T-1 #2102 for a couple of excursions. And all of these would combine to make a really interesting layout.

However, for the area that I am planning to model (see my earlier posts) my layout will feature mostly switching areas. The focus won't be on passenger operations (which didn't exist in 1984) or the the railfan-friendly engines of the 1970s. It will be grittier, perhaps darker and more worn out, and I am sure a bit more mundane. Maybe even boring?

Once I settled on the 1980s, I had to pick a date or window to focus on. This was extremely tough, and I started by making a timeline of D&H engines that existed in the 1980s. Though this will be the focus of a future post, I determined that in 1984 there were still many interesting engines on the roster. Next, I focused on what industries still existed and were switched by rail. This led to extensive research in books, magazines, online forums, maps, and even the government. After about 2 years' worth of work, I have focused on May of 1984. Here is why...

Reason #1: Good Photographic evidence of what existed
I have photographs of the Colonie Main Line from Watervliet to Kenwood yard taken in early 1984. When New York State offered grant money to the D&H to improve their track, the NYSDOT mounted a camera on the front of a hi-rail truck and took pictures every 100 feet or so as the truck went down the line. Though all shots are from the main line (meaning the point of view sometimes crops out sidings that curve away), these thousands of pictures show trains meeting, freight cars spotted at industries, tracks out of service or being removed, what road crossings existed at the time, and what areas hadn't even been developed yet.

With these pictures, I can scroll through them quickly like a movie and see just what existed at the time. There is evidence of Guildford's recent acquisition of their "rationalization" of the main line, Menands Yard, and various industries. The Colonie Main wasn't frequently photographed because railfans tended to focus on busy main line areas like Binghamton or Whitehall. So, these DOT pictures are crucial in understanding what existed then.

I also have pictures from the summer of 1986 from Kenwood Yard up to Mechanicville Yard and many of the tracks existing in 1984 were gone. Guilford didn't take long to change things and choosing to model a period during their early years means frequently referencing photos.

Reason #2: Online customer base was still strong
The 1984 pictures also showed that many online customers in North Albany, Menands, Colonie, Cohoes, and Watervliet still existed. While the number was probably half of what was there even 15 years before, I am not looking to maximize the amount of areas to switch. Most of the buildings will need to be scratchbuilt so the less required, the better. And, since I likely won't have a large operating crew over having 15 spots compared to 40 is more manageable for one or two crews. Some of the interesting customers include a millwork company in North Albany; a grouping of a liquor distributor, tractor distributor and an Agway all located across from a cemetery in Menands; a rock quarry in southern Cohoes; an Abrasive company in Watervliet; and Mohawk Paper in Cohoes. That will mean a large variety of freight cars.

Reason #3: Guilford's "rationalization" was just starting
Guilford purchased the D&H on January 4, 1984. From that point on, Guilford started to “rationalize” their infrastructure and many yards were condensed, sidings pulled up, and maintenance allowed to suffer. Modeling the prosperous 1960s-1970s will entail double-track main lines, lots more industries, a full yard in North Albany, etc. For a switching layout, this will only result in spending more money on track and having scenes appear "busier" than they need to be. In contrast, by 1984 some of the dual main lines were removed, portions of the Colonie Main were weed covered and barely visible, yards were in various stages of being torn up, and spurs were out-of-service.

To some, this is depressing and I see their point. However, I am fascinated whenever I travel someplace new and see evidence of where railroads used to be. Old factories, tracks buried in the dirt, crossings gone except for the rails in the pavement, etc. Modeling in 1984 will allow me to recreate various stages of railroad abandonment and neglect. Between Kenwood Yard and Mechanicville Yard there were yards in North Albany, Menands ("Breaker Yard") and Colonie. I don't need this many operational yards, but by modeling North Albany as abandoned it becomes a model on its own. And rarely do I see on other layouts anything more than an abandoned siding to suggest "the past." Here, it will feature prominently.

If I model any later than 1984 though I risk missing out on many interesting scenes. By 1986 some yards and sidings were completely gone, fewer online customers remained, and that (for me at least) is when it becomes depressing. Besides, even Guilford offered a few interesting things to model. For example, their executive and railfan excursion trains featured high-nose Geeps (which I love because my first train set had one) and passenger cars, which means I can actually... occasionally... have a legitimate reason for running passenger consists on my layout!

Reason #4: Opportunity to model something unique that I researched
Let's face it... there aren't many D&H layouts out there. And out of those that do exist, most (if not all) do not focus on the Colonie Main line or the year 1984. I have seen wonderful layouts set in the other regions of the railroad, including the northern Adirondacks, the Pennsylvania regions, or the Albany to Binghamton line. I have even seen Schenectady modeled, but not the Colonie Main. And, usually the period modeled is the 1960s-1970s.

The area between Kenwood Yard and Mechanicville isn't glamorous and much of the original railroad infrastructure is gone. However, when I first moved to Albany I lived in Menands and explored the remains of the Colonie Main Line during my free time. Because of this, I have a personal connection with the area. And, modeling something different appeals to me. Doing my own research instead of following in the footsteps of others is exciting. And frustrating. If I were modeling the Sante Fe's Cajon Pass or the D&RGW I would have thousands of sources of research. Here, there are very few. My pair of sneakers and Kodak camera are my most valuable tools. I have lot of good memories exploring the old buildings and taking measurements, and I find it enjoyable. So, for me the research is just as much fun as seeing the final layout.

Reason #5: Recreating childhood memories
I was born in 1982 in Rochester, NY. That was Conrail territory and "Big Blue" was everywhere. But, the types of trains that I saw as a kid in Rochester will be the same types modeled on my D&H layout. There weren't many TOFC or COFC trains, boxcars still were prevalent, and there was no graffiti on the cars. Though my layout will be set several hundred miles east of my hometown, watching the trains roll by will trigger early railfan memories. Plus, Conrail trains interchanged with the D&H and Amtrak trains rolled across on bridges so I can model them too.

Reason #6: Evidence of 1983's "Year of the Bible"
In 1983, President Reagan declared that 1983 was going to be the "Year of the Bible". While looking through my DOT pictures from 1986 I noticed on the southern side of the prominent Central Warehouse in North Albany a large banner advertising the Year of the Bible. Assuming it was put up sometime in 1983, it likely was there in 1984 and it apparently lasted at least three years. I have no idea when it came down. God is very important in my life and, as a Christian, this is a great way to incorporate my religious beliefs into my layout in a realistic way.

Reason #7: Diverse D&H Motive Power:
The D&H owned a tremendous variety of engines in the 1970s from Alco, EMD, GE, and Baldwin. By the early 1980s, however, the selection was much smaller. The D&H moved nearly all of its Alcos up to Colonie Shops to consolidate maintenance of them, and that included seven types of Alcos (RS3, RS3m, RS11 high nose, RS11 low nose, RS36, C420, and C424), one type of GEs (C33C), and two types of EMDs (GP38-2 and GP39-2). Aside from the EMDs, the roster is small enough and the paint schemes are varied enough (Lightning Stripe with small numbers, Lightning Stripe with large numbers, blue dip, blue with yellow nose, blue with yellow chevrons) that it is reasonably possible to build accurate models of nearly every class of engine. And, the engines are recognizable and lend credibility to the layout. And because of the Colonie shops, I have an excuse to run whatever motive power existed on the D&H at the time.

Reason #8: Colorful Freight Cars:
The late 1970s "per diem" boxcar incentive was over by the 1980s but all of the boxcars built a decade before remained, complete with bright color schemes. The D&H alone had red, orange, yellow, green ("Reading repaints and other), maroon, brown, and blue/white boxcars, along with red covered hoppers and tank cars, silver covered hoppers, blue glass hoppers and gondolas, etc. And that doesn't even count the interchange cars that went through the D&H. And, very important to me, this was before the era of graffiti on cars so they don't have to be marked or decaled to represent vandalism. In preparation for my layout I already have dozens of boxcars assembled and weathered. I am, admittedly, a 50' boxcar junkie.

Reason #9: "I ♥ NY" boxcars
I really like the classy paint scheme of the NYSDOT/D&H collaborative "I ♥ NY" blue and white boxcars. Though they were introduced in 1982, many were still in great shape in 1984. There were at least three variations as well, with some featuring green "Operation Lifesaver" emblems, some featuring NYS DOT emblems, and others having neither. Several manufacturers have offered models of these and I plan to get a few. Sadly, several brands (Bachmann and Athearn/BevBel) have released them in the wrong color blue.

Reason #10: Cabooses still used
The D&H still used cabooses on their trains in 1984. There were many different styles including wide-vision cabooses, bay window cabooses, center cupola cabooses, and a few odd ball wooden and homemade cabooses. And they came in two different paint schemes- red or yellow- with a variety of heralds. Nothing boring here! While the cabooses wouldn't last forever on the D&H, I can justify using them in 1984. And no train looks complete without a caboose.

Reason #11: Foreign Road Power
Because Guilford and Conrail interchanged with the D&H in the Albany area, I can model B&M geeps (though the "McGinnis Bluebirds" were gone by this time), some MEC engines, Conrail units, and some of the early gray Guilford engines. I am especially looking forward to getting MEC #2311, which was the D&H's gray ghost. This engine alone almost made me move my layout back to 1983 (the D&H purged themselves of U23Bs in June of 1983) but because the MEC kept it gray and put their pine tree emblem over the D&H shield, that is fun too. Thus, we shall stick with 1984.

Reason #12: Amtrak Phase III paint scheme
You don't have to say it... I know what you are thinking! Amtrak didn't run trains over the Colonie Main line in 1984. They did, however, roll them over the bridge in downtown Albany and cross the Hudson River on the Livingston Avenue Bridge. So, I might be able to partially model that. And perhaps Amtrak had to detour off of the NYC/PC/Conrail tracks at one point. I don't really know about that.

What I do know is that I really like the Amtrak Phase III paint scheme with the equal red-white-blue stripes, which was introduced in 1980. I also like the F40PH engines because I saw more of them than any other train engine as a child. My grandfather always took me to the Amtrak station to watch the trains and because of that, I have a fondness for Amtrak. And compared to Conrail trains, they were much cleaner and classier. Though some railfans I know say "if all I saw was an Amtrak train I didn't see anything" I don't agree. Besides, I can do what I want on my model railroad!

An interesting fiasco occurred when the D&H repainted Amtrak's dome car into blue and yellow stripes without asking Amtrak! (Note the yellow instead of red in the picture). It was part of the Adirondack passenger train consist and waiting at a station stop when some Amtrak officials spotted it and demanded it be painted back. The dome lasted less than a week before being restored to red/white/blue. Though that occurred in the 1970s, I seriously considered backdating my layout so that I could include this interesting piece of D&H history.