
I mentioned it in my last flatcar post, but one of my two cars will be Conrail #716019 based on
this picture I found online. The prototype isn't the same: my car is based on a Thrall built flatcar and the picture is of something else. But, I liked its beat up appearance and it seemed as good as any. Once again Ricky at
Modern Rail Decals came through for me with some decal sets custom made for my cars. They went on super easy and were strong enough for someone with my "delicate touch" to hamfist into position. After the car was done up, all of the decals were sealed with Dullcote and it was ready for a load and some weathering.
 |
| Photo by Jonathan Fischer, used with permission |
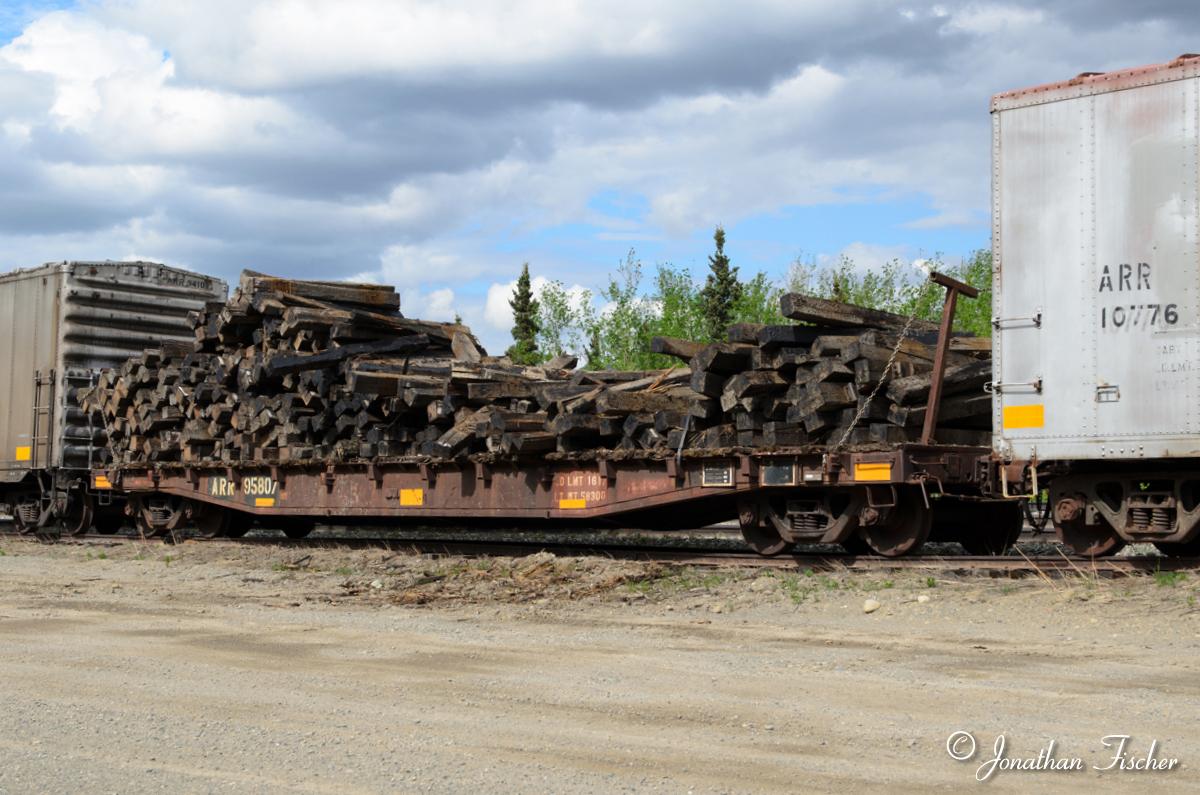
I knew I wanted to try and get as many merit points as I could, so adding a scratchbuilt load seemed natural. The Conrail flatcar was supposed to represent a beat up car so carrying a brand new load just wouldn't make much sense. Something like MOW equipment, wheels, scrap rail, or ties seemed more appropriate. While searching the internet, I found
a fantastic picture of an Alaska Railroad flatcar with a load of used railroad ties. The ties are just mounded on the car, and some look like they are ready to tumble off! Additionally, the "end restraints" look to be nothing more than steel square tubing and chain. All of it would require scratchbuilding. The kicker was that I had a huge bag of HO scale wooden ties on my shelf with no purpose.
 |
Lots of ties (vertical) with horizontal tape masking
everywhere except where I want the rust pain to show. |
The ties, from Mt. Albert Scale Lumber, were purchased through Fast Tracks... the same company that makes those neat track jigs. I think I bought them while laying track to slide under rail joiners, but discovered that they are much thicker than plastic flextrack ties (they scaled out to 7" x 9" x 8.5' which is correct for many railroad ties) and were more work to sand down than the plastic ones. They are only sold in bags of 1000, so I had about 998 left! They were stained in a very dark ink/alcohol wash for 24 hours and then left to dry. The photo showed that the ties were definitely used because there were rust stains where either the rail itself or tie plates had been. This looked to be a fun detail to replicate, so I used some scrap balsa wood and poster board to make a "tie plate weathering jig."

The load was built up on a base of clear 0.010" styrene, which is thin and yet allows the load to be removed. The first layer of ties were superglued to the base and subsequent layers were built up with white glue. I placed each tie by hand. Finally, a light sprinkling of real dirt, ballast, and green foam were applied and then shaken off. I probably could have used another 100 or so ties but I threw out the stain first so I can't make more. I also fabricated some support brackets similar to the prototype picture using C-channel and square strip styrene. The flatcar deck was then heavily weathered with additional oil stains.
 |
| Ignore the diagonal shading under the stake pockets! |
Finally, everything was put together. The Kadee couplers and Accurail trucks were attached with 2-56 screws into holes I had drilled before the wood decking went on. I replaced the terrible looking wire "glad hands" at the ends with Precision Scale Co. castings, which look much better. The brake wheel and shaft were installed on the end of the car. The load was secured to the deck with thick superglue gel, and then the tie retraining brackets were strung up with some 45 links-per-inch chain I bought from Crescent Locomotive Works and secured with superglue into the stake pockets. Everything was given a final coat of Dullcote and then I was able to call the car finished.


 The load was built up on a base of clear 0.010" styrene, which is thin and yet allows the load to be removed. The first layer of ties were superglued to the base and subsequent layers were built up with white glue. I placed each tie by hand. Finally, a light sprinkling of real dirt, ballast, and green foam were applied and then shaken off. I probably could have used another 100 or so ties but I threw out the stain first so I can't make more. I also fabricated some support brackets similar to the prototype picture using C-channel and square strip styrene. The flatcar deck was then heavily weathered with additional oil stains.
Nice work.. Great load.
ReplyDeleteYour flatcar and the load look great, and I also like that you made the load removable.
ReplyDeleteJim @ the JSSX