Warning... massive post ahead!
 |
| Me with my awesome blond hair in 1987. |
This past weekend my wife and I attended the
Finger Lakes Live Steamers' 50th Anniversary Meet. This place is pretty special to me. Located about an hour east of Rochester where I grew up, I remember my parents bringing me to a couple of their annual open house days when I was a child. Looking back in the old photo album, that would be 1987 and 1988. As a boy fascinated by trains, it was all just too much. The size factor alone made them mesmerizing and the fact that you could ride them round and round made it almost feel like riding a real train. And the seeds were planted.
 |
| Me with my parents and siblings on straddle car in 1987 |
As is typical of a 5 or 6 year old, I decided I wanted one. I remember doodling lines around a drawing of the backyard of our house showing where I would put it. That it wasn't "too scale" or that I didn't have the money to build it anyway was entirely besides the point. I remember the club engines being painted in a scheme similar to the Erie Lackawanna's... which was important as my first HO scale train set had an Erie Lackawanna engine. My parents, who indulged many of my train fancies, never bought me a live steam engine. My dad did bring me back the following year though, which was
almost as good.
 |
| 1988 (in my pink ALF shirt) |
I remember being about 12 and seeing an advertisement in
Model Railroader magazine for
Little Engines, a company that sold (and still sells) live steam locomotive castings. The ad said to send for the catalog, which I did. I remember opening it up the envelope and there was a bill for the catalog. I can't recall how much it was, but my mother made me return the catalog to them. Perhaps in an act of restitution, several years ago I purchased their most recent paper catalog. Though the F.L.L.S. advertised that they had junior memberships and that they had machine shop equipment on the premises, what I expected to do at 12 with the catalog anyway is unknown.

Though the open houses were open to the public and free, I never visited them again that I can recall while in Rochester (we went once with a VHS camcorder and I don't know what year they came out, but it might have been 1988). I distinctly remember a man named Charlie C. who brought a magnificent Little Engines pacific locomotive painted in the bright orange, yellow and blue Chessie scheme. While I thought it was pretty then, I was giddy in 2010 when he brought the locomotive to ALS and I met Charlie in person and got to tell him how much it meant to me to see it again after all those years. It was built to last!
 |
| 1988 |
Certainly, as a college student nearby I blew the opportunity. Then I moved to Albany, and everything was forgotten until 2006 when I was looking through a hobby store and found several issues of
Live Steam and Outdoor Railroading magazine for sale. Having now read nearly every issue since 1967, I can honestly say I got lucky. Those two issues (June and August) I bought were filled with train articles and other things that interested me. I didn't have a clue about the machine shop language and things like hit and miss steam engines didn't appeal to me (and still don't) but I bought the two issues anyway. Some issues have little train content and had that been the case here, I likely never would have bought them.
I later found out a friend had actually convinced the store to carry the magazine in hopes of attracting new members to the local live steam club, so I guess it worked! The magazine had a section devoted to club listings, and I found a reference to the Adirondack Live Steamers. I joined in 2007, rekindled my interest in the hobby, and the rest is history.
 |
| 1988, and happily riding around! |
My wife and I decided a couple of years ago to visit some of the live steam clubs that are within a couple hours of Albany, so in 2014 we visited FLLS again. We found the club to be extremely gracious as hosts and made several friends that day. Having not stepped on the property in twenty six years, I was amazed at some of the changes that had been made. The strange elevated 3/4 scale, 3.5" gauge live steam track was gone (it can be seen already in a state of decay in the picture at right). But, their 7.25" gauge track was just as I remembered it and after a loop around the line they let me take over and drive for a couple more trips.

They also had a new, extensive, gauge 1 layout. I have always wanted one in my garden and someday will have one. I have seen a few before that were nice but boy does the FLLS track look grand compared to them. It was set up to run electric and live steam powered trains, and I had brought my live steam Ruby engine and a few cars to play with. The last four cars are scratchbuilt. Though the picture at right doesn't really reflect the state of the railroad (it has lots more track and a big yard and multiple mainlines) this image of a train plodding along on a raised garden with lots of greenery is what I want my garden line to be someday.
 |
| FLLS - 2019 |
So, that is my history with FLLS. But how about their recent 50th Anniversary? And what has changed in the past five years (or the past 31 years?) At right is a modified map that was handed out at the recent meet. I marked in red the track I remember from 1988 (minus a passing siding here or there). Everything else is new. What's more, nearly all the 7.25" gauge stuff is new within the past 5 years! They are definitely expanding.

As we pulled up we had trouble finding out where we were supposed to park. They have at least three parking lots, not all of which are marked, and in the chaos of moving to each of them I managed to set up this shot as we finally found our spot. I think it is a great juxtaposition of three things all in the same area, presumably doing the same thing (moving people) via three different modes of transportation technology. We saw many Amish (I think?) people during the morning drive by in their carts, and on the southern edge of the property there was a man teaching his sons how to cut hay in a field with a giant blade cart thing. I believe that is the technical term.

It was a really nice day, and it wasn't too terribly hot, but still I decided to set up my folding camping chair in the shade by the elevated gauge 1 track. FLLS has a permanent garden railway line and a smaller raised live steam track, but this looked to be temporary and brought in for the weekend. Though the sun shifted throughout the day, as did our chairs accordingly, we were usually no further than 10 feet from this track. As a result, I got to see a lot of the G scale live steamers run. This looks to be an Aster Hall class pulling a lovely rake of 9 coaches. It ran for about 30 minutes without much interruption from the driver.

At the same time, right in front of us was the 7.25" gauge main line and train after train went by. The main line was busy and backed up in places, though their signalling system worked well to keep the trains spaced apart. I particularly enjoy the older 1800 based locomotives, and this Railroad Supply locomotive and coaches were really well done. I don't know if the engineer attempted the grades on the middle flyover section, but he had no trouble keeping up speed on the level areas. At one time I considered building a locomotive like this but was concerned the grades at ALS would prevent it from operating well. I might have been wrong.

A group from the New Jersey LS banded together and brought a trailer full of goodies to run. Of interest, there were two pacific locomotives that individually were running with nice long trains and together were really pulling hard. It was interesting to hear the engineers trying to work together to get their locomotives in sync with one another. Another point of interest is that both locomotives appear to be derived from the Little Engines design, but the final detailing was taken in different directions. I especially love the Southern "Crescent Limited" green and gold scheme on the second engine. The moon on the cylinders is really classy.

Speaking of long trains, this poorly lit shot shows the double headed engines working around one of the original curves with a very long train. All of the cars behaved well which is quite an achievement as slack action can build up over the length of the train.

Here is another long train, mostly passenger style cars but also a few bench style riding cars. The amount of work it must ha
ve taken to put everything together and paint it all is incredible. I think that there were nine passenger cars trailing the riding cars.
Here is another train from NJLS being driven by Ron. If you look to the left of him, you can see the roof of a covered flat car that provided protection from the sun! That was a nifty idea. While I was relaxing in the shade eating my pizza, Ron offered to let me use his train (
we aren't total strangers). It was a classic pizza vs. train moment but I stuck with my food and he took another lap. When he came around again, I got on board
with my pizza and he showed me the new track and how to operate his engine. For the third and fourth laps, I drove the train around (my pizza was gone). It is a great hobby and people are very generous with their equipment. His engine behaved beautifully and I managed to keep it on the rails the whole time.
 |
| What was I pointing to? |
Next time I come, I might try and arrange with someone to bring my equipment. There were several other people from ALS here, as well as other local clubs in the North East that I am friendly with. It was nice to go back to my roots and see that while some things have changed, others have remained the same. I believe that they are pretty boxed in their current location which is why their track is folding in on itself instead of stretching out very much. All of it operated well (aside from a pesky electrical switch machine that was quickly fixed) and I personally didn't observe a single derailment. That is quite an accomplishment. FLLS has a lot to be proud of. They have open days for the public to attend which are free, and I would highly recommend anyone with an interest in trains to stop by and check them out. The hobby is a lot of fun and can really stay with you. If you asked me in 1988 where I wanted to go to have a good time, I would have probably pointed to FLLS. In fact, I guess I did...
The following are a couple more pictures from the 2019 meet, without any commentary by me.


 A couple of years ago I was sitting at my work bench one day and realized I had over a dozen types of ballast in my scenery supply bin. And I find ballasting so much fun that I wanted to do some just to enjoy it even before my layout had track installed. So, I decided to create a ballast sample board. It lets me easily compare ballast size and colors. It would have been much wiser to paint the board the same shade of brown as my layout and to perhaps include a little grass, but I was in a rush. I had stuff from Woodland Scenics, and had ordered samples from Arizona Rock and Mineral and Scenic Express. I have been looking for a substitute for Highball Ballast which I loved working with but sadly has been out of business for awhile now.


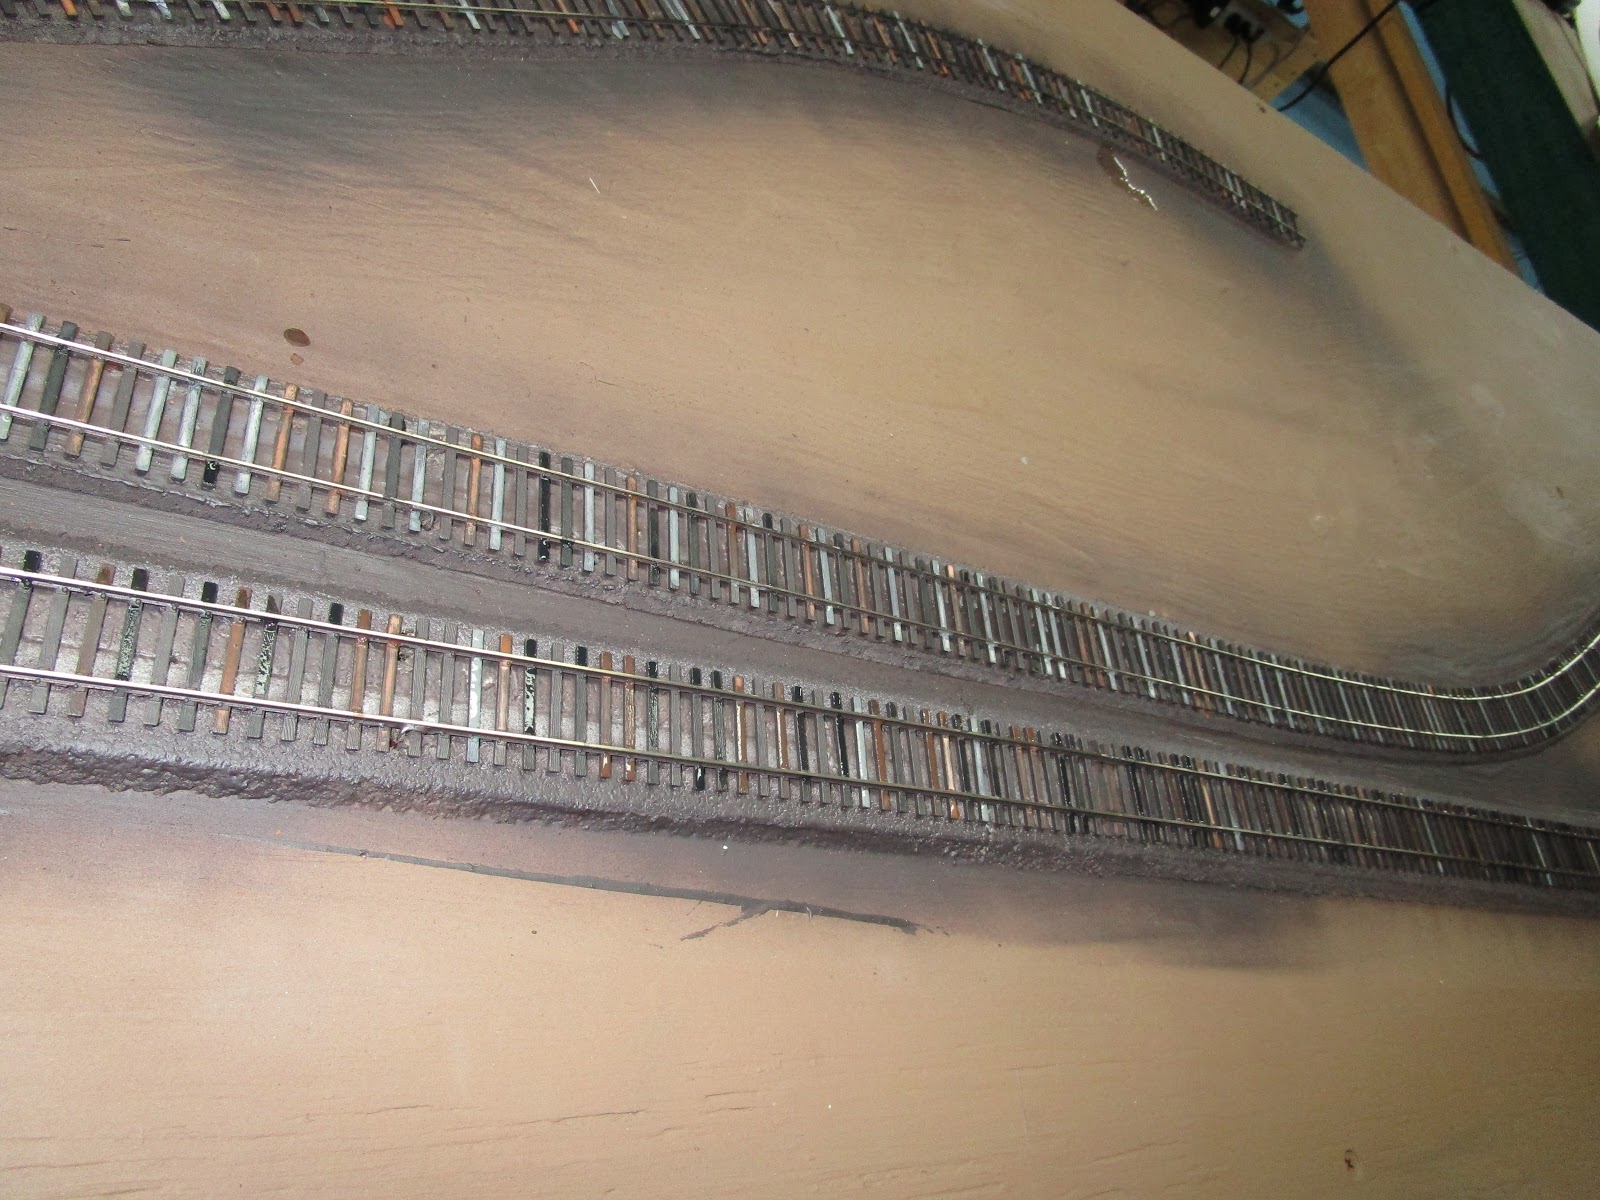
 So that left me with Woodland Scenics' ballast, which I planned to avoid. Why? Because I have always heard "real modelers use real crushed rock for ballast, not walnut shells." And I turned into a snob and believed it. I admit if you use wet water to saturate the ballast instead of rubbing alcohol, you need a lot more water and that extra spraying could cause the loose ballast to go flying. But, I use straight up rubbing alcohol and the WS ballast stays put. My sample board showed that I could secure it without any trouble. So that was that, Woodland Scenics ballast for me. In the picture at the right, the section of track ballasted on the left has been secured with glue, while the portion on the right has not. The difference in color is important to note.