CP Executive train in Albany

CP Executive train in Albany

Tuesday, October 20, 2015

Structure - Albany Tomato Company (part 3)

This building has been slowly progressing and along the way I am learning quite a few lessons. The first of which is one should never take on such an ambitious project unless he is willing to swallow his pride and make some mistakes. So far, I have been pretty lucky in the regard but as I was working on one of the walls I noticed a slight rock in the building. That could only mean one of two things: either my work bench is warped or my building is. Tragically, it was the building.

The same wall I tried to cut and repair before was again at fault, and I have no idea how I messed it up again. So, I cut apart the fix I did before, again reset it on a flat surface while using blue tape to prevent it from shifting, and then applied styrene patches. It is now flat.

I have also finished the roof areas and the complex inner walls. The roof supports are strips of 1/4" square styrene and I have come to learn that they are not always perfectly flat. During the extrusion process, sometimes a gentle bend is formed and these have to be accounted for when using it. Not all pieces have them, but those that do require extra clamping. I didn't notice the bend in one of my pieces and have had to correct this with extra bracing.

Setting the height of the roof braces has proved difficult too. Ideally, it would be measured from the bottom up but some of the bottom edges are not perfectly flat (which will be corrected during the sheathing of the brick sheets) and some of the top edges are likewise not perfectly flat. I can correct this with thin 0.060" thick strips but until I do I cannot use the top lines as reference points. Since there are three distinct areas for the roofs, and only one is a perfect rectangle, there are so many reference lines that it is nearly impossible to guarantee the roof will be perfectly flat on first go. Interior bracing has complicated matters.

So, I glued the 1/4" square strips along the proposed roof lines and left blanks where windows might interfere. Before the roofs are installed, I will purchase some 0.005" styrene strips and use them and a miniature bubble level to shim the roof up or down. Who knows, perhaps real roofs are pitched at an angle too?

Another issue is that the roofline and details have changed over the past 50 years. The picture in the book from 1963 shows interior sheds and windows and doors that don't exist today. And, unless I get on the actual roof to take measurements (which likely isn't possible) all I have are satellite photos to rely in. They are better than nothing, but not perfect. 

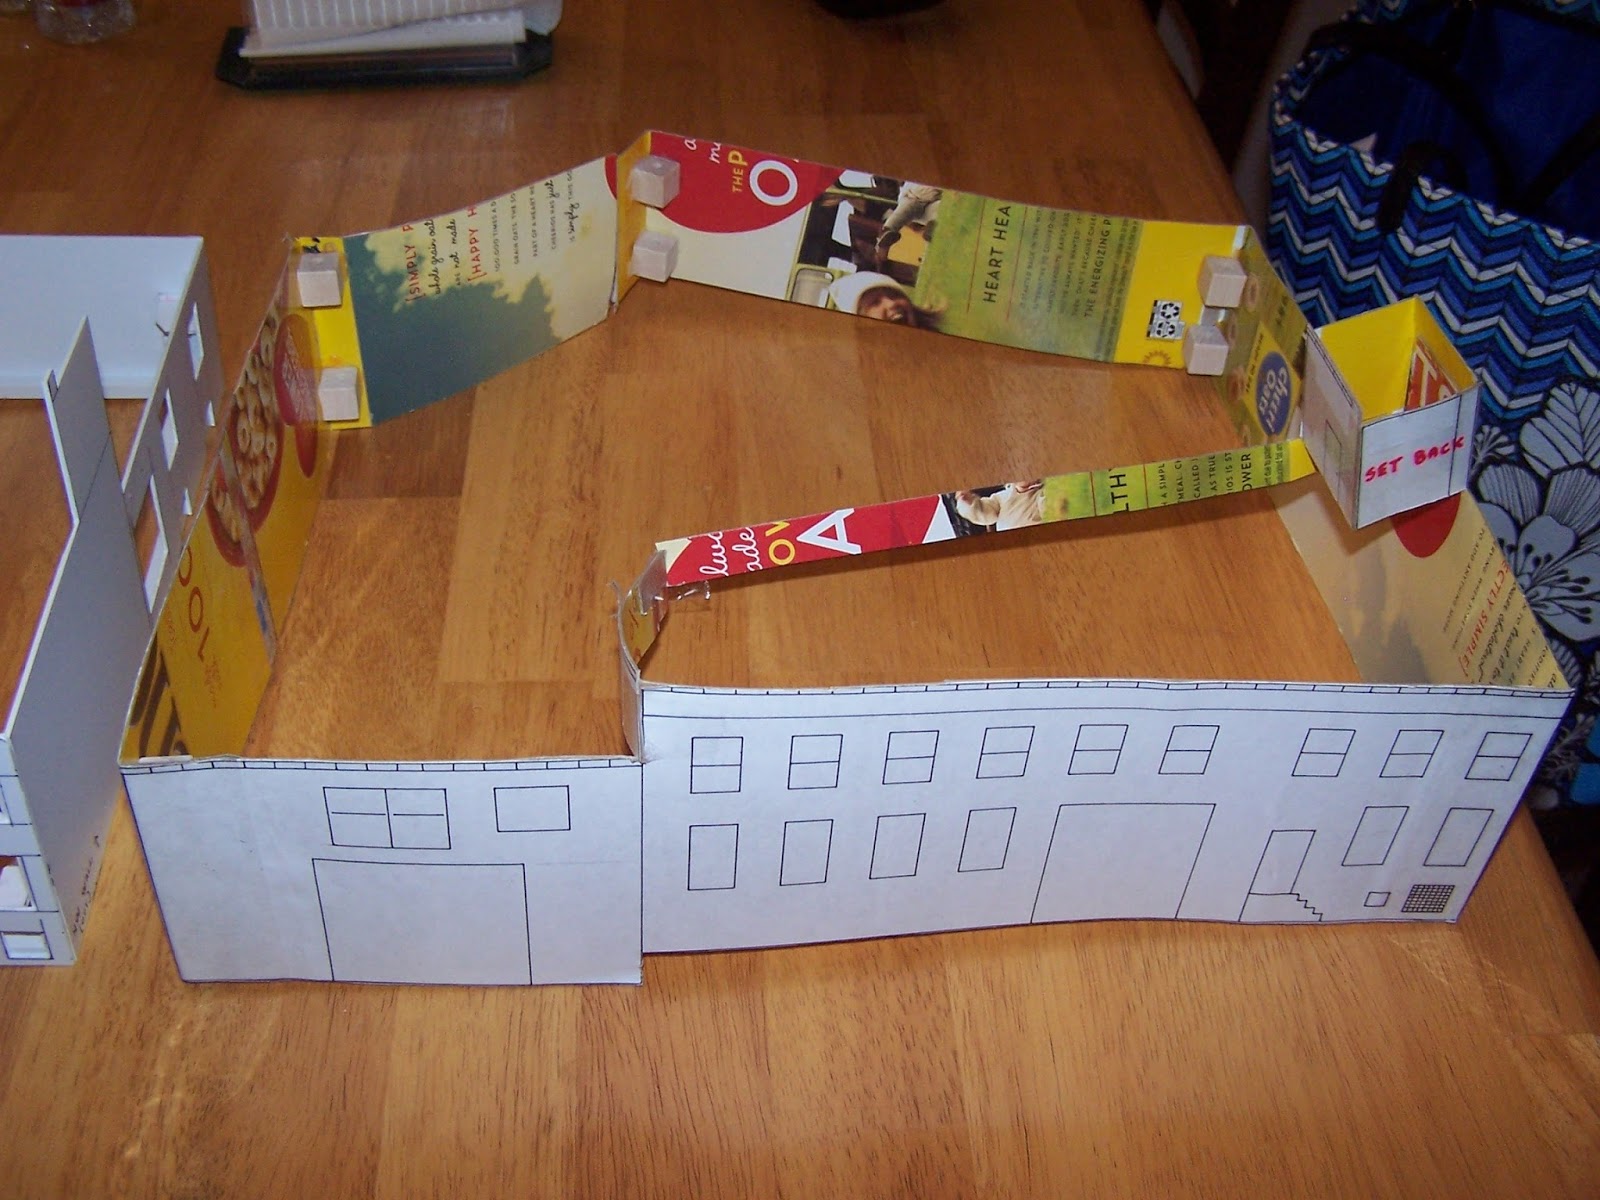
Still, the pictures show where I am now. I am nearly at the point where order of operations will matter. Do I build the windows and doors next and set them flush in the window and door frames? Do I cover the outsides of the building with the brick sheets? Do I permanently glue down the roofs now, which will add rigidity to the building but make it difficult to install the windows later? On the roofs, do I install the brick sheets on the inside lip of the roofs now or wait until the roof itself is glued in? And that doesn't take into account the detailed interior. 

And, I still need to figure out how I am going to do the artwork on the side of the building. Decals? Paper sanded thin and glued? Since that side of the building isn't being weathered, any problems will show. Plus, I need to fix the artwork to remove the power lines and create the portion on the bottom that is cut off.

With these tough choices ahead, I am going to think it over for a while. In the meantime, I will experiment using various glues to mount the brick sheet on plastic styrene. To do this, I will build a small styrene box and practice my cutting and bonding methods so that the corner joints look decent. 

I already have about 15 hours into the project, with 2-3 spent on photographing and online photo research, 3 hours spent making the drawings, and about 9 hours building what I have already. I mostly work in spurts of about 60-90 minutes at a time, then go and do something else to clear my head. Sometimes, I just stare at it and wonder "what is the next step?" and wait for the answer to come to me.

And yet I still have so much to do!

Wednesday, October 7, 2015

Structure - Albany Tomato Company (part 2)

As has been mentioned previously, one of the goals of constructing this model was to earn points in the Structure category of the Master Model Railroader's certification program. After having talked with several local MMRs including Robert Hamm and Kevin Surman, I was encouraged to attempt this undertaking. Both pointed out that more points would be awarded for scratchbuilding details such as windows and doors (instead of using castings), and so I will attempt to do everything by myself for this model (paint and decals excepted). 

This will not be an easy model to build, yet I don't think in and of itself it is a very complex structure. Certainly, as this will be my very first scratchbuilt structure I have an uphill climb but I am not intimidated by it.

I plan to do as much as possible using styrene, a plastic which I am quite familiar with and really enjoy using. It is dimensionally stable and doesn’t warp or twist from humidity, it takes paint really well, cutting (using the “score and snap” method) is very effective up to about thicknesses of 0.080,” and my local hobby store carries the full line of Plastruct and Evergreen shapes.

More importantly, though, is that it fits in with the time period I am modeling. If I were modeling the steam era or even the transition era, wooden structures would be much more common. In that case, I would likely need to build them in stripwood just to preserve the wood grain and allow for better weathering techniques. I have longed to build one of those master craftsman kits which contains hundreds of pieces of wood and countless castings, and which usually result in a worn-down wooden factory or station. However, those types of structures just don’t fit with my 1984 layout. Instead, corrugated iron or steel, concrete, and brick are what I will be using and all are nicely represented by styrene.

Initial Drawings
The first step of any project should be to make some drawings or at least sketches of what you hope to build. This not only will serve as a guide when cutting the wood or plastic but it also tempers expectations at the early stage. For example, after drawing plans for the main portion of the ATC I was surprised just how much room it would take up on my layout. And that didn’t include the attached garage or adjoining building. Instead of taping multiple 8.5x11" sheets together, I went to Office Max and purchased an oversize book of graph paper.

I love making drawings and find it very relaxing and enjoyable, but will gladly take any printed drawings from books or magazines if available. Then, consistent with good advice I have seen online I copied my drawings and glued them to cereal box cardboard. These were then trimmed and taped together to give me a three-dimensional view of the building. Since mine had complex roof lines I left them pretty much open for now. I used wooden blocks to reinforce the corners but they didn't work all that well. 

Then, I waited. And waited. And waited some more until my yearly vacation came around. I didn’t want to start this project and have to stop and put it away every night because of other things, so I just thought about it and collected supplies (like styrene and brick sheet) until the magical week arrived.

For this structure, I plan to use a core of 0.060” styrene sheets. I would have preferred 0.080” but my hobby shop had a lot of trouble ordering it. The down side with going thicker is that when you scribe and snap it the edges don’t always come out square. Also, window openings are more difficult to cut in larger styrene. The walls will be braced in the corners and edges with 1/4" square styrene rods. Additionally, I made some custom 90-degree corner braces from styrene.

Finally, the outside will be sheathed in plastic brick sheets. I looked long and hard online and the various options out there (including some marketed for N scalers) and for right now settled on some by Plastruct. This will be discussed more in the future, but suffice to say that because the sheets are so thin all of the rigidity of the building must come from the styrene core.

Cutting the Walls
One of my favorite tools is my large plastic cutting board which was sold for using in the kitchen for carving turkeys. I don’t have one of those healing cutting mats, but instead have multiple plastic cutting boards in various sizes including a really helpful one about the size of a business envelope. I also have a piece of glass that I sometimes use for complex gluing jobs because styrene won’t bond to the glass. One side also has a "juice" channel around the edges which catches round things like springs and knives from rolling off. (Note: they can warp in the dishwasher from the heat so don't use an old kitchen one if you need it to be perfectly flat.)

I cut the walls to size per the plans, and constantly double checked my work. It is important to make sure the walls end up square and true but even more so when you are scratchbuilding a model and don’t have pre-molded guides. And, since this was to be a model for competition and wonky walls would surely result in a bad score. Inside joints were braced (perhaps too much?) with the square styrene and my corner braces. Since the roofs would be supported along the top and I wasn't sure yet how I was going to do it, all braces were left off the top 1/2" of the model for now. I also made sure not to put any braces in locations where they would be seen from the windows or open doors.

I use Plastruct Weldene exclusively for all styrene joints. It is labeled as non-toxic and I don’t get headaches like when I use MEK, though proper ventilation for everything is a must. I flow the Weldene into the joints on the inside and let capillary action suck it into the gaps. Joints set quickly and fully harden overnight. Usually, I glue up a joint and then let it sit 30 minutes before doing another. If you get it on painted surfaces it doesn’t damage them or cause them to bubble… it will cause the paint to go from shiny to dull, but a coat of Dullcote over it at the end hides all mistakes. I love the stuff, though my shop doesn’t carry it anymore and I have to buy it online. The only downside is that it won't work on ABS plastic, only styrene plastic. 

For the few windows and doors that I have I decided to depart my my usual course and purchase a "Nibbler." In the past, I either did the "scribe an outline, then scribe an X" to break through the plastic or else cut the building into slices, removed the window areas, and then glued it all back together. Here, I purchased the Nibbling Cutter from Micro-Mark (http://www.micromark.com/nibbling-cutter,7761.html) after reading some good reviews online. It is only recommended for plastic up to 1/16" thick (0.0625") and it did a good job on my 0.060" walls. Had I gone with the thicker 0.080" walls, I don't know if it would have handled it. True, the Nibbler is a slow tool to use but it is accurate and sort of fun.


To use it, I had to drill a 3/16" diameter hole inside the window or door area and then begin nibbling out. What I did was to nibble to one of the edges, then turn the tool 90" and nibble along that edge. At a corner, I turned the tool and went on again. I left barely a sliver of plastic at the edges so that a file would straighten it. However, if I were using window castings that sat proud of the wall and covered the edges this might not have been necessary. My windows are recessed in the gaps so straight edges were critical.

Some doors were actually cut out with the nibbler and then styrene was glued directly behind them. That is because I wanted to door to be slightly recessed so I had to make a gap for it, but at this time I didn't want to leave that much plastic missing which could compromise the integrity of the wall. As long as my finished recessed door is less than 0.060" thick it is fine.

The walls went together fine over the course of about 2 days with only one issue. One of my drawings was 3/16" shorter than the opposite side wall, and that resulted in a warped structure. It was easy to correct by sawing through the wall and then gluing another wall piece of the correct length over it. I chose to do it at the short wall section because doing it there wouldn't affect any window or door spacing. I used my Dremel to go right through all of the corning bracing and then shifted it out. The inside is now looking pretty ugly at that corner, what with all of the bracing. However, it won't be visible from the outside. It will serve as a valuable lesson though!

After getting this far, I decided to call it quits. I still need to figure out the divided roof areas for the larger "room" on the right in the picture above, and I don't want to rush it and make a mistake. Also, the small building on the roof and the chimney will also require some thinking to make sure they come out right. Overall, though, I am quite pleased with where it is right now.

Thursday, October 1, 2015

Structure - Albany Tomato Company (part 1)

Where to begin? Humm... 

The Albany Tomato Company (ATC) has been on my mind for several years now. In fact, I have already starting building a model of it (the first model for my future layout) even though in all likelihood the LDE that it will be part of won't be built for many years. However, I will get to my motives later.

The ATC is located at 10 DeWitt (sometimes spelled "De Witt") Street, Albany, NY. It is located north of the Central Warehouse and is around mile post 0.5, which is just at the beginning portion of my layout.

Meeting Len Kilian
Living in the Capital District of NY, our library system is full of regional railroad books and one of them is Trackside in the Albany, N.Y. Gateway 1949-1974 with Gerrit Bruins, authored by Len Kilian and Jim Odell. I had borrowed the book from the library on several occasions and thought very highly of it. Despite the fact that it leaned heavily on the NYC/PC era (railroads that while interesting I cared little about) there were also good sections on the D&H and Rutland. It was fascinating to see the pictures from the fifties and sixties because many of the landmark structures were gone, while others existed in various stages of decay. But, one in particular stood out...


On page 86 was a picture of the Albany Tomato Company as it existed in 1963. Though nearly all of the other pictures in the book were of older brick or stone buildings or rundown warehouses or stations, here was a gorgeous red building with a colorful mural on one wall. The caption said it best: "Most model railroaders are forced to accept selectively compressed versions of industries on their railroads... this June 1963 photo offers a prototype for all of those industries." I was smitten. I did some research on the building and found out that it still exists and, unbeknownst to me, I had parked in front of it many times without realizing what it was. Its current appearance doesn't look at all like it did then so perhaps my ignorance is excused.   

I didn't think too much about it until I went to a train show where Len Kilian had a table of books for sale. I didn't know him or recognize him as the author and thought he was just a regular vendor. I must have been looking at something he had for sale when he asked me if I had seen his Trackside book. Affirming that I had, he motioned me to a small box of pictures for sale that had been made from prints of the book. Without looking, I quickly replied that I was interested in only one picture... the Tomato Company picture. "Ahh, the Tomato Company," Len beamed, and at that moment our friendship began. He didn't have that print for sale at that time but said that he liked it very much himself. After discussing it with him for a bit, I likely purchased something else and moved on. He was, and still is, an active book seller and is always very busy at the shows and I didn't want monopolize all of his time. 

Since our first meeting I am glad to say I have come to call Len a friend. He is a wealth of knowledge about the local rail scene, is always on the lookout for various books I might be interested in, and over time has allowed me to purchase some pieces of his collection at (I am sure) a great discount in part because of his belief that I will be a good steward of the items. Len is quite aware of my ambitious endeavors in modeling this building. In one of our follow-up meetings, he presented me with a very nice print of the picture that had been made from the slide, which is currently framed at home. I am elated to say that recently he sold me the slide of the ATC that was used in the book!

Looking south-west in 1984.
From what I have been able to research online, the ATC would purchase produce from across the country and have it shipped in by freight cars. Then, it would be sold wholesale to various local companies such as grocery stores and restaurants. An obituary from The Troy Record newspaper (4/02/1966, page 14) contained a notice for Gaetano Scafidi, President of the Albany Tomato Company, and it said that the ATC also had a presence in the Menands Regional Market (an area I
am not sure about modeling). I have advertisements from 1951 and 1969 which evidence that they were still in business then, but I don’t know when they stopped receiving rail cars or when they finally went out of business. From my pictures from 1984 the rail siding had been removed and the ATC slogan was painted over, leading me to believe it was not a vegetable wholesaler anymore.

Currently, it is used as a facility for medical treatment as part of the Whitney M. Young Health Center system. And, if one were to compare it to the photo above they would see that the bricks are gone, presumably covered by a concrete or stucco facade. The large truck doors have been replaced with smaller ones, and some new windows on the left portion were added. The ground also doesn't appear very much sloped here, likely a result of adding more earth before installing that concrete sidewalk.   

Modeling Notes
It is an interesting building from an architectural standpoint because it is built on a sloping foundation. Not only that, but the main portion of the building has three different roof elevations and at least two of them are divided not by a straight line but by a “z” shaped line. So, modeling it will be a challenge. I have one shot from 6/1963, several blurry shots showing the north and west walls from 1984 taken from the tracks, and many photos as it currently stands today. The building's exterior in 1963 was brick but now it is sheathed or covered in concrete, though many original window locations haven’t changed and allow for registering what it looked like in 1984. The south wall abuts an adjacent building which I likely won’t build for lack of space. The garage which extends off of the north-east wall may or may not be built.

By 1984, a wooden wall had been erected.
Since the wall with the tomato slogan is the "western" wall, away from the layout viewer under normal layout viewing conditions, I plan to model that wall as it appeared in 1963 and the remaining three walls as they appeared in 1984. Admittedly this isn’t a normal thing, but it isn’t that much different from when modelers painted boxcars with different roadnames on each side to get double duty out of them. If I modeled it as it appeared in 1984, it would make for a boring building. At least by 1986 someone had put up a fence.

The garage in 2015. Note the building on the left, which isn't
being modeled but also would make for an interesting structure
After taking many pictures of the building and also saving online satellite photos, I was able to draw up plans for the structure. I take great pleasure in sitting at a table and making diagrams and sketches, always in ink. I do this for buildings I may never even build. The planning stage is just as engaging as the actual construction. For my plans of the ATC I decided not to compress it in size. The attached garage was also drawn to scale but it is just too large for my layout and likely will be omitted or severely shortened with a black "wall" where it meets the fascia. Having no good pictures of the garage from 1984, I had to guess what it looked like but it probably hasn't changed much since 1984.

For added modeling interest, I plan to build a shadow box scene on the west side and will leave the boxcar loading door open so that I could detail the interior of the warehouse. This will be entirely freelanced as I have no pictures of what the interior actually looked like. 

I have several goals for this building. First, I want to make an accurate representation of the building as it appeared in the book and for that I will need to hire someone to custom make decals or the like from the original slide or a sharp scan. Second, I am planning on trying for my Master Model Railroader certificate in structures (http://www.nmra.org/structures) and this will be my first building towards that goal. I am pulling out all of the stops with this one, scratchbuilding everything possible, and hoping to earn a good score. That is part of the reason I am allowing the option to build a partial shadowbox interior. Third, I want to do a great job and make Len Kilian proud.