CP Executive train in Albany

CP Executive train in Albany

Tuesday, October 20, 2015

Structure - Albany Tomato Company (part 3)

This building has been slowly progressing and along the way I am learning quite a few lessons. The first of which is one should never take on such an ambitious project unless he is willing to swallow his pride and make some mistakes. So far, I have been pretty lucky in the regard but as I was working on one of the walls I noticed a slight rock in the building. That could only mean one of two things: either my work bench is warped or my building is. Tragically, it was the building.

The same wall I tried to cut and repair before was again at fault, and I have no idea how I messed it up again. So, I cut apart the fix I did before, again reset it on a flat surface while using blue tape to prevent it from shifting, and then applied styrene patches. It is now flat.

I have also finished the roof areas and the complex inner walls. The roof supports are strips of 1/4" square styrene and I have come to learn that they are not always perfectly flat. During the extrusion process, sometimes a gentle bend is formed and these have to be accounted for when using it. Not all pieces have them, but those that do require extra clamping. I didn't notice the bend in one of my pieces and have had to correct this with extra bracing.

Setting the height of the roof braces has proved difficult too. Ideally, it would be measured from the bottom up but some of the bottom edges are not perfectly flat (which will be corrected during the sheathing of the brick sheets) and some of the top edges are likewise not perfectly flat. I can correct this with thin 0.060" thick strips but until I do I cannot use the top lines as reference points. Since there are three distinct areas for the roofs, and only one is a perfect rectangle, there are so many reference lines that it is nearly impossible to guarantee the roof will be perfectly flat on first go. Interior bracing has complicated matters.

So, I glued the 1/4" square strips along the proposed roof lines and left blanks where windows might interfere. Before the roofs are installed, I will purchase some 0.005" styrene strips and use them and a miniature bubble level to shim the roof up or down. Who 
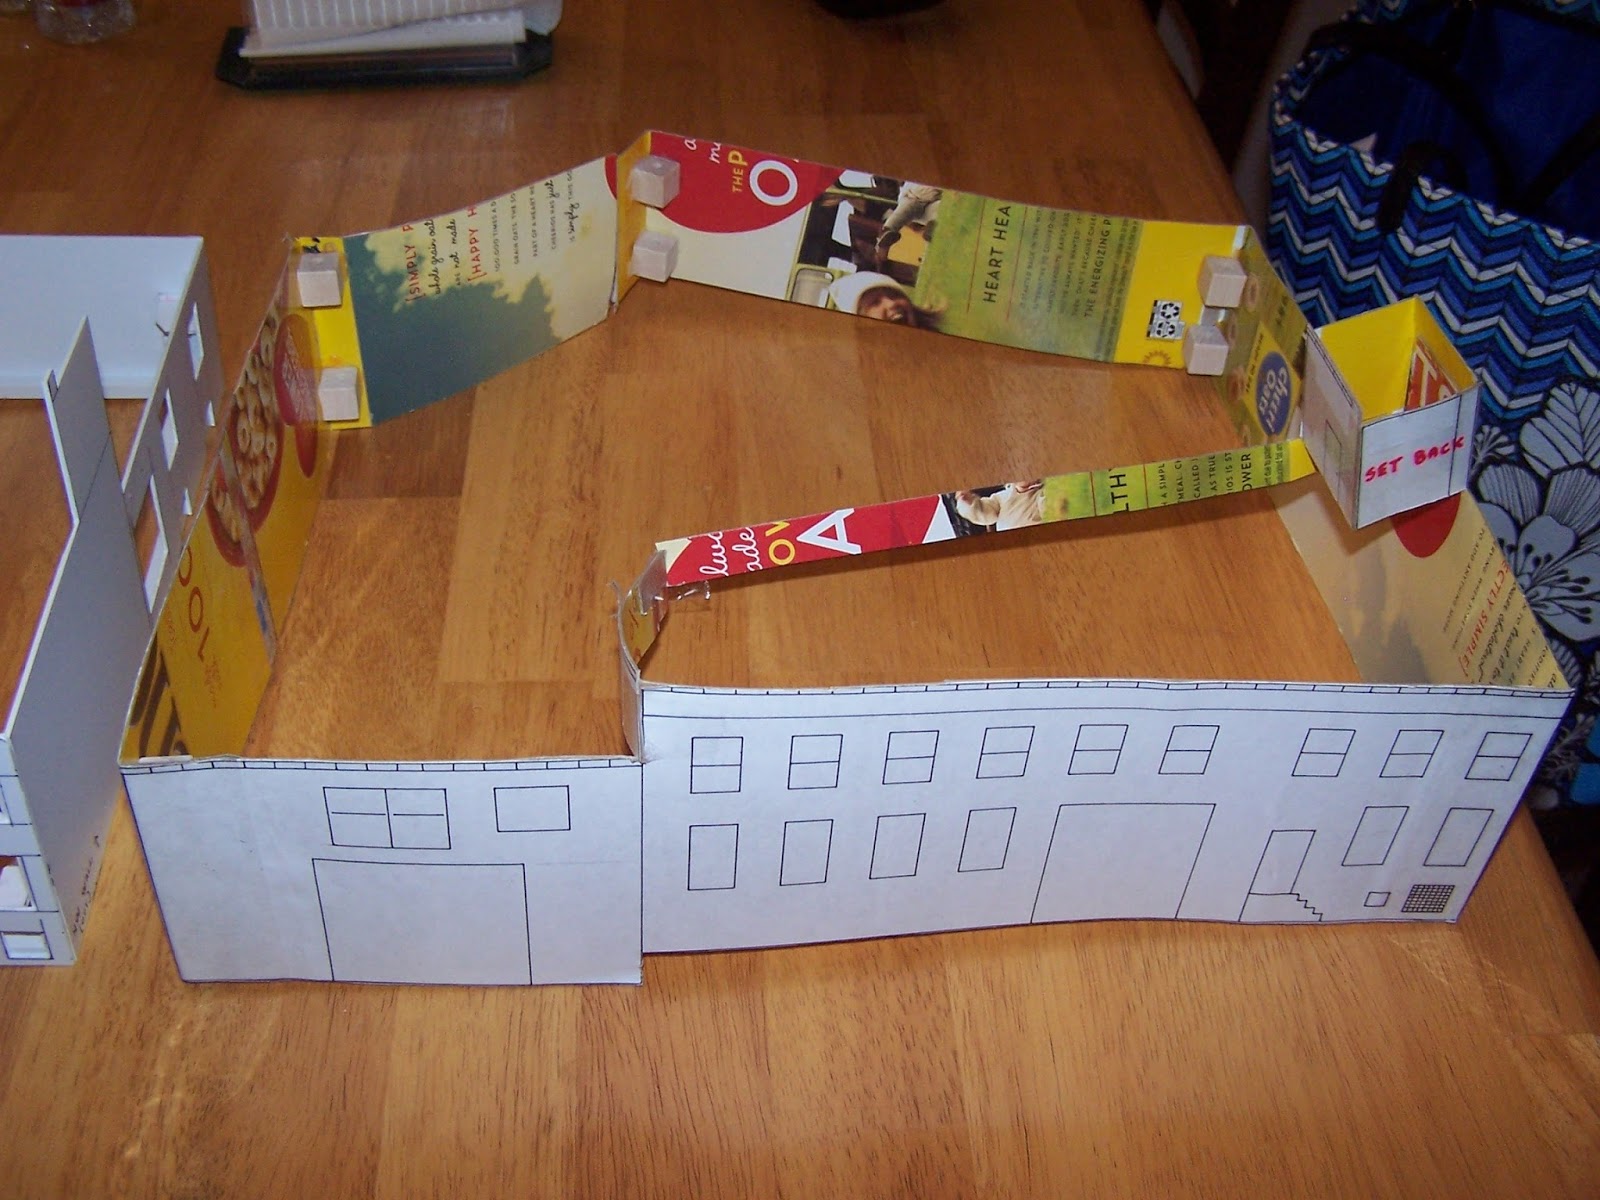
knows, perhaps real roofs are pitched at an angle too?

Another issue is that the roofline and details have changed over the past 50 years. The picture in the book from 1963 shows interior sheds and windows and doors that don't exist today. And, unless I get on the actual roof to take measurements (which likely isn't possible) all I have are satellite photos to rely in. They are better than nothing, but not perfect. 

Still, the pictures show where I am now. I am nearly at the point where order of operations will matter. Do I build the windows and doors next and set them flush in the window and door frames? Do I cover the outsides of the building with the brick sheets? Do I permanently glue down the roofs now, which will add rigidity to the building but make it difficult to install the windows later? On the roofs, do I install the brick sheets on the inside lip of the roofs now or wait until the roof itself is glued in? And that doesn't take into account the detailed interior. 

And, I still need to figure out how I am going to do the artwork on the side of the building. Decals? Paper sanded thin and glued? Since that side of the building isn't being weathered, any problems will show. Plus, I need to fix the artwork to remove the power lines and create the portion on the bottom that is cut off.

With these tough choices ahead, I am going to think it over for a while. In the meantime, I will experiment using various glues to mount the brick sheet on plastic styrene. To do this, I will build a small styrene box and practice my cutting and bonding methods so that the corner joints look decent. 

I already have about 15 hours into the project, with 2-3 spent on photographing and online photo research, 3 hours spent making the drawings, and about 9 hours building what I have already. I mostly work in spurts of about 60-90 minutes at a time, then go and do something else to clear my head. Sometimes, I just stare at it and wonder "what is the next step?" and wait for the answer to come to me.

And yet I still have so much to do!

Wednesday, October 7, 2015

Structure - Albany Tomato Company (part 2)

As has been mentioned previously, one of the goals of constructing this model was to earn points in the Structure category of the Master Model Railroader's certification program. After having talked with several local MMRs including Robert Hamm and Kevin Surman, I was encouraged to attempt this undertaking. Both pointed out that more points would be awarded for scratchbuilding details such as windows and doors (instead of using castings), and so I will attempt to do everything by myself for this model (paint and decals excepted). 

This will not be an easy model to build, yet I don't think in and of itself it is a very complex structure. Certainly, as this will be my very first scratchbuilt structure I have an uphill climb but I am not intimidated by it.

I plan to do as much as possible using styrene, a plastic which I am quite familiar with and really enjoy using. It is dimensionally stable and doesn’t warp or twist from humidity, it takes paint really well, cutting (using the “score and snap” method) is very effective up to about thicknesses of 0.080,” and my local hobby store carries the full line of Plastruct and Evergreen shapes.

More importantly, though, is that it fits in with the time period I am modeling. If I were modeling the steam era or even the transition era, wooden structures would be much more common. In that case, I would likely need to build them in stripwood just to preserve the wood grain and allow for better weathering techniques. I have longed to build one of those master craftsman kits which contains hundreds of pieces of wood and countless castings, and which usually result in a worn-down wooden factory or station. However, those types of structures just don’t fit with my 1984 layout. Instead, corrugated iron or steel, concrete, and brick are what I will be using and all are nicely represented by styrene.

Initial Drawings
The first step of any project should be to make some drawings or at least sketches of what you hope to build. This not only will serve as a guide when cutting the wood or plastic but it also tempers expectations at the early stage. For example, after drawing plans for the main portion of the ATC I was surprised just how much room it would take up on my layout. And that didn’t include the attached garage or adjoining building. Instead of taping multiple 8.5x11" sheets together, I went to Office Max and purchased an oversize book of graph paper.

I love making drawings and find it very relaxing and enjoyable, but will gladly take any printed drawings from books or magazines if available. Then, consistent with good advice I have seen online I copied my drawings and glued them to cereal box cardboard. These were then trimmed and taped together to give me a three-dimensional view of the building. Since mine had complex roof lines I left them pretty much open for now. I used wooden blocks to reinforce the corners but they didn't work all that well. 

Then, I waited. And waited. And waited some more until my yearly vacation came around. I didn’t want to start this project and have to stop and put it away every night because of other things, so I just thought about it and collected supplies (like styrene and brick sheet) until the magical week arrived.

For this structure, I plan to use a core of 0.060” styrene sheets. I would have preferred 0.080” but my hobby shop had a lot of trouble ordering it. The down side with going thicker is that when you scribe and snap it the edges don’t always come out square. Also, window openings are more difficult to cut in larger styrene. The walls will be braced in the corners and edges with 1/4" square styrene rods. Additionally, I made some custom 90-degree corner braces from styrene.

Finally, the outside will be sheathed in plastic brick sheets. I looked long and hard online and the various options out there (including some marketed for N scalers) and for right now settled on some by Plastruct. This will be discussed more in the future, but suffice to say that because the sheets are so thin all of the rigidity of the building must come from the styrene core.

Cutting the Walls
One of my favorite tools is my large plastic cutting board which was sold for using in the kitchen for carving turkeys. I don’t have one of those healing cutting mats, but instead have multiple plastic cutting boards in various sizes including a really helpful one about the size of a business envelope. I also have a piece of glass that I sometimes use for complex gluing jobs because styrene won’t bond to the glass. One side also has a "juice" channel around the edges which catches round things like springs and knives from rolling off. (Note: they can warp in the dishwasher from the heat so don't use an old kitchen one if you need it to be perfectly flat.)

I cut the walls to size per the plans, and constantly double checked my work. It is important to make sure the walls end up square and true but even more so when you are scratchbuilding a model and don’t have pre-molded guides. And, since this was to be a model for competition and wonky walls would surely result in a bad score. Inside joints were braced (perhaps too much?) with the square styrene and my corner braces. Since the roofs would be supported along the top and I wasn't sure yet how I was going to do it, all braces were left off the top 1/2" of the model for now. I also made sure not to put any braces in locations where they would be seen from the windows or open doors.

I use Plastruct Weldene exclusively for all styrene joints. It is labeled as non-toxic and I don’t get headaches like when I use MEK, though proper ventilation for everything is a must. I flow the Weldene into the joints on the inside and let capillary action suck it into the gaps. Joints set quickly and fully harden overnight. Usually, I glue up a joint and then let it sit 30 minutes before doing another. If you get it on painted surfaces it doesn’t damage them or cause them to bubble… it will cause the paint to go from shiny to dull, but a coat of Dullcote over it at the end hides all mistakes. I love the stuff, though my shop doesn’t carry it anymore and I have to buy it online. The only downside is that it won't work on ABS plastic, only styrene plastic. 

For the few windows and doors that I have I decided to depart my my usual course and purchase a "Nibbler." In the past, I either did the "scribe an outline, then scribe an X" to break through the plastic or else cut the building into slices, removed the window areas, and then glued it all back together. Here, I purchased the Nibbling Cutter from Micro-Mark (http://www.micromark.com/nibbling-cutter,7761.html) after reading some good reviews online. It is only recommended for plastic up to 1/16" thick (0.0625") and it did a good job on my 0.060" walls. Had I gone with the thicker 0.080" walls, I don't know if it would have handled it. True, the Nibbler is a slow tool to use but it is accurate and sort of fun.


To use it, I had to drill a 3/16" diameter hole inside the window or door area and then begin nibbling out. What I did was to nibble to one of the edges, then turn the tool 90" and nibble along that edge. At a corner, I turned the tool and went on again. I left barely a sliver of plastic at the edges so that a file would straighten it. However, if I were using window castings that sat proud of the wall and covered the edges this might not have been necessary. My windows are recessed in the gaps so straight edges were critical.

Some doors were actually cut out with the nibbler and then styrene was glued directly behind them. That is because I wanted to door to be slightly recessed so I had to make a gap for it, but at this time I didn't want to leave that much plastic missing which could compromise the integrity of the wall. As long as my finished recessed door is less than 0.060" thick it is fine.

The walls went together fine over the course of about 2 days with only one issue. One of my drawings was 3/16" shorter than the opposite side wall, and that resulted in a warped structure. It was easy to correct by sawing through the wall and then gluing another wall piece of the correct length over it. I chose to do it at the short wall section because doing it there wouldn't affect any window or door spacing. I used my Dremel to go right through all of the corning bracing and then shifted it out. The inside is now looking pretty ugly at that corner, what with all of the bracing. However, it won't be visible from the outside. It will serve as a valuable lesson though!

After getting this far, I decided to call it quits. I still need to figure out the divided roof areas for the larger "room" on the right in the picture above, and I don't want to rush it and make a mistake. Also, the small building on the roof and the chimney will also require some thinking to make sure they come out right. Overall, though, I am quite pleased with where it is right now.

Thursday, October 1, 2015

Structure - Albany Tomato Company (part 1)

Where to begin? Humm... 

The Albany Tomato Company (ATC) has been on my mind for several years now. In fact, I have already starting building a model of it (the first model for my future layout) even though in all likelihood the LDE that it will be part of won't be built for many years. However, I will get to my motives later.

The ATC is located at 10 DeWitt (sometimes spelled "De Witt") Street, Albany, NY. It is located north of the Central Warehouse and is around mile post 0.5, which is just at the beginning portion of my layout.

Meeting Len Kilian
Living in the Capital District of NY, our library system is full of regional railroad books and one of them is Trackside in the Albany, N.Y. Gateway 1949-1974 with Gerrit Bruins, authored by Len Kilian and Jim Odell. I had borrowed the book from the library on several occasions and thought very highly of it. Despite the fact that it leaned heavily on the NYC/PC era (railroads that while interesting I cared little about) there were also good sections on the D&H and Rutland. It was fascinating to see the pictures from the fifties and sixties because many of the landmark structures were gone, while others existed in various stages of decay. But, one in particular stood out...


On page 86 was a picture of the Albany Tomato Company as it existed in 1963. Though nearly all of the other pictures in the book were of older brick or stone buildings or rundown warehouses or stations, here was a gorgeous red building with a colorful mural on one wall. The caption said it best: "Most model railroaders are forced to accept selectively compressed versions of industries on their railroads... this June 1963 photo offers a prototype for all of those industries." I was smitten. I did some research on the building and found out that it still exists and, unbeknownst to me, I had parked in front of it many times without realizing what it was. Its current appearance doesn't look at all like it did then so perhaps my ignorance is excused.   

I didn't think too much about it until I went to a train show where Len Kilian had a table of books for sale. I didn't know him or recognize him as the author and thought he was just a regular vendor. I must have been looking at something he had for sale when he asked me if I had seen his Trackside book. Affirming that I had, he motioned me to a small box of pictures for sale that had been made from prints of the book. Without looking, I quickly replied that I was interested in only one picture... the Tomato Company picture. "Ahh, the Tomato Company," Len beamed, and at that moment our friendship began. He didn't have that print for sale at that time but said that he liked it very much himself. After discussing it with him for a bit, I likely purchased something else and moved on. He was, and still is, an active book seller and is always very busy at the shows and I didn't want monopolize all of his time. 

Since our first meeting I am glad to say I have come to call Len a friend. He is a wealth of knowledge about the local rail scene, is always on the lookout for various books I might be interested in, and over time has allowed me to purchase some pieces of his collection at (I am sure) a great discount in part because of his belief that I will be a good steward of the items. Len is quite aware of my ambitious endeavors in modeling this building. In one of our follow-up meetings, he presented me with a very nice print of the picture that had been made from the slide, which is currently framed at home. I am elated to say that recently he sold me the slide of the ATC that was used in the book!

Looking south-west in 1984.
From what I have been able to research online, the ATC would purchase produce from across the country and have it shipped in by freight cars. Then, it would be sold wholesale to various local companies such as grocery stores and restaurants. An obituary from The Troy Record newspaper (4/02/1966, page 14) contained a notice for Gaetano Scafidi, President of the Albany Tomato Company, and it said that the ATC also had a presence in the Menands Regional Market (an area I
am not sure about modeling). I have advertisements from 1951 and 1969 which evidence that they were still in business then, but I don’t know when they stopped receiving rail cars or when they finally went out of business. From my pictures from 1984 the rail siding had been removed and the ATC slogan was painted over, leading me to believe it was not a vegetable wholesaler anymore.

Currently, it is used as a facility for medical treatment as part of the Whitney M. Young Health Center system. And, if one were to compare it to the photo above they would see that the bricks are gone, presumably covered by a concrete or stucco facade. The large truck doors have been replaced with smaller ones, and some new windows on the left portion were added. The ground also doesn't appear very much sloped here, likely a result of adding more earth before installing that concrete sidewalk.   

Modeling Notes
It is an interesting building from an architectural standpoint because it is built on a sloping foundation. Not only that, but the main portion of the building has three different roof elevations and at least two of them are divided not by a straight line but by a “z” shaped line. So, modeling it will be a challenge. I have one shot from 6/1963, several blurry shots showing the north and west walls from 1984 taken from the tracks, and many photos as it currently stands today. The building's exterior in 1963 was brick but now it is sheathed or covered in concrete, though many original window locations haven’t changed and allow for registering what it looked like in 1984. The south wall abuts an adjacent building which I likely won’t build for lack of space. The garage which extends off of the north-east wall may or may not be built.

By 1984, a wooden wall had been erected.
Since the wall with the tomato slogan is the "western" wall, away from the layout viewer under normal layout viewing conditions, I plan to model that wall as it appeared in 1963 and the remaining three walls as they appeared in 1984. Admittedly this isn’t a normal thing, but it isn’t that much different from when modelers painted boxcars with different roadnames on each side to get double duty out of them. If I modeled it as it appeared in 1984, it would make for a boring building. At least by 1986 someone had put up a fence.

The garage in 2015. Note the building on the left, which isn't
being modeled but also would make for an interesting structure
After taking many pictures of the building and also saving online satellite photos, I was able to draw up plans for the structure. I take great pleasure in sitting at a table and making diagrams and sketches, always in ink. I do this for buildings I may never even build. The planning stage is just as engaging as the actual construction. For my plans of the ATC I decided not to compress it in size. The attached garage was also drawn to scale but it is just too large for my layout and likely will be omitted or severely shortened with a black "wall" where it meets the fascia. Having no good pictures of the garage from 1984, I had to guess what it looked like but it probably hasn't changed much since 1984.

For added modeling interest, I plan to build a shadow box scene on the west side and will leave the boxcar loading door open so that I could detail the interior of the warehouse. This will be entirely freelanced as I have no pictures of what the interior actually looked like. 

I have several goals for this building. First, I want to make an accurate representation of the building as it appeared in the book and for that I will need to hire someone to custom make decals or the like from the original slide or a sharp scan. Second, I am planning on trying for my Master Model Railroader certificate in structures (http://www.nmra.org/structures) and this will be my first building towards that goal. I am pulling out all of the stops with this one, scratchbuilding everything possible, and hoping to earn a good score. That is part of the reason I am allowing the option to build a partial shadowbox interior. Third, I want to do a great job and make Len Kilian proud.

Tuesday, September 29, 2015

Area Overview: MOHAWK PAPER & COHOES (MP 8.1 - 9.1)

MP 8.1 through 9.1

This is the last area that I anticipate modeling on my layout, and again it really could be divided into two sections. The first would be Mohawk Paper, and the second would be the City of Cohoes. Here is one of the only areas of modeling interest where the surrounding buildings are more residences and small related businesses and less of the factories and industries so prominent on the southern areas of the layout.

Mohawk Paper
From what research I have done online, the company was founded in 1881 as the Gilbert Paper Company. However, it went bankrupt in 1930 and was put in receivership. Its name was later changed to Mohawk Papermakers Inc., and a series of purchases in the late sixties and early seventies has culminated in what it is today, Mohawk Fine Papers Inc.  The main plant is located on Route 32 in Cohoes, but a satellite branch facility is located further north in Waterford. As the later doesn’t receive rail traffic (and may never have), I have no plans to model this second facility.

To reach the paper company, the D&H had a passing siding located just north of the plant off of which a spur branched off and dropped down an incline while crossing directly through a road intersection. How cool is that? During earlier periods there was actually another spur which ran north into the plan from the opposite direction but that doesn’t remain anymore except for a short stretch of track actually adjacent to the building itself. For my modeling purposes, the one siding and passing siding where it meets the mainline is sufficient. I definitely won’t model the whole factory, and much of it will end in at the front edge of the benchwork. It is too bad that the cars run into the building on the western side, as that will be mostly hidden from the operators at normal viewing angles.
  
Unfortunately from a modeling perspective, across the street are lots of houses (some of which are currently for sale and at reduced prices reflecting the train traffic that goes on in their backyards!) and I am not interested in scratchbuilding house after house. So, I likely will settle on a couple of kits and kitbash them over and over to make a dozen or so “different” homes.

City of Cohoes
Here is where my pictures from 1984 and 1986 came in handy. I had no idea, for example, that the area was still being developed at that time. I have shots showing empty areas which currently are home to fast food restaurants and small businesses.

There wasn’t much left in Cohoes on the D&H in 1984. The freight station on the east side of the tracks was abandoned by then, as was the F. B. Peck Coal trestle just south of that. North of the freight station, the Star Woolen Mill still had a spur in place but the switch had been removed sometime in the seventies. Interesting enough, there was a spur heading south off the eastern main line just before the bridge and I haven’t yet figured out what it went to. It might have been part of the tracks that went into the freight station but in 1984 it currently appeared to end at a building north of the freight station. 
The passenger station (shown on right) on the west side of the tracks was boarded up in 1984 but I have a good shot of it and some floor plans that I can use to build a model of it. Currently, it is used as an OTB site. Yuck!

Behind and surrounding the station, Cohoes has some interesting architecture including what is now the Cohoes City Library. It looks like a medieval castle and it is really fascinating to me. I haven't done much research on it yet but I am interested to see what inspired it originally. I am betting at one time it was a church. Considering the amount of work that will be required to scratchbuild it, I am sure that it will prove to be a love/hate sort of project! The stonework and the windows and... well... everything is just so different. It is located directly south of the passenger station on the main line and leaving it off the layout just won't cut it (at least to anyone who knows the area).

Mohawk River Bridge
The mainline between Colonie and Cohoes was still double tracked (though one main line was practically buried in weeds in the summer) in 1984 and it was at Cohoes that the tracks combined into a single main line over the bridge over the Mohawk River. I plan to model the bridge, though likely shortened, as well as the river. Modeling bridges is something I haven’t done before and will likely prove to be a tough challenge. The adjacent highway bridge just east of the railroad bridge, with its many stone arches, is also high on my modeling list. Originally double tracked, one span of the bridge was removed in the sixties and the eastern-most portion was (and is) all that remains today. 

Wednesday, September 16, 2015

Area Overview: KEIS & NORLITE (MP 7.0 – 7.5)

MP 7.0 through 7.5

Moving further north, one comes to a pair of industries that are about as different as you can get. Located on the west side of the tracks, which in case you haven’t been paying attention are one of only a few such industries to be modeled on my layout, this area will allow me to incorporate a bit of varied scenery and structures. I get the chance to see them both everyday on my commute home from work off while riding on Route 7.

Keis Distributors
I don’t quite know when the original building was constructed, but seems to be from a later period of time then many of the brick and stone block warehouses that were in downtown Albany. This distributor was, according to Dominic Bourgeois’ research, a long-time customer of the D&H going back into the 1950s.  As such, I was pretty excited to incorporate this pair of sidings on my layout because it meant that I could actually model newer, better maintained track. I believe the pair or tracks were installed in the late 1970s, and while doing some research at the house of Tony Steele (a former D&H employee), his friend Greg Whittle who was also there overheard us talking and said “I designed that track and they never used it.” When I asked what he meant, he explained that Keis had been interested in getting better rates from the trucking companies that delivered beer to their facility and the presence of a railroad siding, and thus competition to the trucks, resulted in the trucks offering better rates.

So, did Keis ever receive rail deliveries on the new sidings? Were there other rail sidings before the new ones that allowed the D&H to service them somehow? If they did receive rail shipments in the 1980s, were they in refrigerated boxcars or regular ones? As of yet I don’t know the answer to any of these questions. What I do know is that the D&H sometimes used the sidings to store MOW equipment, and I may do so as well. Or, I may take some modelers’ license and switch the industry as if it did receive cars.

Both sidings still remain though the switch off the main line has been pulled. Perhaps the D&H thought that service might return so they left the barely-used tracks in place?

Norlite Lightweight Aggregates
I drive by this place every day on the way home from work and for years I just assumed that it was a gravel quarry. I mean honestly, if you look online and satellite maps it looks like a rock quarry. Big dump trucks come in and go out every day with what looks like loads of stone. So, it was a reasonable assumption to make that it was a gravel operation.

But is isn’t! From their website: “Norlite is a manufactured lightweight, porous ceramic material produced by expanding and vitrifying select shale in a rotary kiln. The process produces a consistent and predictable high quality ceramic aggregate that is structurally strong, physically stable, durable, environmentally inert, light in weight and highly insulative. It is a non-toxic, absorptive aggregate that is dimensionally stable and will not degrade over time.
Norlite offers designers solutions to the challenges of reducing dead loads, lowering thermal conductivity of building products, improving fire ratings, enhancing soils, and treating wastewater, just to name a few.”

I can’t explain it any better than that.

Per a 2013 article in the Troy Record newspaper, Norlite also has another distinction: “The business, which employs about 62 from around the greater Capital District, is the only entity of its kind in the state that has a commercially permitted waste incinerator which other businesses can use to dispose of their liquid waste.”… “Other businesses, ranging from Gillette to IBM, bring their waste to the site. And it is then transformed into fuel, specifically for the 25-foot flames in Norlite’s 180 foot long kilns.”

From a modeling standpoint, this is a huge facility filled with towers and pipes and the like. I doubt I will attempt to model it all, and thankfully I don’t have to. 

The actual railroad spur coming off the mainline is relatively short and curvy and almost perfect for modeling. Per the D&H Yahoo group I was told that the siding was longer but it had been reduced over time as the facility expanded and needed the real estate. Currently, it looks like it could probably hold 2-3 open top hoppers and, unless my research turns up something different, I will model it like that. I don't think they received liquid waste via tank cars so unfortunately this will not result in an additional destination for them.

In late 2011, the switch was removed by CP.

There are other interesting scenes that can be modeled too. Right across the tracks from Norlite and separated by a row of trees is an apartment complex. Between Norlite and Keis is a huge, probably man-made water retention pond. I like ponds, but this one wont have any boats, docks, and swimmers. And, just south of Keis, between it and Route 7, there is even a preserved Erie Canal lock which now looks a bit out of place.

Monday, September 14, 2015

Area Overview: COLONY LIQUOR (MP 3.8 - 4.0)

MP 3.8 through 4.0

Moving North a bit and skipping some areas of Menands (which I may come back to later), the next area that I want to model I nicknamed “Colony Liquor” even though there are three interesting industries in the area. This is going to be the first section I actually build and I have already drawn up full size HO scale plans of the area including most of the buildings. 

Though the track schematic I drew up is from MP 2.8 - 3.8, the area I am focusing on is MP 3.8 – 4.8. Thus, the left portion of the diagram likely won’t ever be built. Still, I am planning on devoting a full seven feet of my layout to this section because there are lots of interesting buildings to go here. I may even increase it to eight feet just to give it all some room. (Note: I later learned "Colony" should be spelled with a "y" at the end.

In 1984, the dual main line had been reduced to a single track with the western one pulled up and a gravel maintenance road left. Just after the Route 378 overpass, several industries cropped up on the eastern section of the line. A single siding broke off the main line and from it two additional spurs curved away into the first two sidings. The parallel track eventually ended at the last industry.

In order from the switch off the mainline and working south (left), they were:

Southworth Tractor and Machinery Co.
Here is an industry that was still receiving boxcars in 1984, though the condition of the track suggested that it wasn’t a high-volume customer. The track (which still exists today in the undergrowth) came off a switch just after the one from the main line and broke sharply into a curve that ended at a concrete loading dock. This is a really neat feature and one that usually seems unrealistic when I see them on layouts. I have no idea what was shipping in or out at the time but until proven otherwise in addition to boxcars I will send in an occasional flat car of tractor loads. On the schematic it is marked as #8, with the loading dock just to the left.

Agway
This business may or may not have received rail shipments in 1984 but the track was so old and rusty that I wouldn’t be surprised if it didn’t. Even if it did, I am not quite sure what it would have received. From my research it looks like a track ran parallel to the three buildings. Agway consisted of three buildings, including a Quonset hut in the middle! All the buildings still exist, but for space concerns may only model portions of the buildings and have the sides that face away from the track end at the end of the layout. I definitely want to model at least a portion of the Quonset hut.

Colony Liquor
This appears to be two huge buildings with one that featured a loading dock set at a 45-degree angle to the rest of the building. The track actually curved around it, and there was just enough room for a boxcar to fit. I plan to compress this down in size to fit but that loading area will be interesting. And, it will take some careful switching to properly spot a car without overshooting the area and crashing into the bumping post. I plan to model the first building which had the loading dock but not the one that is more south, as that will just take up space and not really contribute anything to operations.

But there’s more…

Just across the tracks is the St. Agnes Cemetery, though there is a wall of trees between it and the railroad. I imagine that the cemetery wanted to isolate itself from the trains and this was a pretty effective method of doing so. For modeling, I plan to plant a row of trees with occasional breaks in which scenes of a cemetery will be visible. 

The south end of the layout will feature the train disappearing behind Colony Liquor and perhaps running under another highway bridge. I generally hate modeling highways as the cars appear static but here it might not be so bad. 

Just north of Cemetery Avenue, the second abandoned trackbed becomes more mainline track. Apparently, Guilford had only pulled out to that area by 1984 and so the rest of it heading north is just completely overgrown. A pair of ties, crossed over and under the rails, marked the end of the line. I will try and include this detail too, though it may mean modeling a short section of double track which won’t visually match up with the next area. Sort of like an NTrak module that doesn’t fit with the others. We shall see.

My favorite spot to watch trains in Albany is Ganser Smith Park, marked as #1 on the schematic. This little park has a pavilion, baseball diamonds, plenty of parking, and lots of trees. In law school it was a quiet place to park and read my textbooks while seeing the occasional train. I love it there, and it is a shame that it won’t fit on my layout. Perhaps I will find another way to work it in.

Friday, September 11, 2015

Area Overview: NORTH ALBANY (MP 0.5 - 1.5)

MP 0.5 through 1.5

Though this is the first area that a northbound train would encounter on its way out of Kenwood Yard, it will likely be one of the last sections to be built. In fact, it likely will be divided into three different areas. The first is the Central Warehouse/Albany Tomato Co.; the second is the North Albany Yard; and the third is the team tracks and Surpass Chemical area. If I do model this area I will likely chop it up into separate sections as the latter two are the ones I care about most.

Based on the photos from 1984, I was able to accurately determine just what tracks existed at this time. See the diagram I drew up, in which north is to the right. Blue lines are the D&H main line, brown lines are tracks that existed but were badly rusted, red lines were where tracks were in the process of being torn up, and gray lines were areas where the tracks had been removed and only the roadbed remained. The buildings are drawn as they existed then, though I am still in the process of identifying them. Some still exist today, others have been sold to new owners, and some are gone with only vacant lots remaining.

My research started here one blistering hot day in 2010 on July 4th when the temperature was in the mid-90s. As my wife was out of town, I found myself with the day free to go exploring. At the time, I didn't think to bring along an actual map so instead I hand-drew everything I came across on blank pieces of paper. Later, matching that up with a street map allowed me to put it all together. Later, I located a Sanford Insurance map (from 1972) which also proved useful.

As can be seen, even this area of only a half-mile is much too large for one modeling area, which might be between 6-7 feet. If my math is correctly, to accurately represent it would require a space of about 30 real feet. Instead, I plan to chop it up into three sections which running from south (left) to right (north) are as follows: 

Central Warehouse / Albany Tomato Company (section #1)
Geographically, this is the area between Livingston Avenue to North Ferry Street. By 1984 there were no active sidings in this area. The large Central Warehouse (building 1 on the schematic) sat prominently in the area and still stands today. Here, the D&H ducked behind it and disappeared, perfect for a staging yard exit. Just south of it, the NYC/PC tracks ran perpendicular and over the D&H before crossing the Hudson River on the Livingston Avenue swing bridge. There were several warehouses too, including one painted in a rainbow of colors. The Central Warehouse building is a prominent feature (some would argue eyesore) of the Albany skyline and will firmly set my layout in the Albany area.

But, there is one building featured in this section that I have to model. The Albany Tomato Company (buildings 3 and 4 on the schematic) received produce from the west and then repackaged it for local distribution. Big deal, you say. I would have agreed with you until I saw a beautiful picture of it in Len Kilian’s book and was smitten. The slide which was used for the book, which I have since obtained from Mr. Kilian, was taken by Geritt Bruin in 1963 and features the building looking stunning.

North Albany Yard (section #2)
Here was where the yard under deconstruction (or as Guilford liked to refer to it as, "rationalization") scene will be prominent. As noted before, few modelers have ever devoted so much time to modeling a yard that was being removed. This will be a good place to lay the track with separate wooden ties, lots of weeds, pieces of rail lying around, and plenty of dirt and junk. Just thinking about it is a bit depressing! However, because of the various stages of decay present the yard will tell a story of brighter times and busier railroads. The real trick will be to compress it enough that it looks like a small yard but doesn't eat up too much real estate.

Team track and Surpass Chemical (section #3)
These two industries still exist today and receive cars, though the team track was rebuilt around 2013 into an oil distribution facility. When it was still a team track in the late 2000s, then known as Bulk Handlers, I drove around and took pictures. I don’t recall the gantry crane then and I don’t know if it still existed in 1984. The team track (building #27 on schematic) was built by New York in response to their removing the previous one at Madison Avenue as part of the I-787 construction. Team tracks allow for a variety of freight cars so that will be good for my layout. I love tank cars, so the Surpass chemical facility (building #20 on schematic) will also be a great choice for a layout.

I found the image below recently on Google maps, even though the area at the bottom was redeveloped in 2012 and turned into a petroleum tank car loading area.


Thursday, September 10, 2015

Synaposis of the Colonie Main Line

I love maps. In the course of my research I have found D&H and CP track charts, topographical maps, Sanford maps, valuation maps, and Google maps. However, none of them by themselves really show the area that I am interested in modeling. So, I asked a graphic designer friend of mine to produce a map of the area. Until that is finished, though, I will have to cobble something together.

The “Colonie Main” is the portion of the D&H that ran north from Kenwood Yard in Albany (milepost A=0) up to Mechanicville Yard in Mechanicville (milepost A=19). The first five miles featured a lot of industries as well as two more yards, including the prominent Colonie Yard. It has been at various times referred to as part of the “Third Subdivision” and the “Saratoga Division,” though the term “Colonie Main” is also an official designation of at least part of the route. I like the sound of the later, and it instantly identifies where I am building (at least to those people who know where Colonie is) so that is the name of my layout.

In his excellent book Bridge Line Freight 1960-1983, author Dominic Bourgeois’ research indicated that at least 65 customers existed sometime during that window. While many were long gone by 1984, enough remained to form the basis for an interesting layout.

As an aside, this is an excellent book and a wonderful resource for any D&H modeler for the time period listed. Admittedly, I am a bit biased as I played a very minor role in the review of the text covering the Colonie main. However, the well-researched text is very informative and the pictures are just fantastic. The second volume is very good too, though it doesn't cover the area that I am interested in.

Even if I were to somehow acquire a huge basement, modeling 5 miles of switching areas would not only take up a lot of space and money but also a huge amount of time. I plan to scratchbuild the structures to match their prototypes and I know that will not be a quick process. Plus, warehouse after warehouse is bound to get boring after awhile. Finally, I find urban scenery interesting but I may want to put some green grass down. So, I will cherry pick portions of the line that interest me.

As has been mentioned earlier, I plan to build it in sections that Tony Koester has come to refer to as “Layout Design Elements” (“LDE”), which is the “design technique of identifying a
"signature" scenic element of a prototype or prototype scene and building that element in order to
capture the feeling of the prototype." In broader terms, each section of my layout will be based on a portion of the Colonie Main. Some may be scaled from the prototype, and some may be compressed to fit more in a certain space. Certain portions may be modified or cut altogether, though as a whole each segment of my layout will replicate a specific geographical area. And, as my layout grows and more sections are built I can adjust the layout to include them.

So, what to model?

As I sit here right now, I have about eight areas that I am sure will be featured on my layout. They were selected based on a variety of criteria including personal interest to the subject matter, ease of research, diversity of freight cars which serviced them, and associated modeling challenges. Will all get built right away? Doubtful. Will some get dropped before it is all said and done? Possible. Also, I don’t plan to model Kenwood or Mechanicville yards themselves and instead they will be represented by staging yards (perhaps the same one in a wrap-around layout).

One last point. I plan to model the railroad from the east side looking west, so North will always be to the right. This is how I see it when driving on parallel road I-787. All references to the “right” will thus be North.

Here are my favorite portions, or “LDEs,” of the Colonie Main...

North Albany (MP 0.5 - 1.5)
Even though nothing still received cars in the southern area in 1984, I need to pick a “bookend” of sorts to represent the southern portion of the line. The large Central Warehouse sat prominently in the area and still stands today. Here, the D&H ducked behind it and disappeared, perfect for a staging yard exit. Just south of it, the NYC/PC tracks (blue) ran perpendicular to the D&H and crossed over the Hudson River on the Livingston Avenue swing bridge.

There is also still standing the former Albany Tomato Company building, which by 1984 was nothing more than another non-rail served building. There was a milling company and several warehouses too, including one painted in a rainbow of colors. Because this section didn’t receive rail traffic anymore I won’t build it first, but it firmly plants the layout in the Albany area.

As you progressed north, the D&H had their North Albany yard which was being demolished in 1984, as well as several industries that still received occasional rail traffic. I didn't bother to include a satellite photo of this areas as today it is all gone and redeveloped to the point where it is hard to believe that any railyard, even a small five-track one, existed.

The very northernmost portion had a small team track yard, and in the area were also a couple of steel fabricators and a chemical company. The industries will allow for tank cars and some gondolas as well as boxcars. The bigger draw, though, is the yard. I don’t plan to model it as an active yard. Instead, it will be a yard that is in the process of being torn up. Some tracks will be missing, others covered in weeds and rusted, and one or two may feature rail lying around. I don’t want to make it too big because yards take up space (and unusable yards even more space!) but this is something I have never seen on a layout before. The image above is of the northern-most portion with the chemical company (upper) and team track facility (lower).

Menands & North Menands (MP 1.5 - 3.8)
To be honest, I am not sure what I will model here if anything. Breaker Yard fed the Menands Public Market and there were several industries here including a wheel turning company but I haven’t really explored this area much. That is partly due to the fact that no rail sidings exist anymore, though until a couple of years ago a boxcar used for storage was located next to a building.

Colonie (MP 3.8 - 4.0)
I am really excited about this area. On the east side of the tracks were three industries that came off of one switch from the main line and went to a tractor dealer, an Agway, and a beverage distributor. At least two were active in 1984 and perhaps all three were. Freight cars will include boxcars, gondola, and flatcars (loaded with tractors). Plus, directly across the tracks is a large cemetery hidden by a row of trees. That should make for a fun background scene! All the buildings are still standing and I have extensively photographed the area. I plan to build this section first.

Colonie Yard (MP 4.0 through 5.5)
I doubt I will model this. It is too large for a switching layout and just too much track. However, the Colonie Shops were where the D&H's engine maintenance facilities were located. This fact will allow me to credibly run any D&H engine on the roster in 1984. Also, by the mid-1980s the D&H had consolidated the operation base for nearly all of their remaining Alco engines to this area as the crews in Colonie were most familiar with them, so building an engine roster heavy on Alco power is realistic.

Watervliet Wye (MP 6.3 - 7.0)
There was a large sandpaper company located in this area, as well as a scrap metal dealer. And, the Green Island Branch took off from the main on a wye which will be interesting to model. Thankfully, the wye will extend into the isle but likely not for very far as it won’t be an active wye. I will model just enough to capture the prototype but have no plans to represent the branch at all.The red tracks were torn up by 1984 and the blue track was the old Troy and Schenectady Railroad.

Norlite / Keis (MP 7.0 - 7.5)
Here is an exciting pair of industries. The first is the two track Keis beverage distributor that was installed in the 1980s and was unfortunately, per the civil engineer who designed the tracks, “never used.” However, the D&H did use it for MOW equipment storage and I may too. Just north of that is the Norlite Lightweight Aggregates where hopper cars were loaded with vitrified shale. How many switching layouts get to feature water ponds, a huge gravel pit, and heavy forests sandwiched by yards and heavy industries and across from apartment complexes?

Mohawk Paper & Cohoes (MP 8.0 - 9.0)
This was the location of the large Mohawk Paper Company, which may be compressed in size to fit on its own LDE. Boxcars and tank cars arrived here after traveling through a passing siding and then down a hill and over a road crossing. It will be a huge undertaking to build but I like the area. And, it is still one of the only active customers on the line today.

Between Mohawk Paper and Cohoes much of the D&H was still double-tracked in 1986. However, the eastern-most track was so heavily grown over with weeds that in places it isn't visible. This again is another chance to model something that rarely is done. We have all seen weed covered sidings and abandoned track but what about an entire portion of the main line practically buried in plant growth? Operationally, it will make the layout single tracked and a bit more interesting too. I don't know what the track looked like in 1984 as those photos were in the colder weather, but I plan to guess that Guilford wasn't taking special care in 1984 to preserve the appearance of both main lines.

In the city of Cohoes itself, not much railroad infrastructure was left here by 1984. From pictures I have seen, the area wasn’t commercially developed like it is now and there were large empty spaces adjacent to the tracks. But, I will make sure to include the boarded up Cohoes passenger station, the now Public Library which reminds me of a cathedral, and the Star Warehouse.

Just north of Cohoes, the D&H crossed the Mohawk River on a large deck truss bridge. Originally there were two parallel railroad bridges but one was removed in 1968. I plan to model the sole remaining bridge, as well as the picturesque arched road bridge parallel to it.

Leaving Cohoes represents the northern most area of the modeled layout. Beyond that will be another staging yard representing Mechanicville, perhaps the same one that also is for Kenwood. As the rest of the line to Mechanicville is predominantly rural and secluded it may be nice to model one or two scenes from that just so I can have places to take pictures that aren't back-dropped by buildings. 

Conclusion
If all of this sounds ambitious, it is. However, remember that one of my goals in building the layout is the challenge of building and detailing realistic scenes. There won’t be a lot of operating track so I plan to carefully ballast and detail it. The buildings will all be scratchbuilt, including the bridges. Part of my plan is to document everything so that I can word towards my Master Model Railroader (MMR) achievement.

Since the layout will be mounted on shelf brackets around the room, in theory I can build additional areas that won’t fit onto the layout at this time and I can store them on additional shelf brackets. I can pull them down (with help), work on them for a bit, and store them back on the brackets. And, when the time comes to add them I can adjust the temporary bridge sections to match up with the new LDEs.

An ambitious plan is better than no plan at all!

Thursday, August 20, 2015

Why 1984? (12 reasons)

Over the past few years, I have agonized about what area and time period to model the D&H in. It seems that the most popular time period would be the 1960s - 1970s, and I think a large reason for that is those were the last few "golden years" of the D&H. The engines wore the new Lightning Stripe scheme, the railroad had fan-favorite Alco PAs and Baldwin sharks, the road was mostly Alco, and company pride was high. In 1973 in celebrations of the D&H's 150th Anniversary even "D&H steam" returned in the form of modified Reading T-1 #2102 for a couple of excursions. And all of these would combine to make a really interesting layout.

However, for the area that I am planning to model (see my earlier posts) my layout will feature mostly switching areas. The focus won't be on passenger operations (which didn't exist in 1984) or the the railfan-friendly engines of the 1970s. It will be grittier, perhaps darker and more worn out, and I am sure a bit more mundane. Maybe even boring?

Once I settled on the 1980s, I had to pick a date or window to focus on. This was extremely tough, and I started by making a timeline of D&H engines that existed in the 1980s. Though this will be the focus of a future post, I determined that in 1984 there were still many interesting engines on the roster. Next, I focused on what industries still existed and were switched by rail. This led to extensive research in books, magazines, online forums, maps, and even the government. After about 2 years' worth of work, I have focused on May of 1984. Here is why...

Reason #1: Good Photographic evidence of what existed
I have photographs of the Colonie Main Line from Watervliet to Kenwood yard taken in early 1984. When New York State offered grant money to the D&H to improve their track, the NYSDOT mounted a camera on the front of a hi-rail truck and took pictures every 100 feet or so as the truck went down the line. Though all shots are from the main line (meaning the point of view sometimes crops out sidings that curve away), these thousands of pictures show trains meeting, freight cars spotted at industries, tracks out of service or being removed, what road crossings existed at the time, and what areas hadn't even been developed yet.

With these pictures, I can scroll through them quickly like a movie and see just what existed at the time. There is evidence of Guildford's recent acquisition of their "rationalization" of the main line, Menands Yard, and various industries. The Colonie Main wasn't frequently photographed because railfans tended to focus on busy main line areas like Binghamton or Whitehall. So, these DOT pictures are crucial in understanding what existed then.

I also have pictures from the summer of 1986 from Kenwood Yard up to Mechanicville Yard and many of the tracks existing in 1984 were gone. Guilford didn't take long to change things and choosing to model a period during their early years means frequently referencing photos.

Reason #2: Online customer base was still strong
The 1984 pictures also showed that many online customers in North Albany, Menands, Colonie, Cohoes, and Watervliet still existed. While the number was probably half of what was there even 15 years before, I am not looking to maximize the amount of areas to switch. Most of the buildings will need to be scratchbuilt so the less required, the better. And, since I likely won't have a large operating crew over having 15 spots compared to 40 is more manageable for one or two crews. Some of the interesting customers include a millwork company in North Albany; a grouping of a liquor distributor, tractor distributor and an Agway all located across from a cemetery in Menands; a rock quarry in southern Cohoes; an Abrasive company in Watervliet; and Mohawk Paper in Cohoes. That will mean a large variety of freight cars.

Reason #3: Guilford's "rationalization" was just starting
Guilford purchased the D&H on January 4, 1984. From that point on, Guilford started to “rationalize” their infrastructure and many yards were condensed, sidings pulled up, and maintenance allowed to suffer. Modeling the prosperous 1960s-1970s will entail double-track main lines, lots more industries, a full yard in North Albany, etc. For a switching layout, this will only result in spending more money on track and having scenes appear "busier" than they need to be. In contrast, by 1984 some of the dual main lines were removed, portions of the Colonie Main were weed covered and barely visible, yards were in various stages of being torn up, and spurs were out-of-service.

To some, this is depressing and I see their point. However, I am fascinated whenever I travel someplace new and see evidence of where railroads used to be. Old factories, tracks buried in the dirt, crossings gone except for the rails in the pavement, etc. Modeling in 1984 will allow me to recreate various stages of railroad abandonment and neglect. Between Kenwood Yard and Mechanicville Yard there were yards in North Albany, Menands ("Breaker Yard") and Colonie. I don't need this many operational yards, but by modeling North Albany as abandoned it becomes a model on its own. And rarely do I see on other layouts anything more than an abandoned siding to suggest "the past." Here, it will feature prominently.

If I model any later than 1984 though I risk missing out on many interesting scenes. By 1986 some yards and sidings were completely gone, fewer online customers remained, and that (for me at least) is when it becomes depressing. Besides, even Guilford offered a few interesting things to model. For example, their executive and railfan excursion trains featured high-nose Geeps (which I love because my first train set had one) and passenger cars, which means I can actually... occasionally... have a legitimate reason for running passenger consists on my layout!

Reason #4: Opportunity to model something unique that I researched
Let's face it... there aren't many D&H layouts out there. And out of those that do exist, most (if not all) do not focus on the Colonie Main line or the year 1984. I have seen wonderful layouts set in the other regions of the railroad, including the northern Adirondacks, the Pennsylvania regions, or the Albany to Binghamton line. I have even seen Schenectady modeled, but not the Colonie Main. And, usually the period modeled is the 1960s-1970s.

The area between Kenwood Yard and Mechanicville isn't glamorous and much of the original railroad infrastructure is gone. However, when I first moved to Albany I lived in Menands and explored the remains of the Colonie Main Line during my free time. Because of this, I have a personal connection with the area. And, modeling something different appeals to me. Doing my own research instead of following in the footsteps of others is exciting. And frustrating. If I were modeling the Sante Fe's Cajon Pass or the D&RGW I would have thousands of sources of research. Here, there are very few. My pair of sneakers and Kodak camera are my most valuable tools. I have lot of good memories exploring the old buildings and taking measurements, and I find it enjoyable. So, for me the research is just as much fun as seeing the final layout.

Reason #5: Recreating childhood memories
I was born in 1982 in Rochester, NY. That was Conrail territory and "Big Blue" was everywhere. But, the types of trains that I saw as a kid in Rochester will be the same types modeled on my D&H layout. There weren't many TOFC or COFC trains, boxcars still were prevalent, and there was no graffiti on the cars. Though my layout will be set several hundred miles east of my hometown, watching the trains roll by will trigger early railfan memories. Plus, Conrail trains interchanged with the D&H and Amtrak trains rolled across on bridges so I can model them too.

Reason #6Evidence of 1983's "Year of the Bible"
In 1983, President Reagan declared that 1983 was going to be the "Year of the Bible". While looking through my DOT pictures from 1986 I noticed on the southern side of the prominent Central Warehouse in North Albany a large banner advertising the Year of the Bible. Assuming it was put up sometime in 1983, it likely was there in 1984 and it apparently lasted at least three years. I have no idea when it came down. God is very important in my life and, as a Christian, this is a great way to incorporate my religious beliefs into my layout in a realistic way.

Reason #7: Diverse D&H Motive Power:
The D&H owned a tremendous variety of engines in the 1970s from Alco, EMD, GE, and Baldwin. By the early 1980s, however, the selection was much smaller. The D&H moved nearly all of its Alcos up to Colonie Shops to consolidate maintenance of them, and that included seven types of Alcos (RS3, RS3m, RS11 high nose, RS11 low nose, RS36, C420, and C424), one type of GEs (C33C), and two types of EMDs (GP38-2 and GP39-2). Aside from the EMDs, the roster is small enough and the paint schemes are varied enough (Lightning Stripe with small numbers, Lightning Stripe with large numbers, blue dip, blue with yellow nose, blue with yellow chevrons) that it is reasonably possible to build accurate models of nearly every class of engine. And, the engines are recognizable and lend credibility to the layout. And because of the Colonie shops, I have an excuse to run whatever motive power existed on the D&H at the time.

Reason #8: Colorful Freight Cars:
The late 1970s "per diem" boxcar incentive was over by the 1980s but all of the boxcars built a decade before remained, complete with bright color schemes. The D&H alone had red, orange, yellow, green ("Reading repaints and other), maroon, brown, and blue/white boxcars, along with red covered hoppers and tank cars, silver covered hoppers, blue glass hoppers and gondolas, etc. And that doesn't even count the interchange cars that went through the D&H. And, very important to me, this was before the era of graffiti on cars so they don't have to be marked or decaled to represent vandalism. In preparation for my layout I already have dozens of boxcars assembled and weathered. I am, admittedly, a 50' boxcar junkie.

Reason #9: "I ♥ NY" boxcars
I really like the classy paint scheme of the NYSDOT/D&H collaborative "I ♥ NY" blue and white boxcars. Though they were introduced in 1982, many were still in great shape in 1984. There were at least three variations as well, with some featuring green "Operation Lifesaver" emblems, some featuring NYS DOT emblems, and others having neither. Several manufacturers have offered models of these and I plan to get a few. Sadly, several brands (Bachmann and Athearn/BevBel) have released them in the wrong color blue.

Reason #10: Cabooses still used
The D&H still used cabooses on their trains in 1984. There were many different styles including wide-vision cabooses, bay window cabooses, center cupola cabooses, and a few odd ball wooden and homemade cabooses. And they came in two different paint schemes- red or yellow- with a variety of heralds. Nothing boring here! While the cabooses wouldn't last forever on the D&H, I can justify using them in 1984. And no train looks complete without a caboose.

Reason #11: Foreign Road Power
Because Guilford and Conrail interchanged with the D&H in the Albany area, I can model B&M geeps (though the "McGinnis Bluebirds" were gone by this time), some MEC engines, Conrail units, and some of the early gray Guilford engines. I am especially looking forward to getting MEC #2311, which was the D&H's gray ghost. This engine alone almost made me move my layout back to 1983 (the D&H purged themselves of U23Bs in June of 1983) but because the MEC kept it gray and put their pine tree emblem over the D&H shield, that is fun too. Thus, we shall stick with 1984.

Reason #12: Amtrak Phase III paint scheme
You don't have to say it... I know what you are thinking! Amtrak didn't run trains over the Colonie Main line in 1984. They did, however, roll them over the bridge in downtown Albany and cross the Hudson River on the Livingston Avenue Bridge. So, I might be able to partially model that. And perhaps Amtrak had to detour off of the NYC/PC/Conrail tracks at one point. I don't really know about that.

What I do know is that I really like the Amtrak Phase III paint scheme with the equal red-white-blue stripes, which was introduced in 1980. I also like the F40PH engines because I saw more of them than any other train engine as a child. My grandfather always took me to the Amtrak station to watch the trains and because of that, I have a fondness for Amtrak. And compared to Conrail trains, they were much cleaner and classier. Though some railfans I know say "if all I saw was an Amtrak train I didn't see anything" I don't agree. Besides, I can do what I want on my model railroad!

An interesting fiasco occurred when the D&H repainted Amtrak's dome car into blue and yellow stripes without asking Amtrak! (Note the yellow instead of red in the picture). It was part of the Adirondack passenger train consist and waiting at a station stop when some Amtrak officials spotted it and demanded it be painted back. The dome lasted less than a week before being restored to red/white/blue. Though that occurred in the 1970s, I seriously considered backdating my layout so that I could include this interesting piece of D&H history.