CP Executive train in Albany

CP Executive train in Albany

Wednesday, November 30, 2022

Harrison's first train show

It is now officially train show season! I recently went to a show as both an Exhibitor and Vendor and it was a lot of fun. It wasn't my first show since the pandemic started (I did go to Springfield during the blizzard earlier this January) but it was the first time I could share the experience with someone special... Harrison. 

True, all he could really do was stare at the trains going around, and all I could really do was make sure he didn't try and eat anything that wasn't made of food! He seemed to enjoy it, though, and nothing was eaten which was nice. 

There is another train show this upcoming weekend: the Great Train Extravaganza! Perhaps I will see you there.

Friday, November 25, 2022

Modeling Mishap - how not to build a wall

I am working on a wood structure and the article I am following called for commercial board-and-batten siding. The stuff looks great, but it wasn't long enough for the walls of my building, so I had to glue three pieces side by side. I framed it with scale 6x6 lumber, and built up the bottom as well which will eventually be hidden by a stone wall. However, because the model was going to have a detailed interior I decided to scribe individual board lines on the inside of the walls with an Xacto knife. I didn't measure them, but they looked pretty good. I then stained all the wood pieces and set them under weights to dry flat. And for the most part, they did.

But over time it started to curl (scribing lines, instead of drawing them with a pencil, was a fatal mistake) so I reinforced the bottom with hardwood toothpicks and lots of wood glue. And then I set them under weights to dry flat which, for the most part, they did. But, they curled again. Also, the three side pieces started to separate and show gaps between then. I used more boards to hide them, but it didn't really help.

It was a losing battle, so in desperation on Thanksgiving morning I flooded everything with alcohol stain and left it all under heavy weights. Then, we drove to visit my grandmother in Utica and on the way I had plenty of time to think. I decided to start over completely and build it board-by-board. 

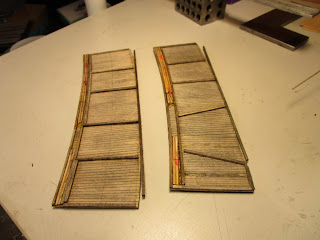
When I got home that evening and looked at the walls, these pictures show what I found. I didn't mind, as I had already resolved to start over. But, it is interesting that the bottoms with the most reinforcement expanded the least and the tops of the walls, without much reinforcement, expanded more. 

I am quick to point out that there is nothing inherently wrong with the commercial wood siding, but it has no board detail on the inside. And, using it felt like cheating. There definitely is something wrong with scribing the already-thin wood with additional grooves.

Oh well, on to Plan B.

Monday, November 21, 2022

Bowser D&H Alco RS3-M engines!

Bowser just recently announced  on their Facebook page that they were tooling up for some Alco RS3-m engines (also referred to at times as RS3-u). These have been on the wish list of every D&H modeler for decades. Bowser only finally got their Alco RS3 engines released after several years of trouble with the manufacturer in China, and these engines are a logical next step. Of course, other railroads besides the D&H had RS3m rebuilds, so they aren't one-size-fits-all thing. I know I have bugged Lee English for several years for these models. I am sure Bowser will put out a great product. 

 The D&H had a small fleet in 1984 in three different paint schemes including the bicentennial #1976 / #506! 

 It is an exciting time to be a D&H modeler!

Tuesday, November 15, 2022

Wrecked C&CV Thrall All-door boxcar (1984)

Here is a slide I found on Ebay while searching for Maine Central information. As soon as I saw it, I pounced on it. Dated May 1984, the seller labeled it "Maine Central" because of the orange boxcar on the right (notice the circle which is part of their Pine Tree emblem). But, I wanted it because I thought it also showed a Thrall All-door C&CV boxcar, which I have written about previously. The large yellow block letters on the top of the door panel on the left make me think it is one of them. The D&H only owned 12 of them total. It is from my modeling period of May 1984, but the presence of snow meant it is probably somewhere besides New York (like Maine?).

A couple of months later I found another picture from the same accident on Ebay. It shows the aftermath of the wreck, with some of the cars shuffled around. The slide is labeled "Bangor & Aroostook train", which explains the snow. However, it also conclusively proves that the All-door car was a C&CV boxcar. I own HO models of #28071, 28074, and 28075, and if the car above is one of them it likely shouldn't be on my layout. I guess we will never know...

This final shot below is of another boxcar from May, 1975. It is number #28075, and there is a 1/12 chance that it is the same car as shown in the two pictures above. 

Friday, November 11, 2022

Structure - Southworth Tractor (part 7)

With all of the windows installed, I went around and used very thin, tiny strips of styrene to fill in any gaps in the window frames. My sprung tweezers helped hold them in position while the glue set. They aren't perfect, though. If I installed the window frames before I added the clear glazing to the back, I could have used modeling putty to hide any seams. Since the window frames are the same white color as the walls, this was an option. But, I would have had two problems to overcome: (1) finding an easy way to secure the window frames into the walls without them falling out, and (2) installing all of the clear glazing in hard to reach areas. For this building I took the easier approach but had this been a model to be entered into a competition I would have gone the other route (I used the other method for the Albany Tomato Company building). Then, I painted all of that newly added trim white. 

I next added the "Southworth" decal on the end of the building. This had been custom made for me by Bill Brillinger at Precision Design Company and he did a great job taking the poor partial image I had and extrapolating what the entire word would have looked like. I sprayed the area where the decal was going to be applied with clear gloss, having first roughly masked other parts of the building with some cardstock so that they wouldn't also turn shiny. 

The decal went on perfectly on the first try, and after multiple applications of Microsol it snuggled down into the bricks. I don't know what magic Bill does, but his decals are awesome!

Next, I went around the roof and touched up any nicked edges or tape seams with flat black paint. The roof had a mottled black look, but that appeared prototypical. Then, I measured all of the windows and cut out pieces of blue painters' tape to mask them. I didn't have to make them perfect (I rounded to the nearest millimeter) and then I sprayed the building with Dullcote.

The building was then given a light wash of oil paint. I didn't want it to look old and decrepit, especially since it appeared to have been painted bright white less than a decade before. But, it was next to train tracks and did have trucks and cars driving by and around it.

The wash settled into the brick mortar joints, just like in real life, and added the appearance of time without looking neglected.

I then glued the three prepared corrugated roof panels on top of the extension. They wanted to slide off, so metal weights were used to keep them in place until the tacky glue cured.

For the three roof vents, I looked at the Walthers parts I had in my stash. I also looked at some castings online. In the end, I decided to just make them myself from some bits of styrene sheet, tube, and rod. The angle on the bottom which sits on the roof peak was first measured using strips of cardstock that I stapled together at the angle of the roof. 

I then measured this with my compass and found it was 138-degrees. I marked a piece of 2"x4" wood with this angle and cut it on my bandsaw. I glued sandpaper over it and then used that to sand the bottoms of the styrene tubes using this fixture so that the angles formed on the bottom perfectly matched the roof. Once the styrene pieces were glued up, I painted them flat black to match the roof.

The roof vents were glued onto the building, making sure they didn't lean one way or the other. I used superglue gel to hold them because tacky glue would have taken too long to cure. 

Then, I took some silver paint and went around to pick out the handles and hinges of some of the doors. Some black paint was drybrushed on the frames of the rolling doors and vents to show the effects of truck smoke as they went in and out of the factory. Finally, clear styrene was cut to size and glued to the inside of the main entryway door frame. 

And with that, the building was finished! It was started on February 12, and it took nearly nine months to complete. Along the way, Harrison arrived that that directly impacted its schedule. But I am happy with the finished structure. 

During the upcoming winter I can combine it with the other three buildings plus the loading ramp that make up this scene and add the scenery around them. What's more, this is the last structure needed for this side of the layout. 

My next project has already been in the works for a couple of months now. I need one more structure model to earn a Merit award for my M.M.R. certificate, and that will be my next priority.
Monday, November 7, 2022

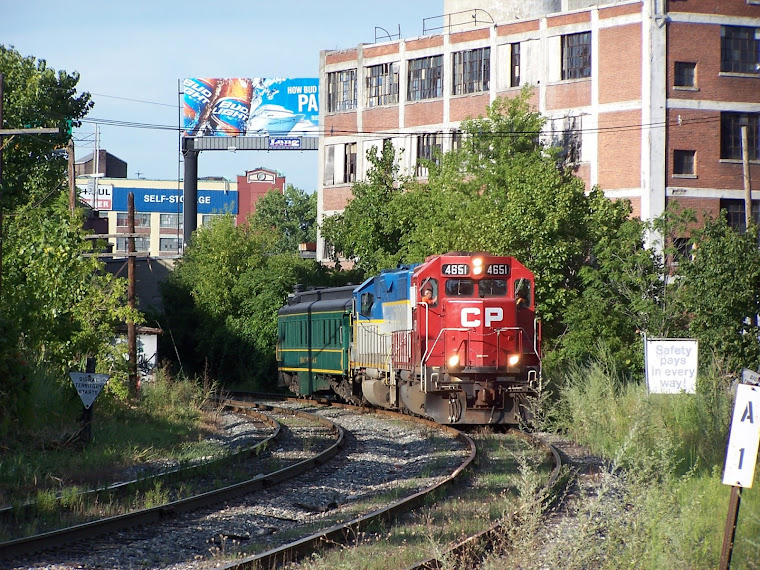
Guilford mixed consist in Crescent (1984)

Here is a shot dated October 17, 1984 taken in Crescent, NY near the D&H's "Magic Triangle" where the lines form a wye to connect the eastern Mechanicville to the north/south route between Canada and Schenectady.

Led by Maine Central #352, I see a pair of black N&W engines (perhaps owned by Guilford at this point) and a pair of blue B&M engines in two different schemes. Where as some of my recent posts have focused on the colorful consists that could be found, this is decidedly less so. The folige in the background has also given up much of its color and winter is just around the corner.

Thursday, November 3, 2022

Amtrak Turbo Train at Port (March 1975)

Due to the pandemic, all manufacturers have dealt with issues of having their models stuck in port (or off shore) waiting for clearance to dock and manpower to unload. In that vein, here is an interesting shot of an Amtrak Turbo train actually making its way through port. 

It is dated March 1975, which makes it part of one of the later French ANF RTG Turboliner trains (not to be confused with the earlier UAC Turbo Train or the later Rohr RTL Turboliners). The RTG trains first entered service in 1973, and Amtrak was impressed with them enough to order four more train sets in 1975. This is likely one of the coaches from that order.

Rapido not only indicated that there HO scale Rohr RTL Turboliners are in production, but they also announced that they were going to make them in N scale too. It won't be long until I have mine!