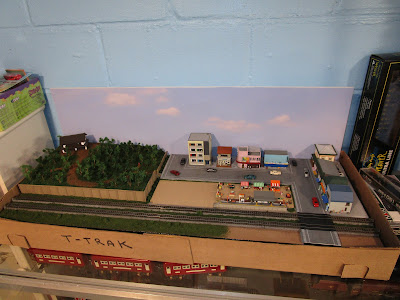
On the left side of my layout is a forest scene with a relaxing Roykan (traditional Japanese inn) at the end of a long, winding trail. At least that is what I wanted it to be. It supposedly represents Aokigahara, Japan's most famous forest, which is about 70 miles west of Tokyo. It was planned to provide a nice balance to the bustling city scene on the other side of the module. However, it was a bit barren at this point. All I had was some dirt and ground foam, and a gap in the concrete retaining walls for a stairway up to the path. It was time to get some landscaping done and first was the stairway.
I started scratchbuilding one from styrene pieces laminated on top of each other a year ago, but I couldn't find it now. What I did locate was a 3D printed staircase I had purchased at the start of my project on Ebay for cheap. It was from the earliest of printers and had lots of layering marks. It was also insanely huge... I only needed the portion at right, and I later cut that down even more to shorten it and remove the railings.
I then built up its height with scrap styrene, and added sides from thin styrene. A quick test showed that it fit perfectly.
Then, it was suitably painted and installed in the gap of the wall. The excess stairway part is on the right. What a waste.
The trees were next. I mean, what's a forest without trees? Several years ago I had purchased many bags of extremely cheap "N scale" trees from China on Ebay. However, upon arrival they looked terrible so I set them aside. You can see in the picture below the Ebay trees on the right... and I have bags and bags of them!
Scenic Express makes wonderful tree kits, but they aren't durable enough to survive moving my layout around. So, after recent consultation with some local N scalers I went with JTT tree products (#95616, #95619). They aren't very expensive (about $12 each delivered) and they are a lot more durable than homemade trees. I bought two packages and liked them enough to buy two more.
Getting them out of the package without bending their wire branches was tough because they were packed in really tight. The color of their trunks was also too bright gray for my liking so I drybrushed several shades of brown and that toned them down. Tip: do this before installation!
Then, I drilled holes in the layout scenery base and started gluing them in. I quickly discovered that the trunk was much too long so I usually trimmed it right where the lowest set of branches started to diverge. Clothespins helped hold the trees up while the blobs of tacky glue cured.
I would drill and glue 2-4 trees, then sprinkle some ground foam over the blob of glue that was at the base of each tree. This helped hide the white plastic sign residue and the green oil paint chips which came up with the drill bit. Rinse and repeat. By sprinkling on the ground foam, I also added other various shades of green to the trees. If I had drilled all the holes (and marked them with toothpicks to remember where they were) I could have vacuumed up all the debris before planting the trees, but I wanted to add them a little at a time.
Finally, everything was sprayed with alcohol and then lots of matte medium was dribbled all around and through each tree. This secured the ground foam onto the tree branches and around the base of each tree.
Several days later, I went back and painted some more of the exposed gray branches with brown. For me, the light gray just looked really fake.
There are three packages of trees, about 45 total, on this section. My wife thought that I used too many, but I wanted it to look like an actual forest and not just a few trees here or there. I kept one package in reserve in case I wanted to add a few along the front.
My path through the woods has two little diverging branches. At the end of one I installed a tiny Shinto board for posting Ema onto. I made it from made from, of all things, a signboard in my scrapbox that originally came from an N scale church kit which I painted red, black, gold, and white.
I really like the look of the large red and black Shinto shrine gates ("Torii") that are located throughout Japan. I don't know if it would be appropriate for my layout... at least where I planned to locate it... but I decided to add it anyway. I considered scratchbuilding one but first reached out to a friend who loves to 3D print things. After describing what I wanted, he looked around online and we
settled on this one. He then printed it out twice, once with his filament printer and again with his resin printer. Naturally, the resin one looked a lot better.
The resin one on the left looked a lot cleaner than the filament one on the right, but there were two issues with it. First, the base on one leg was deformed. Second, the end of the crosspiece on one side had shifted during printing and looked strange. By cutting down its height and removing the bases, and trimming off the crosspiece and then rebuilding it stripwood, I overcame these issues.

Then, it was a "simple" matter of painting it. Which went like this: sprayed everything in dark maroon, only to find out that it was "glitter" maroon. And, the wooden piece took the paint differently then the resin. So, I then repainted everything in white primer. Then, I brush painted Tamiya red paint but realized it was too bright a red. So, I sprayed everything another shade of dark red which looked good but was really glossy. The black parts were then brush painted flat black. After looking at them, I decided to repaint them with some gloss black. Finally, everything was given a couple of light sprays with Dullcote to kill the gloss sheen. Wow, that was a lot of work for one piece!
Finally, just when I thought I could install it the unthinkable happened: I dropped it and it shattered into pieces. Stupid resin. And my friend's 3D printer was broken, so I couldn't replace it in time for the show. That's how it goes.
It operated well at the train show (I forgot to take pictures) and several people were curious about it. I still have a lot to work on, but I am happy with it.


No comments:
Post a Comment